Showing posts with label Scraps. Show all posts

Saturday, June 6, 2020

Snippet Strips

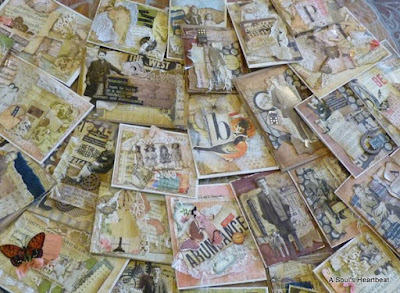
Hi Everyone, have you heard my blog moaning and groaning because I've ignored it for so long!  Well today I'm back sharing a fun idea to use up your scraps and create a multitude of cards.  I kept seeing YouTubers doing epherma snippets for their journals and thought hmmm, this would be an excellent way to use up some of my scraps but I want to turn mine into cards.  I had no idea how much I was going to fall in love with this idea, I hope you do as well.


I started with two strips of 3"x12" paper, a medium weight scrap paper.  I glued them together to form a strip a little less than 24".  Then the fun began, I just started adding layers and building up.  No scissors just tearing and inking the edges. You really don't have to have too heavy of a base weight paper to begin with, just something to glue the scraps to and be able to transfer to your card fronts


Then I started looking at where I could cut the strips apart to form my card fronts.  I did discover it's easier to make a snip on the right side, flip the strip over, and then continue cutting from the back.  you get a much straighter cut this way.


I discovered when I started to cut my strips that some sections worked better as a portrait card and some as a horizontal.  Also I alternated between sizes fitting card base size to the snippet I was cutting apart.  I used A2 (4 1/4"x 5 1/2"), A7 (5"x7") and 6"x7", just because some of my pannels didn't fit the standard size and I wanted them to fit in a regular A7 envelope.


I pulled out all kinds of stuff from my crafty spaces.  Pieces of cardstock, epherma, lace, buttons (real and cardboard) and word strips.  I did a lot of sorting and organizing so if I wanted a butterfly, a button or a sentiment I quickly could find it and not have to rummage through everything around me.


I also dug out my old music paper, some books and magazines for that age bit here and there.  It's amazing how these little snippets of paper and lace can really change up and add to your snippet strip.  I guess what I'm saying is nothing is off limits (notice the corrugated cardboard from and old box???) 

Don't despair if you have little strips left over, they are perfect for just a little something on the inside (I didn't add any sentiments on the insides of the cards so I could use them however I wanted and not be limited to all birthday, all thank you etc.).  


I think I made 5 or 6 of the feminine strips and 2 of the masculine and ended up with 28 fabulous cards.  I've created a playlist on YouTube sharing the strips, the process, the cards and photos of all the cards.  I hope you'll give this a try and let me know how your Snippet Strips turned out.  Remember you don't have to use them for cards they would work fabulously as tags, pockets or tuck ins in any journal you're making.

This video series consists of four videos -


 Snippet Strip Playlist

Find A Soul's Heartbeat at

Friday, February 14, 2020

Using Scraps - Lots of Tags

Hi everyone.  I have had so much fun playing and making some large tags just from scraps I've had laying around and the Tim Holtz Paper Dolls.


I ended up making 9 tags and could have just gone on and on  They are so fun and just take bits and pieces to make them unique from scraps I had here and there.  The tags measured 3.5" x 8.5" but they easily could be made whatever size you wish, especially since the Paper Dolls come in various sizes.


I loved finding something fun to pop the 'Dolls' on, like this little girls looks like she's just perched perfectly on the pocket.   


Here's a couple more little 'Dolls' perched on their pedestals.  Cute huh?


This is one of my favorites for a variety of reasons.  The lace across the bottom came from my Niece Lisa's hippy dress of the 70's.  It's the perfect adornment for my tag.  The little girls above have been halved, lol, I promise they weren't hurt in the process.  I cut right across their chest area and put part on the back flap and the rest on the front flap.  Love how they look.


These were so fun and I hope they will inspire you to dig out your scraps and make some tags of your own.  If you pop on over to the videos I'll share the complete process and a walk through close up of all 9 tags.


Video 1 - Step by Step Process


Video 2 - Finished Tags

Find Me on - A Soul’s Heartbeat - at

Monday, May 20, 2019

Using the Scraps from the Lavender MIst Kit!

Hey everyone, you know how I love using my scraps up.  Well I've uploaded a couple of videos and made two cards so far with the little snippets of leftover paper bits from the kit and I thought maybe you'd like to take a look-see.  I'll be adding more videos and examples throughout the week.


--- Check out the videos for the complete process on both cards ---


Dimensional Card with Flowers


Process of building Quilt/Pieced Mats
and resulting card.


Two cards and a Tag!
More inspiration for your leftovers

Find A Soul's Heartbeat at


.

Friday, April 5, 2019

Retro Birthday Card

Any of you that follow my blog or YouTube have heard me say before that my middle child should have been born in the 50's.  She's my real retro gal.  So when any occasions arise like anniversaries or birthdays I always try to make some type of retro card for her.  Today I'm sharing the newest one and will provide you a video link below where you can see the entire start to finish process if you like.  Perhaps it will give you some ideas to make a similar card for a Retro lover you know. 


After I'd finished and given the card away I realized I never took a photo of the envelope so this is one from my iPhone that I had to try and crop all my desk out of but it will give you an idea of how you can create something visually grabbing before they ever get to the card.  

Join me on the video and thanks so much for stopping by, Patti


Visit me at A Soul’s Heartbeat on BloggerFacebookYouTubePinterest and Instagram.

Wednesday, February 6, 2019

Using My Scraps for a Valentine's Tag/Card

I'm back again today with a tag or card, whichever you prefer to call it, using more of my crafty room scraps.  I used several different paper collections in this tag, both sizes of the Graphic 45 Alphabet tags and other embellishments from my stash.  As always check the video link at the end of this post to get the complete process of how I made my tag along with tips and ideas for using your own crafty scrap stash.


I store my 6x6 and 8x8 paper pads in a bin on my shelves and leftovers from paper collections either by themes or manufactures in 13x13" art bins in my wire shelving unit.  For this card/tag I pulled Websters Pages papers and a Victorian Valentine pad my friend Paula had gifted me from the 6x6's and then looked in my art bin labeled Love/Marriage.  In here I toss remnants of paper lines that pertain to love and romance. I found an old Basic Grey sticker sheet from the Bittersweet Collection (circa 2008!) I found great cut aparts from Authentiques Adore collection, I think that's a couple years back.  The jist of it is if you group things together you can pull them out and begin seeing what piece from this will go with what piece from that.  It's amazing how you can cross over manufactures and collections for your project.


I had some white doily paper hearts in my stash and I lightly shaded them to dull down the white and let the color scheme flow better with the natural tones of the paper.  By backing the thin doily with paper you can form a pocket while strengthening the paper.  I also slit the paper (upper left) along the curved line to create a second pocket on the front for the tuck in tag you see in the first photo.  I love slitting through the paper when I'm trying to preserve the image.  You don't loose any of the picture part but you can create an additional useable accent.


One of my favorite parts of this project was running across this die from Creative Expression by Sue Wilson, I love her dies.  This one was perfect to create an addition pocket on the back side to slip the cut apart in.  I used a tinted glassine bag (gifted from Manuela) to slide the cut apart into. 


Come and spend a few minutes with me on the video where  I can share more of what I've created here and inspire you to dig into those crafty scraps you have in your own art space. Thanks for stopping by, Patti


Visit me at A Soul’s Heartbeat on BloggerFacebookYouTubePinterest and Instagram.

Sunday, February 3, 2019

Using my Crafty Space Scraps

Hi everyone I decided I'd use up some of my crafty room stash and make either embellishment clusters, tags or cards.  For this first experiment I ended up with a pretty 5x7" card.  What do you think?


I pulled out a handful of 6x6" paper, which I'm really bad about using anymore.  I also found two boxes of Graphic 45 Alphabet Banner tags.  I never use these and thought they'd make great bases for cluster elements or card fronts.  I still love that they have these fabulous grommets at the top and wanted to be able to utilize them in something revamped. I used some old packaging acetate and made templates that were 1/4" smaller than the tags so I can cut mats to decorate them with.  Since the middle is cut out where the letters are I wanting a backing for stability.  


I have a bin that has die cuts in it.  Ones I've cut and didn't use, just odds and ends.  I found the arrow and leaves in this bin and used a jar of Nuvo Mousse to give them shimmer.  Mind you I've had the Mousse for well over a year and never used it.  It dried out from sitting around being neglected for so long.  The jar says you can add water and that's what I did.  It's not the soft creamy texture it was to begin with but it still gave a gorgeous glimmer to my die cuts.

Another thing that's been stashed on a shelf is this wonderful dictionary I bought at a paperback book store.  I love the look of torn pieces of it on my cards or art.  Since my image on the front is a frog and fairy I thought it would be great to incorporate the word Believe (like kiss a frog, get a prince, you know believe the impossible).  You can see how I've torn and inked the edges and placed them on the card front on the picture above.  The word stickers, oh my goodness they were a Tuesday Morning find I just had to have, and really I'm so glad I got them but I rarely used them, will today was the day and they were perfect, just the right size, just the right sentiments.  So Hoorah!  I've used up bits and pieces that have just being laying around and have a new card as well.


If you follow my channel you know I always like to put something on the inside.  Here's a sampling of the inside, more die cuts with the Nuvo Mousse, another sticker, some seam binding and a great journaling spot.

Come on over to my YouTube channel and check out the process video.  I'll share lots of tips and ideas for using up your crafty scraps.  Thanks so much for stopping by!


Visit me at A Soul’s Heartbeat on BloggerFacebookYouTubePinterest and Instagram.

Monday, October 8, 2018

Authentique Solitude Leftovers to Cards

a Country Craft Creations project share 

Well if you're a regular visitor to my Blog, YouTube or any of my social media outlets you know I've been trying to stay in the habit of using up my scraps before I store them away.  This time it was with Authentique's Solitude collection, a wonderful assortment of very vintage Christmas designs and images.  I had so little paper scraps left I had assumed I'd only have a couple of cards to share with you.  As happens lots of time the scraps grew and I ended up with twelve Christmas cards and still a few designs left for maybe three more.


This was the first card I made and wow do I love it.  Super simple, super elegant and something I'd love to share with anyone.  This one was larger because the image is 4x6", all the rest are 4 x 5.5".


On the video (the link is at the bottom of this post) I'm going to give you three examples of perhaps making a card a little differently than you usually do. I'll share all the cards I made to give you loads of food for thought and hopefully inspire you to look at and use up your scraps into cards.  On this particular card I fussy cut the little girl out of the mat.  Popped both the mat and the little girl on scraps of chipboard, or a couple of sheets of scrap cardstock work well too.  I then added the ribbon and bow and glued the girl back into the design.  Now she's dimensional!  To hide where I snipped the border to get to her I've added one of my snowflake clusters.  Easy Peasy!


The next idea, well there's no two ways about it, I'm going to be an enabler and tell you if you don't already have a branch punch in your crafty stash you need to invest in one.  Mine is an older pine bough punch by Martha Stewart.  All your little scraps can be punched to make a lovely wreath like the one shown here.  The scrap only has to be as wide as the widest part of the branches, which is pretty small.  It takes a bit of time to punch them all but I love the visual it provides!  I've also included some of these same branches around the fussy cut robin on this card.  It will add so much punch to your cards if you add them here and there.


OK the last idea I'm sharing here is using the negative space to create a card.  I had punched out the snowflakes and I was left with this beautiful negative space image of a snowflake.  I added an acetate pocket behind and filled it with sequins and shiny bits and glued a backing on it. Voila instant shaker card.  Across the middle is the punched snowflake with of course some shiny Stickles added to it. The small photos show the negative space cutting to add just a small border around to form another snowflake (on the left above) and the dimension of the altered negative space (on the right).


So come and join me on the video and see the other cards I created.  
As always, thank you so much for stopping by.  
I really love when you visit!
Patti


Please visit Country Craft Creations here -
you can also join the Facebook group
which will provide you with an unending stream of creativity, tutorials and friendship

 Visit me at A Soul’s Heartbeat on BloggerFacebookYouTubePinterest and Instagram


Sunday, September 16, 2018

Leftovers to Embellishment Clusters


Recently I did a blog post sharing a mini album using Prima's Misty Rose for Country Craft Creations.  As always I had bits and pieces left over.  I've used the majority of these making twelve embellishment clusters and the rest will be used to finish decorating the cards they are used on.  If you'd like to see the process of creating these clusters check out my video.  I will have a follow up video posting shortly sharing how I turned the twelve clusters into cards so stay tuned for that.


Visit me at A Soul's Heartbeat on