Any of you that follow my blog or YouTube have heard me say before that my middle child should have been born in the 50's. She's my real retro gal. So when any occasions arise like anniversaries or birthdays I always try to make some type of retro card for her. Today I'm sharing the newest one and will provide you a video link below where you can see the entire start to finish process if you like. Perhaps it will give you some ideas to make a similar card for a Retro lover you know.
After I'd finished and given the card away I realized I never took a photo of the envelope so this is one from my iPhone that I had to try and crop all my desk out of but it will give you an idea of how you can create something visually grabbing before they ever get to the card.
Join me on the video and thanks so much for stopping by, Patti
Hi everyone, I was contacted a while back from one of my viewers asking if I could make a mini for her. She'd purchased some bits and pieces of collections but then gathering them all together she was so hesitant to cut the paper and start on this journey.
So here I'd like to share what I created for her. It's a six page mini measuring 6"x8.5"x3". I wrapped the book and constructed the pages with Artisan Black Cardstock. I used Carte Bella's Metropolitan Girl and For the Record along with Authentiques Saucy. I threw in a few pieces here and there from Retro collections from my own stash.
I've used lots of glitter and glossy accents to create glittery pieces of fun throughout the book. The corners are capped with Tim Holtz corners and I added a Door Plate and Glass Knob to loop the elastic closure around. This is by far the most convenient type of closure if you aren't sure how large you mini will grow once you begin adding photos and what nots.
There are lots of mats and tags throughout the pages along with numerous pull out journaling booklets. One thing that was requested was lots of space to capture thoughts and memories. Here's a little show and tell of some of the pages
I have a complete video walk through posted below, I hope you'll join me there to see all the pages with descriptions of what I've used, punches, paper etc.
If you have yet introduced yourself to Ai (Art Impressions) stamps there is just no time like the present to do so. Tamra Merrill, from Country Craft Creations sent me two of the Vintage stamp sets to play with. I'd mentioned I like to paper piece and decided I'd like to share that technique with you. It's a little time consuming because you are stamping and fussy cutting several times for each stamp but the end result, well it's kind of addicting, like you'd like to do another, just wait you'll see.
I'm just going to do a short run through of what I've used and how I used it here on the blog. You'll really want to watch the video (link below) to get the full benefit. On video we'll paper piece one stamp together and I'll share all the techniques I've come up with through trial and error. As we all know it's nice to not have to make the mistakes that others have made and just reap the rewards of the easiest way to do something, well in this case the easiest way for me. I'll post a link to the supplies I used plus store links directly below the video link at the bottom of this post.
The first step is to stamp your image on white cardstock (I'm using 110# white from Georgia Pacific). This stamped image will become your building base to glue your fussy cut pieces too. I like to have a good set of small scissors, I use Cutter Bees and a set of reverse tweezers. The tweezers are like a third hand when you're trying to glue the small pieces into their respective spots. I also use a cut piece of an old Cricut mat to stick my pieces onto while I'm assembling my images. This mat didn't have a lot of sticky left on it but it's enough to keep the tiny bits from flying elsewhere while you are working.
The first step is to figure out what areas won't be recut, in this case it was her legs, shoes, hair, face, the one arm. I then color these first and start layering. You can see above the first layer, her dress has already been glued down.
Here's a look at the finished paper pieced stamp. The key is to look at your image and decide how many layers you're going to have. Starting with the layer that would be the furthermost away from you begin gluing. In this stamp there are 4 primary layers, her dress, the apron, the bowl and the arm holding the bowl. When I was done I fussy cut the whole image, glued it to a solid green and fussy cut again. I am thinking these will be used in a mini I'm making.
Here's the second stamp I paper pieced. There are three ladies here so I pretend each is a stand alone and fussy cut and paper piece each image separately and then re-glue them in the order they would be standing so some parts of them over lap the others. It will make a lot more sense as you watch the video. This is an extremely fun process and one that will give your cards, minis, or whatever project you used the pieced images in a great added dimension. I hope you'll give it a try.
Supplies from my stash - Georgia Pacific 110# white cardstock; 3D Crystal Lacquer; various alcohol markers; old piece of Cricut mat; Twizzer Bees, Cutter Bee scissors
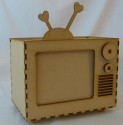
This project had been put on hold while we took a short vacation to visit my family but I've been dying to get my hands into it ever since I saw it previewed in Sa's shop! I LOVE this Retro TV and knew immediately I had to make it for my middle child, Angi. She and her husband Luke would have been perfectly happy living in the 50's! This past year they had a family photo shoot done at their house all with a retro theme! Perfect for this project. So while home I told her I wanted a copy of all the photos so I could play with them! This is the result -
Seldom do I have the pleasure of playing with photos and actually finishing up and album I've made. This was super fun for me. I hope you'll enjoy following along.
I moved outside on the patio to paint the inside and out of the tv after I'd glued it together. I used a black Krylon paint for the outside and Martha Stewarts acrylic in red for the inside. I wasn't happy with the black, I'd use something else next time.
Next step was to Mod Podge the box, inside and out and then adhere my paper and cut outs (from Crafty Secrets). See I really am a 'messy Marvin' when I craft :-)
I die cut from the papers I'd be using to make flowers, at this point I wasn't sure whether they'd be going on the box or the mini but I knew I'd use them somewhere, I've moved to the living room so I can watch tv and make my flowers at the same time.
I found that if I used my magnetic mat and ruler I could line up the chipboard across the bottom to create a straight end as I put the cardstock to the chipboard.
Last step before the fun stuff was to add several coats of Collage Podge (from Aleene's) to the outside of the cover. This is the first time I've done it before folding to the inside and gluing down. It worked great and anytime you can accomplish something with the paper lying flat it's a lot easier!
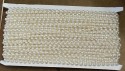
Since I wanted the box to retain it's 'TV' look I shied away from too much bling and left the flowers for the book. The 50's look always had pearls and I'm sorry how can you make a project with out stickles??????
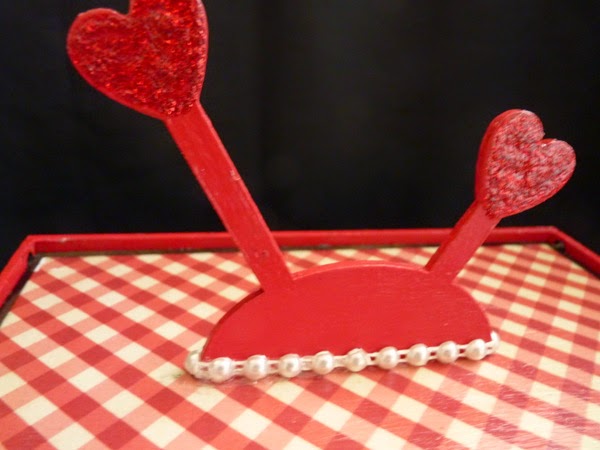
This sentiment arrow from Sa's store was perfect. I painted it red, masked off on both sides of the arrow with some washi tape and then painted the arrow black.
A couple of fussy cut aprons from Crafty Secrets, a wooden message and flatback pearls from Sa's store and the back is done!
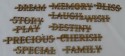
These Retro people and sayings were just too cute, I had to add a couple to the inside of the top of the box!
And here's the mini front, I added the key and the date (thank you Bunny Bow) and the Heart that says Made With Love (thank you Kathie) on a Tim Holtz chain, tucked in an oval framed photo and used my flowers I'd made earlier to adorn the front cover.
The mini measures 5" x 7" outside dimensions so some spots can house 4' x 6" photos. There are seven pages and each has a side pocket with a mat that tucks in. I'm sure I could get every photo from their shoot in this little book!
To add interest and appeal I fussy cut the shapes of several of the photos, this one creates a pocket to put photos behind.
So this is my Retro TV filled with a book of memories. Such a super fun project to make, thank you Sa for allowing me to play with your fun products. Please check out Sa's store today and come join me on the video for a more in depth view of TV and mini.
Please visit Sa Crafters
Store - www.sacrafters.com
YouTube - https://www.youtube.com/user/SaCrafters
Blog - http://sacrafters.blogspot.com/
Facebook - https://www.facebook.com/pages/Sa-crafters
In addition to these products I also used Krylon Black spray paint, black cardstock and chipboard, Mod Retro and Lady Coutour Papers from DCWV, Martha Stewarts acrylic paint in red and cut outs from Crafty Secrets.