Showing posts with label Easter. Show all posts

Tuesday, April 16, 2019

Extra Large Spring Cards

I have a close crafty friend that makes cards often in the larger sizes, she sent me one at Christmas time and I love it so much I decided to take her card as inspiration and make a few extra large spring cards myself.  These wouldn't be so great to mail by themselves, but work great in a package or hand delivered.


These are the 3 I made, a birthday, Happy Easter and a Friend card.  They are 7" square and use Strathmore Bristol paper.  You can see them all on today's video along with the process of how I made one in case you'd like to try the layering effect for yourself.

Check out today's video here - 


Visit me at A Soul’s Heartbeat on BloggerFacebookYouTubePinterest and Instagram.

Saturday, April 13, 2019

Easter Happy Mail from Ms Paula.

Check out this fun Happy Mail that arrived full of Spring goodness from my crafty friend Paula DiGiovanni.


Paula is just the most creative soul around and I love when she surprises me with fun things like this.  It's now all sitting in a cute little Easter basket on the dining room table.  Thank you Ms Paula!

Please check out the video walk through if you'd like to see all the fun things she included up close and personal and be sure and stop by her channel and say hello and Patti sent you.


Visit me at A Soul’s Heartbeat on BloggerFacebookYouTubePinterest and Instagram.

Wednesday, March 26, 2014

Spellbinders Filigree Egg Cards

a Cut at Home Design Team Project


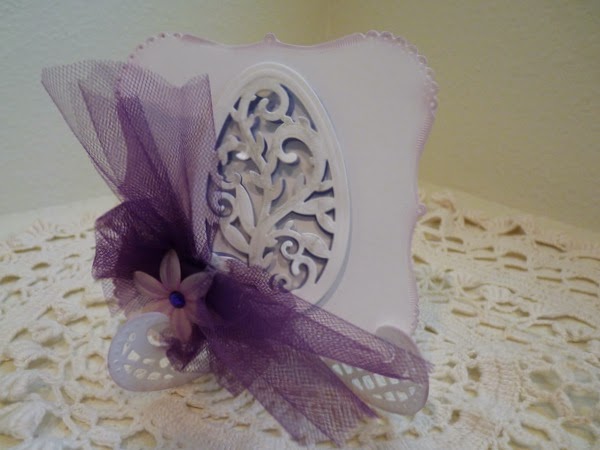
How would you like to give a really beautiful 'wow' Easter card that will take you very little time and supplies to make?  I've got one for you today using Spellbinders Die D-Lites Filigree Egg Die.  The base of the card is made with Spellbinders Majestic Labels One die.  You cut two of the labels and use one for the front and score the other 3/4" from the edge to form the back.  Glue the two together along the scored area and you have a hinged card.


I cut the egg twice and sprayed one with Lindy's Stamp Gang Starburst in Love at First Sight Lavender and then popped the white one atop the lavender and centered it on the front of the card.  By adding a tulle bow and the flower with bling it just finishes off the card.


Now, to step up my card a tad I used Joy! Crafts Elegant Card Stand (thank you Marie-Louise for sharing about this stand with me!)  I used 100# card stock and and cut two stands, glued them together and lightly colored the edges with Tim Holtz Distress ink in Milled Lavender (I also used this ink to go around my card base).  The card stand just adds that extra touch and I know whomever I give the cards to is going to love that they can display it this way.  I know this is something I'm going to use and give often with my cards!

Now, hmmmm, did you notice there are two stands above?  And one is not lavender??? Well I guess you'd better check out my video below not only for a step-by-step on how to make the card but also for another idea of how to use these dies!   Have fun crafting everyone!

Supplies:

Wednesday, January 5, 2011

Sending You....

This is the fourth of this set for my friend.  Now can you see why I scooped up these new K & Co Paper packs?  I guess after the snow, cool temps and cloud cover here in Southern Utah I was drawn to something bright and Springy!  This again is the Spring Blossom Paper Pad. 
This petal soft yellow flower is one cut from the White Rose Trim put out by Bo Bunny.  I again used my Gold Glow Smooch spray and rubbed the tops lightly with Vintage Photo Distress Ink.  The great yellow ribbon I picked up at my LSS for 85% off after season last year.  I love it because it's wire edged. 
Sentiments also from My Sentiments Exactly as the previous 3 cards.  I bungled up the inside and rubbed the sentiment on crooked so I had to improvise by adding another ink edge mat and a new sentiment.  That's the glory of paper crafting you can almost always hide the goobers!  The top mat, Daisy Garden, is from the Spring Blossom Seed Pocket Die-Cut Cardstock package.  I've never used these little packages of goodies until someone gave me one as a gift at Christmas time.  As you can see I'm really loving how they can finish off my cards.
So sorry I can't remember who made this stick pin, it's from the November Stick It To You swap at Your Paper Pantry.  If you recognize your handiwork please let me know so I can give you credit!

Monday, March 22, 2010

Bunny Easter

I have entered this in the following Challenges:
Stamp for Fun Challenge 51 - Easter or Spring
Allsorts Challenge - Spring is in the Air
Our Creative Corner - Think Easter
Everybody Art Challenge - Challenge #83 - Easter 

This little guy was created at a 'playdate' with another card addict.  She had this set of bunny cards and we cut them apart and used him as a template.  The bunny and background are wallpaper.  The stamps are Inkadinkado.
Love her little neck ribbon and bow.
This is some paper cut in circles, scrunched, inked and then split almost to the brad in several spots and recrunched to give the flower look.
The carrot took some thinking, we finally cut some little ovals or orange on the Cricut and punched the top of this Martha Stewart tree punch from green.  By trimming the trunk of the tree and shaping the oval we got it to resemble a carrot.
Posted by Picasa