I am so in love with Bontik Vintage Designs on ETSY. Anton, the owner asked if I'd be interested in doing a collaboration with him using his designs to make whatever. I was really drawn to his Little Chapel collection and instantly saw an opportunity to turn the designs into Sympathy cards, something that is usually quite difficult for me.
I hope you'll check out my video and then wander over to his ETSY to check out what he has to offer, and trust me, grab a cup of coffee because you'll be there a while!
I had lots of fun with the April subscription box from Your Creative Studio. I have a full process video below sharing how I made my journal page and three cards. I'm hoping you'll take a moment to check the video out.
Thanks for watching be sure and check out Your Creative Studio as well. As of this posting the April box is still available.
I've found I do like to draw, well sort of. I love drawing whimsical wonky birds and things that don't require lots of finesse. I can just loosely sketch and then color them in and smile when I'm done.
Check out my video to have a look at what I've made
It's always so fun to find a new technique, try it out and fall in love. Wow that's how I've felt using the napkins Whitney Kosters and I exchanged. I came out on the good end though because she really had a bunch to share! I've seen YouTubers using napkins on tags, mats, cards, journal pages lots of stuff but I really hadn't given it a good shot. Boy am I sold. How easy fun and wow what fantastic results.
Here are the four cards I've made so far. I used some Anna Griffin Mix and Match embossing folders on two of them. They have pop out sentiments that you can change up. I'll link to where you can find them below.
Remember these color papers I made from the my last post? They are the remains of the Viviva paints on my glass mat after I was done. My goodness you just cannot toss something like this. Let's see what I've made with two of them.
These two background were some of those papers. They just were the perfect accompaniment to my napkins. I can't wait to use the rest of them.
I'm hanging my head in shame here, I've had these beautiful embossing folders from Anna Griffin for eons and had rarely used them The card directly above I made step by step on the video below. I really like how the embossing adds to the napkins. I'll leave a link below where you can purchase the folders since they are out of print now.
I did add some antique lace on a couple of the cards. Can you imagine the house it took to do the tatting on the right?
Please check out my video and as always thank you everyone for stopping by.
Viviva reached out to me to see if I'd like to play and review their colorsheets.
Oh my goodness I love them. Any of you that follow me know I'm no where near close to an artist. If you asked me to draw a cat and I did you'd say what's that. Yeah I'm that bad. But I can make blobs and I can doodle and the two of them together created some very beautiful cards. Well, let me show you -
Because I'm such a beginner I have a habit of picking up way too much color so when my cards were done my glass mat had lots of color still on it. I couldn't throw all that away ink so I used my blank watercolor paper to pick it up. I'll be able to use them for more cards, backgrounds already made!
Arteza sent me two sets of the Holographic Chunky Glitters to try out. I wanted to make a shaker and a card where you lay down a piece of double sided tape and sprinkle the glitter directly on the tape. I have to tell you I really like the results of both techniques.
Here are the 3 cards I made. There was one other Glitter, Electra, which I saved for later
This is the card I chose to do the step by step process on video (the link is at the bottom of this blog post). This technique uses the double sided tape.
You get that great glittery effect (see all the different shades and sizes?) but it doesn't move, the tape keeps it in place. I chose to add a sheet of acetate over the top of the glitter to even keep it more corralled.
There's just something about a naked inside that sets me on edge, so true to form, this is how I finished the inside of this card. Watch the video for a perfect Patti goober and how I corrected it on the front of the card.
Here's the shaker card. I have to tell you glitter and I usually have an issue and this was no exception. There's just no way around it, after all that's why it's so stinkin' pretty, it's glitter, and it's messy. I used a dry fabric dryer sheet on the acetate and then wiped away any residue that was left. I'm not sure if that's what did the trick but the glitter moves freely within the heart. I was amazed, with the way the little bits were sticking to me and everything else I could believe the little buggers just moved around as happy as could be once inside the shaker.
The other possibility is that I double layered my foam tape making a nice air space between the acetate and the card. It let all those little bits of shiny goodness move around and around.
Here's my other card, glitter directly on tape. Love the way it looks peeking from within the heart!
So my friend check out Arteza, they are constantly adding to their store. I'll provide links below the video the the store and the glitters. Don't miss the video so you can see how I did what. Happy crafting everyone, put a little glitter in your life today and shine on.
Hello everyone. YouTube has been my friend for over 10 years now as I learned new techniques, explored new crafts and gleaned knowledge from fellow crafters. Well here we are years later and nothing has changed. I recently discovered a wonderful YouTuber with the channel Cee Cee's Creations When I ran across her channel a few weeks back I was totally in awe at some of her videos. One especially caught my eye, Loose Watercolor Florals . I watched and watched again and thought to myself, I think I could do that. And so the process began.
My first attempts were using an Arteza water filled brush because I didn't own any real watercolor brushes. I made 5 cards and thought humm not too bad. But then I went back and watched her video again and again and thought, I bet they'd be better with real brushes. So I ordered some.
To me, up close and personal the results were so much better. I used Arteza tube watercolors on both sets of cards but saw so much difference using brush brushes. I was hooked. I think I must have gone back and watched that video 8 or more times.
One thing I noticed that I was trying to push the color from the center out, when I watched the video, yet again, I realized she was pulling it out and oh that made so much difference. I also learned there is a real fine line with how much water and pigment you have loaded on your brush. It's a learning curve just as it is with all new craft endeavors.
My other big stumbling block was learning how to draw/paint the stems and leaves, I'm still working on it and I imagine if I came back a year from now I'd tell you the same, still working on it. I love the color I used on these stems and leaves and how fine they turned out. My problem was using the bigger brush (a number 4 round) instead of the fine detail brush. My hands shake too much and the stroke gets too big when I use the larger brush.
I also realized color played a lot into how I liked the finished result of the greenery. This is ok but I don't like it nearly as well as the lighter color I used in the card above. Just how your eye and brain perceive it I guess.
I guess if you take nothing else away from this blog post just know that it's never too late in the game to learn something new and usually it doesn't just pop out at you and you're great. There are learning curves, don't beat yourself up, just have fun trying.
These are some of the first cards I made, with the water filled brush. I'm so glad I didn't stop there or I probably wouldn't be doing this again. Moving on to a real brush, and popping back to watch the video over and over cinched it for me. I know I'll make more. Hop on over to the video, I'll show you how I did mine and all the cards I made. (Link below post)
Please go over to Cee Cee Creation's and give her some love, check out her videos and subscribe. She is so talented. I'm so happy she decided to share this tutorial with the YouTube world, it sure brightened up my day! Links for her channel, Arteza and my own social media just below the video.
*Please
note! - I do receive a small stipend from Arteza for you clicking through and
buying from my personal links. This in
no way affects the price you pay.
Arteza links for the products I used on my cards -
Often times we wander around the Internet just looking. Pinterest, Instagram, Blog Posts, Facebook and of course YouTube. This is one of my favorite pastimes and where I get inspired by other crafty artists. I ran across a new (well new to me) YouTube channel the other day of Nina Ribena and she had the neatest ATCs she'd made. Well I'm not an ATC maker but I could sure see her ideas incorporated into some cards for me. So thank you thank you Miss Nina for inspiring me! Sometimes we just need to see it for our own crafty light bulb to go off.
I loved how Nina had covered mats with ink and then laid the Tim Holtz tissue paper over the top. I used Distress Oxide ink on my four cards and I love them but next time I'm trying some sort of paints to get a deeper more vibrant color. When you adhere the tissue over top of the color it becomes even more muted. As I said I love my cards but want to try them the other way as well.
I made four cards each one varies in size since I was using scraps of Kraft paper I found in my drawer but since I made my own envelopes the size didn't matter I could make whatever size envelope I needed to house them in. How nice four cards and four envelopes all ready to go and they all have a home waiting to be sent to.
Each of my bygone era cards has the Tim Holtz unclaimed relatives on them. My friend Paula had gifted them to me and I have to admit I thought it creepy to add these people that I didn't know on my cards. You know, they grow on you, now I think they are fun and the life they give to the card is just priceless.
I didn't use a lot of fancy techniques, nothing hard at all, easy peasy stuff that any of you can do to make your own set of cards. Come join me on my video, I'll share the process of how to make them and lots of pictures of the finished cards. Who knows maybe I'll turn that crafty lightbulb on for you the way Nina did for me! Whatever you do have a great crafty day! Big hugs friends, Patti
Arteza kindly has given me products to review and play with. I was so excited to try them, they are the first I've had although many friends have tried them and I've heard nothing but good. Today I'm sharing some 'Puddling' cards I've made using the water colors. Arteza sent me the set of 60 Water Color tubes, 3 spiral pads of watercolor paper, a pack of 6 water brushes and a set of 12 fineline black markers. Perfect things for a cardmaker.
I call these Puddling cards because that's what I do, puddle the ink with water onto my card letting it pool and run until I've achieved the look I like. There's no great talent, no hard to learn technique, it's just having fun with the colors until you say, oh that's nice and stop.
I used the Arteza Watercolor Pads to make my card bases. The paper measures 5.5" x 8.5", comes spiral bound 30 sheets to a pad and is perforated for easy removal. So that's what I did, I simply removed the paper from the spiral pad and snipped off the perforated edge. I scored in the middle and instantly had an A-2 sized card to play with, easy peasy.
On video (link is below) I'll share how I made two different types of card, it's just a matter of swiping the ink across your card base, spritzing with water and drying to the effect you like. I did add some additional interest by scoring 1/2" around the edges inside and out. I think the hardest part is trying to decide which colors to use and when to quit playing.
Besides the two cards I actually show the process of making on the video I also include several examples like this one to spur your imagination and get you thinking of what you could make yourself. I used an embossing folder after I'd finished my color combination. Adding the sentiment to the top was perfect after I splashed it with some flecks of color and added a deeper blend of the orange to the edge.
Finishing the inside was also a super simple process using a wash of the colors from the front to create just a splash of color on the inside where my greeting will go. Again I used my score board to create 1/8" groves along the edge.
Please visit Arteza here -
For 10% off please use the code Heartbeat10 this will be good until July 14, 2019
*Please
note! - I do receive a small stipend from Arteza for you clicking through and
buying from my personal links.This in
no way affects the price you pay.
Hey everyone, you know how I love using my scraps up. Well I've uploaded a couple of videos and made two cards so far with the little snippets of leftover paper bits from the kit and I thought maybe you'd like to take a look-see. I'll be adding more videos and examples throughout the week.
--- Check out the videos for the complete process on both cards ---
Dimensional Card with Flowers
Process of building Quilt/Pieced Mats
and resulting card.
Two cards and a Tag!
More inspiration for your leftovers
A few weeks back I shared a package I'd received from a company called Beebeecraft. They have an enormous amount of gems and findings to make jewelry but in amongst that I found a lot of great treasures that work well with my cards and mini albums. They allowed me to pick out some goodies to work with and today I wanted to share some cards I'm made using them and giving you some ideas.
I have a video at the bottom of the post that will share how I did some things and walk you through all three cards, be sure and check it out and if you not a subscriber when you get to YouTube please take a moment to subscribe and hit the little bell so you don't miss my next video.
I only want to share my first card with you and the rest will be a surprise when you watch the video. Here I've used the Glass Cabochons. the tags, key and metal pieces all from Beebeecraft. The little girl is a Tim Holtz unclaimed relative. These people cut outs are so fun to incorporate into cards.
I used this crown topped key and had the little girl like she was holding it. I also used a needle to fray the twine that is looped through the tag hole. When I had it all frayed and trimmed I dusted it over with some Distress Ink in Vintage Photo and Age Mahogany.
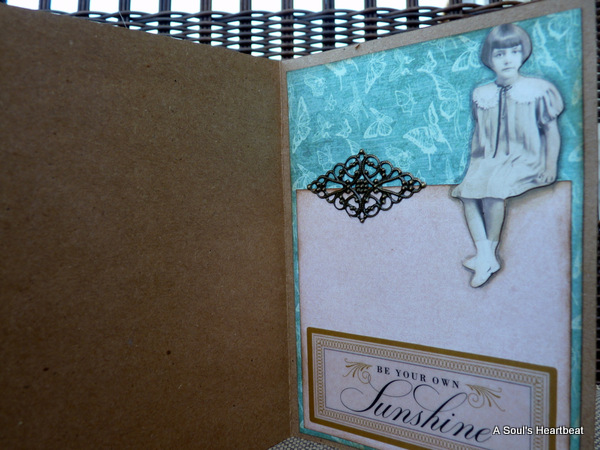
The inside of each card is completely finished too. These are 4" x 5 1/2" cards made from heavy Kraft cardstock. When you are adding heavier items to your cards it's always best to offset the weight on the front with something on the inside, otherwise your card kind of flaps because the weight is all centered on the one piece of the card and not distributed throughout. Who doesn't love to get a card that has fun stuff on the inside too? This is another of the Tim Holtz unclaimed relatives, and the metal piece from Beebeecraft. The sentiment is a clear sticker I had in my stash.
Thanks for stopping by, don't miss the video and the other two cards. Oh alright I'll give you just a sneak peak of what I'll be showing you how to do on video with the metal butterflies, you won't want to miss that!