Showing posts with label Valentines. Show all posts

Saturday, January 18, 2020

Glittered Valentine Hearts

Arteza sent me two sets of the Holographic Chunky Glitters to try out.  I wanted to make a shaker and a card where you lay down a piece of double sided tape and sprinkle the glitter directly on the tape.  I have to tell you I really like the results of both techniques.


Here are the 3 cards I made.  There was one other Glitter, Electra, which I saved for later


This is the card I chose to do the step by step process on video (the link is at the bottom of this blog post).  This technique uses the double sided tape. 


You get that great glittery effect (see all the different shades and sizes?) but it doesn't move, the tape keeps it in place.  I chose to add a sheet of acetate over the top of the glitter to even keep it more corralled.


There's just something about a naked inside that sets me on edge, so true to form, this is how I finished the inside of this card.  Watch the video for a perfect Patti goober and how I corrected it on the front of the card.


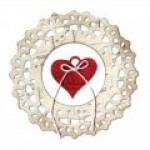
Here's the shaker card.   I have to tell you glitter and I usually have an issue and this was no exception.  There's just no way around it, after all that's why it's so stinkin' pretty, it's glitter, and it's messy.  I used a dry fabric dryer sheet on the acetate and then wiped away any residue that was left.  I'm not sure if that's what did the trick but the glitter moves freely within the heart.  I was amazed, with the way the little bits were sticking to me and everything else I could believe the little buggers just moved around as happy as could be once inside the shaker.

The other possibility is that I double layered my foam tape making a nice air space between the acetate and the card.  It let all those little bits of shiny goodness move around and around.


Here's my other card, glitter directly on tape.  Love the way it looks peeking from within the heart!


So my friend check out Arteza, they are constantly adding to their store.  I'll provide links below the video the the store and the glitters.  Don't miss the video so you can see how I did what.  Happy crafting everyone, put a little glitter in your life today and shine on.


Links to Arteza online - Holographic Glitter Mermaid Rain & Electra - https://tinyurl.com/wob7kpv Holographic Glitter Fairy Dust & Moonstone - https://tinyurl.com/rsbaf5m Foam Mounting Tape - 36 Yards - https://tinyurl.com/vvq38gr USA Link* - http://arteza.com/?a_aid=Youtube_Asou... UK Link* - https://arteza.co.uk/?a_aid=Youtube_A... Please visit Arteza online here - YouTube - https://www.youtube.com/arteza Blog - https://arteza.com/blogs/articles Facebook - https://www.facebook.com/artezacolors Pinterest - https://www.pinterest.com/artezacolors/ Instagram - https://www.instagram.com/artezaoffic...
Check out the Sookwang Tape Etsy Store for all your double sided tape needs. 
Visit me at A Soul's Heartbeat on Blogger - http://asoulsheartbeat.blogspot.com/ Facebook - http://tinyurl.com/zbph36l YouTube - https://www.youtube.com/user/nwlady1949 Pinterest - https://www.pinterest.com/northwestlady/ Instagram - https://www.instagram.com/nwlady/ *Please note! - I do receive a small stipend from Arteza for you clicking through and buying from my personal links. This in no way affects the price you pay.


Wednesday, February 6, 2019

Using My Scraps for a Valentine's Tag/Card

I'm back again today with a tag or card, whichever you prefer to call it, using more of my crafty room scraps.  I used several different paper collections in this tag, both sizes of the Graphic 45 Alphabet tags and other embellishments from my stash.  As always check the video link at the end of this post to get the complete process of how I made my tag along with tips and ideas for using your own crafty scrap stash.


I store my 6x6 and 8x8 paper pads in a bin on my shelves and leftovers from paper collections either by themes or manufactures in 13x13" art bins in my wire shelving unit.  For this card/tag I pulled Websters Pages papers and a Victorian Valentine pad my friend Paula had gifted me from the 6x6's and then looked in my art bin labeled Love/Marriage.  In here I toss remnants of paper lines that pertain to love and romance. I found an old Basic Grey sticker sheet from the Bittersweet Collection (circa 2008!) I found great cut aparts from Authentiques Adore collection, I think that's a couple years back.  The jist of it is if you group things together you can pull them out and begin seeing what piece from this will go with what piece from that.  It's amazing how you can cross over manufactures and collections for your project.


I had some white doily paper hearts in my stash and I lightly shaded them to dull down the white and let the color scheme flow better with the natural tones of the paper.  By backing the thin doily with paper you can form a pocket while strengthening the paper.  I also slit the paper (upper left) along the curved line to create a second pocket on the front for the tuck in tag you see in the first photo.  I love slitting through the paper when I'm trying to preserve the image.  You don't loose any of the picture part but you can create an additional useable accent.


One of my favorite parts of this project was running across this die from Creative Expression by Sue Wilson, I love her dies.  This one was perfect to create an addition pocket on the back side to slip the cut apart in.  I used a tinted glassine bag (gifted from Manuela) to slide the cut apart into. 


Come and spend a few minutes with me on the video where  I can share more of what I've created here and inspire you to dig into those crafty scraps you have in your own art space. Thanks for stopping by, Patti


Visit me at A Soul’s Heartbeat on BloggerFacebookYouTubePinterest and Instagram.

Friday, January 20, 2017

Operation Valentines 2017

Melissa Beatrice Adler, Mel to those of us in the Crafty world, has organized a collaboration among crafters called Operation Valentines 2017.  It's a group effort to provide children in local hospitals (in the Portland Oregon area) with Valentines.  Many of these kids are fighting daily struggles and this kind act will give them a sense of normalcy.  Crafters from all over are making sets of six Valentines and mailing them off to Mel.  She and her sister will deliver them to Doernbechers Children's Hospital early in February.  This is the second year they've done that and the response has been outstanding. If you really hustle you could get cards made and mailed in time to reach the deadline.  Checkout Mel's Facebook page Operation Valentines 2017 and her YouTube video which explains it all.


Here's a look at what I made using the Valentine Combo pack from Authentique and an old Bo Bunny line called Head Over Heals.


I used a lot of Stickles on the cards so that there wouldn't be any loose glitter falling off in the Children's rooms.  There are a list of do's and don't, nothing drastic, just things that wouldn't be appropriate for children in this type of hospital setting.


The heart balloons were die cut from an older Marianne Design Creatables called Heart Balloon (PP1401).  I used them on all the cards and envelopes.


The cards are very simple but I'm sure they are going to bring lots of smiles to some boys and girls.


All card bases were cut with white to an A2 size 4 1/4" x 5 1/2"


Inside I cut another heart this time from an oldie but goodie from Spellbinders called Nested Hearts a Shapeabilities die (S4-296)  The heart originally cut with a little knob at the top but I simply snipped it off and made the heart a more traditional look.  The stamped sentiment is a Paper Source die that had been gifted to me.

Thanks everyone for stopping by, I do have a short video to share the cards.  Please check out Mel's links and if you're too late to make cards for this year mark your calendars so you'll be all ready for 2018 because I'm sure she'll be doing it again. And lastly a HUGE thank you to Mel for taking this on, she will brighten the lives of so many young people with her generosity and compassion.


Supplies

Bo Bunny Head Over Heels
Art Glitter Glue
Stickles
Tattered Angels Glimmer Mist - 
Stickles
Glossy Accents
Pearls

Please check out the Facebook Page Operation Valentines 2017 for all the information 
Mel Adler's YouTube Video which explains the whole Operation Valentines 2017 

Visit me at A Soul's Heartbeat on
Blogger -  http://asoulsheartbeat.blogspot.com/
Facebook -  http://tinyurl.com/zbph36l
YouTube - https://www.youtube.com/user/nwlady1949
Pinterest - https://www.pinterest.com/northwestlady/
Instagram - https://www.instagram.com/nwlady/


Thursday, January 12, 2017

My Valentine Mailbox


a Country Craft Creations design team project

Right around the corner Valentine's Day will be popping up.  It's such a fun Holiday and this year I wanted to create some sort of centerpiece and came up with this Mailbox.  Sometimes I've got to tell you creating is just plain fun!  This was one of those times.


At least 5, maybe 6, years ago I bought an oversized Valentine paper pad from Tuesday Morning. The inside covers had templates for cards and various projects.  The mailbox was one of them.  Doing this for Tammy Merrill's Design Team I wanted to be able to offer a similar template to viewers so they could make their own.  Today, in this techy world, it's just an amazing time to find just about anything you're hunting for.  I searched Pinterest and the Net for a 'Valentine Mailbox' and came up with a share from Brenda Quintana, it was on her Blogspt Qbee's Quest. I'll link to it at the bottom of this post. Brenda's is very similar to the one I had on my paper pad and really I used a combination of both to create my mailbox.  It's such a simple quick project with such fun results.


The mailbox door is trimmed with lace and ribbon from my stash and accented with Double Dot Think Pink Jewels from Bo Bunny.  I added a heart button to the top threading my narrow pink ribbon from the back to the outside so I can tie it to the top.  (The top ribbon is again run through an inside glued button, I added an eyelet on the outside so the ribbon wouldn't tear the paper).


There's a template for the flag in the instructions, I simply covered both sides with paper from the collection.  To dress it up I stacked a miniature red paper doily, a cut out Valentine word heart from the paper and a fussy cut piece of white paper (I used stamp scissors on the white paper to cut the heart mat so it would stand out from the words).


To hide the seam from where the back and sides of the pieces meet I took a piece of lace, a piece of pink ribbon and flat back pearls.  Since the pearls were cream I used a blue Copic marker to switch them up to a blue that matches the paper.  Whenever I can I always buy white and cream in embellishments and ribbon, you can then change it up to the color you're needing.


It made me extremely happy to use this heart on the inside of my mailbox door.  Manuela (Bunny Bow) gifted me with several happy mails of laces she's made.  They come all the way from Switzerland to my doorstep and I hoard them all!  I have got to quit and start sharing, but it's hard I get them out and look at them, sigh, oooh and ahhh and then carefully put them back.  This time I took out 3 hearts she'd made and used the one here.  I love it, now my mailbox is extra special.


The base is 3 stacked and glued cores from packing tape that I saved from our move (well I saved about two dozen cores but who's counting????).  I then wrapped them in the ombre pink from the paper and used another piece of ribbon for the bottom.  I attached two strips of heavy duty Velcro to the top of the base and the bottom of the mailbox.  By having it removable it will be easier to store and if I decided I want to just place the mailbox on the table without the base it's easy peasy.  

I'll link to the store supplies below the video as well as links to Country Craft Creations and my own site, A Soul's Heartbeat.  Please come and share a little more of your time with me on video and I'll share the process and lots more hints and ideas of why I did what.  I so appreciate you spending your time with me!!!


Supplies from Country Craft Creations
Authentique Valention Combo Paper Pad - http://tinyurl.com/hc25zxh
Medium Weight Chipboard - http://tinyurl.com/zfc7wxj
Bo Bunny Double Dot Jewels - http://tinyurl.com/jfc3tcd
Art Glitter Glue - http://tinyurl.com/h2dc7jy
Artisan Cardstock - http://tinyurl.com/jpsgegh

Special Thank you to Brenda Quintana for her Mailbox Template - http://www.splitcoaststampers.com/gallery/photo/450969

Please visit Country Craft Creations here -
Country Craft Creations shoppe - http://countrycraftcreations.com/
you can also join the Facebook group
Scrapbookers of Country Craft Creations here - http://tinyurl.com/zhess6s

Visit me at A Soul's Heartbeat on

Wednesday, February 3, 2016

Crazy Bird Valentine

a Cut at Home Design Team Project


Today I'm sharing a fun Valentine Card made with Tim Holtz Crazy Bird stamps, dies and sentiments.  These little birds just capture your heart!  I love that the Crazy Things stamps and dies have something for seasons throughout the year, like these fun Valentine embellishments.


Come join me on today's video and I'll share how I made today's card and the supplies I used.  I'm sure it will make you smile, how could these Wacky Birds not make you smile?


Supplies from the Cut at Home Store:
CMS212: Bird Crazy Stamps
CMS237: Crazy Things Stamps
CMS236: Crazy Talk Stamps
660953: Sizzix Framelits Crazy Things dies
SCI-001: Spellbinders Celebra'tions Berry Black Ink
TIM43263: Tim Holtz Distress Ink Wilted Violet
TIM43218: Tim Holtz Distress Ink Cracked Pistachio
TIM43287: Tim Holtz Distress Ink Candied Apple

Supplies from my Stash
Tattered Angels Dazzling Diamonds Glimmer Mist and Plumeria Glaze; Decorative Crdstock; Art Glitter Adhesive; Glossy Accents; 3M Dimensional Foam; Stampin' UpFoam Dimensionals;  

Wednesday, January 7, 2015

Tom and Tilly in Love

a Cut at Home Design Team Project


I have a super fun card to share with you today, Penny Black's Slapstick Cling stamp Tom and Tilly take center stage sharing their love in no uncertain terms.  I chose to take the bouquet of flowers Tilly was holding off and replace it instead with the die cut LOVE from Spellbinder's In'Spire line.  You can choose to use this card for either a Valentine sweety or an Anniversary card for a special couple.


The background was created with Stratford Watercolor paper and Gelatos. What fun are these to play with, just like going back to childhood in your finger-painting years.
I also added some Lindy's Byzantine Bronze embossing powder to the heart 
to give it a little more shimmery pzazz! 


Today's video gives you the complete 
start to finish process, I hope you'll join me.

Supplies: 


Wednesday, January 1, 2014

Head Over Heels Mini

a Cut at Home Design Team Project

Have you been wanting to make a mini but were afraid to take that first step?  I have the perfect solution for you!  The best of both worlds perhaps.  Bo Bunny has created a Mini Chipboard Album in their Head Over Heels collection
You get six chipboard pages complete with the base decorative papers attached.  Now how cool is that, you're already on your way and all you've done is take the mini out of the package.  You could stop here, just add your photos and journaling and voila you'd be done, but............ if you're like me wouldn't you like to add your own stamp of craftiness to the basic book?  Of course you would!


I added acetate (which is actually left over packaging from one of my Spellbinders dies) over the camera lens hole.  I stuck in a removable circle on the inside to give you a spot to add your photo, or photos if you'd like one on the front cover as well as the first page.   (I also added the acetate to the little square lens in the top right as well, with little tabs to put your photo on, leave the hello love peeking out, or pull them all out to just have the see-though acetate.)


You can work from the 12x12 or 6x6 paper collection to add your own pockets and inserts to expand the spots to place photos.  Here are the first two inside pages in the book.  On the left I added a pocket across the bottom with two pull out tags.  A red heart I cut from my Sizzix Doily Jewel Heart die and completely covered with Glossy Accents decorates a portion of the page.

On the right again I created a pocket with 3 cut outs from the paper inked around the edges and glued together to form one piece then glued to the book along the bottom and outer edge to form the pocket for the tuck in photo book.
Now see here's the fun part, your basic board book can just keep growing and growing.  This little tuck in book can hold 8 5"x5" photos plus there are pockets in the front and back with 3 tags for additional photos or journaling!  This little book closes with a Velcro tab.  

You can dress up the outside with a camera charm and personalized (made with love) heart like I have here or any little goodies you want to add on.  The original book comes with silver rings for closures through the punched holes but I decided to add this wired heart ribbon from my stash 
It gives just enough so that as the book grows with personalization it will expand to accommodate.  As of this post I haven't put a closure on the opposite side, if I decide to I think it will be this same ribbon tied in a bow.

Fun huh and we've only covered the outside and first page!!  Would you like more ideas on finishing the other 5 pages?  Check out my video below, I'll walk you through how I stepped up each page to make it my own and include a how-to of an insert I made plus lots more photos. 

Have fun crafting!!!  Patti