Saturday, July 28, 2018

This is it! Christmas in July Crop at Country Craft Creations

Country Craft Creations project share

HO HO HO - Merry Christmas!  

This is it my friends.  Well Merry Christmas in July anyway.  Country Craft Creations has been celebrating their Christmas all day crop long, today, July 28th, 2018, on their Facebook Page, Scrapbookers of Country Craft Creations.  I hope you've signed up for the group so you get  to be a part of not only the crop but this fabulous group of designers and members.  Lots of tutorials (all for free), lots of inspiration (all for free) lots of member participation and sharing (yep again all free).  So check out Scrapbookers of Country Craft Creations!  The crop started at 11 am Mountain Time Saturday July 28th and I'm bringing in the tail end.  The best for last huh?  Hahahaha!


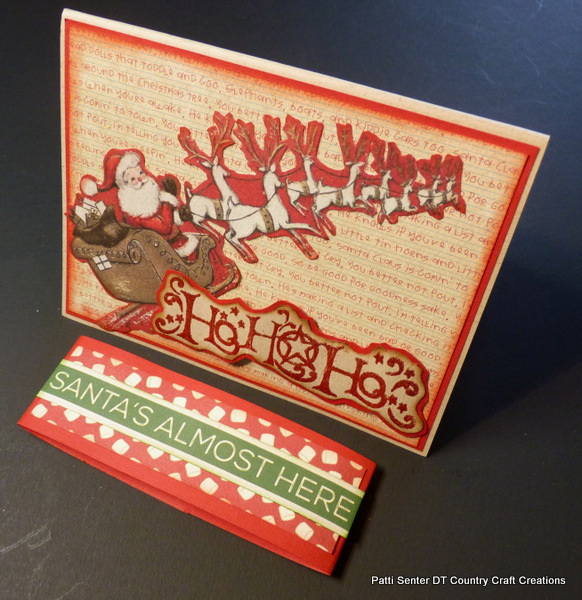
I'm sharing a Christmas Gift Card Holder.  
You'll need these basic supplies -

Scor Board, cutter, bone folder, scissors, etc
Glue - I use Art Glitter Glue but you are free to use your favorite
1 card base color of your choice A2 size 5 1/2" x  4 1/4" (when folded)
Decorative Christmas Paper of your choice with elements you can cut out if you so wish
Solid Cardstock to match your collection paper I'm using Artisan Red
Stickles or something to make glittery areas
Embossing ink, powder and gun - optional

Here's the video tutorial, Have fun, be creative and I hope you've enjoyed Christmas in July at Scrapbookers of Country Craft Creations 


Please visit Country Craft Creations here -
you can also join the Facebook groups

Visit me at A Soul's Heartbeat on

Monday, July 23, 2018

Christmas in July Crop at Country Craft Creations

a Country Craft Creations project share

HO HO HO - Merry Christmas!  Well Merry Christmas in July anyway.  Country Craft Creations is celebrating Christmas with an all day crop July 28th, 2018, on their Facebook Page, Scrapbookers of Country Craft Creations.  You want to be a part of not only the crop but this fabulous group of designers and members.  Lots of tutorials (all for free), lots of inspiration (all for free) lots of member participation and sharing (yep again all free).  So check out Scrapbookers of Country Craft Creations today!  The crop will start at 11 am Mountain Standard Time Saturday July 28th but don't wait until then to join!

There's going to be a lot of activity all throughout the day with challenges to keep your scrapping fingers active, and yes I'm participating.  I'll have a video tutorial for one of the challenges, right here on my blog and on YouTube.  Tamra, owner of Country Craft Creations, will announce the time and activities over at the  Scrapbookers of Country Craft Creations Facebook group throughout the day.  So my thought is, you want to be a member NOW so you don't miss out.  

Oh yes, did I forget to tell you????  Their are PRIZES, and PRIZES and oh yes, did I mention PRIZES you can win!!!  Stay tuned more will be posted on this blog post on Saturday!!  But I couldn't leave you without a little sneak peak now could I????

For my project you will need basic supplies
Scor Board, cutter, bone folder, scissors, etc
Glue - I use Art Glitter Glue but you are free to use your favorite
1 card base color of your choice A2 size 5 1/2" x  4 1/4" (when folded)
Decorative Christmas Paper of your choice with elements you can cut out if you so wish
Solid Cardstock to match your collection paper I'm using Artisan Red
Stickles or something to make glittery areas
Embossing ink, powder and gun - optional


Please visit Country Craft Creations here -
you can also join the Facebook groups

 Visit me at A Soul's Heartbeat on

Sunday, July 15, 2018

Side Swing Mini using Authentique's Jingle Collection

a Country Craft Creations Design Team Prochject

It's always fun to create something new and fresh that no one else has done.  Today I'm introducing my new Side Swing Mini.  It's an 8" square mini with the front split into two sections each 4"x8" which swing in opposite directions to open.


I will be uploading a compete tutorial playlist walking you through the construction of the Side Swing Mini along with decorating each of the pages.  This mini incorporates two hinges one on each of the mini sides.  The hinges are 2" wide and house 3 pages.  The pages alternate side to side on top of one another.  


I've added 3 waterfalls to this mini, two are horizontal and one vertical  The horizontal ones will house 3"x4" photos 7 if you only use the one side double if you use both.  All three close with a magnetic strap. The vertical waterfall houses slightly smaller photos and has 4 flaps and the base photo mat.


This mini has lots of pockets holding mini booklets to showcase your photos.  The collection has darling cut aparts and elements to make your pages pop with Christmas happiness.


I used Artisan red cardstock for the base of the book (along with medium weight chipboard for the book construction).  The red is a great compliment to the colors in the collection.  I also used some Artisan Kraft and the green from the older 6" pad of Graphic 45's Patterns and Solids from the Home Sweet Home collection that was gifted to me from my friend Cheryl.


I'm not a good Washi tape user but my friend Paula had gifted me a roll of red glitter Washi tape some time ago and it was perfect to give some sparkle here and there.  I must admit I erred on the side of caution and glued them as well with my trusty Art Glitter Glue (also available in the CCC store).


If you've followed my projects for a while you know I like to see if I can use up the collection.  This time I have to share I even used (a lot) of the Jingle cover sheet which has the small pics of all the papers).  The Jingle above is from the header on that cover sheet, it made a perfect flag pennant for this page along with some mini clothes pins in red and green.  The  horizontal flag with the sentiment is the topper on each of the collections papers.  I use those quite often as well.

I hope you'll join me on the video for a complete walk through of this video. Thanks so much for stopping by my blog today, see you on the video.


The complete series sharing how to make this mini 
from start to finish is on 
the video playlist link below.
(I am in the process of uploading videos daily, please be patient I will get them all there ASAP.)

Video Tutorial Playlist

Please visit Country Craft Creations here -
you can also join the Facebook groups

Visit me at A Soul's Heartbeat on


Saturday, July 7, 2018

Crafty Retreat at Simp Lee Memories

Hello everyone.  I was so fortunate to be able to attend a Design Team Retreat for Country Craft Creations at Simp Lee Memories, Medical Lake, Washington.  This is a Bed and Breakfast type home that caters to crafters like me.  It's owned and operated by Karen Oliphant who just happens to be Ginger Ropp's Sister, hmm perhaps that's why her crafty name is My Sister's Scrapper.


Ginger taught a class using the fabulous Graphic 45 collection Tropical Travelogue.  Oh my goodness do I love everything about this collection.  This was a super special folio she taught because it was designed for us.  Loved it, loved learning from her.  What a fantastic personality this woman has!


On today's video I'll walk you through the whole folio.  It's just gorgeous and it's so fun to learn from someone else, glean information first hand from them on how they do things.  As you all know we each have our own way of crafting but it's always nice to peek inside another's brain and see how they do it.  I thoroughly enjoyed peeking inside Gingers!

Tammy Merrill, owner of Country Craft Creations store made sure each and every one of us had a fabulous time.  I was fortunate to share a room with her and long gab sessions, something I'll treasure forever.  That she left Godiva chocolates on our pillows the first night was certainly not a bad thing either!


We all did a project. the Fan Fold Box, that Tammy had taught on the Authentique Facebook page.  After ours was constructed we blindly exchanged them with one another, I have Rosa Kelly's.  My goodness is that lady a sweetheart!


I enjoyed meeting Karen, Ginger, Angela, Bonnie, Rosa, Cathy, Tiffany, Ann Marie and Kim and of course our fearless leader Tammy.  What a great bunch of crafters to call my friends!

See you on the video --- 


Please visit Country Craft Creations here -
you can also join the Facebook groups

Visit me at A Soul's Heartbeat on


Tuesday, July 3, 2018

My Infatuation with Tattered Angels High Impact Paints

a Canvas Corp Brands CREW project

If you follow me on YouTube, Facebook or here on Blogger you'll know I'm primarily a mini album and cardmaker, once in a while I'll throw in some mixed media.  Today I'm really stepping outside this safety net zone to share a wonderful product I've discovered.  Tattered Angels High Impact Paint.


I have this large metal sun that we got when we first moved to Southern Utah in 2008.  Two years ago when we moved to Southwest Washington I knew this fellow would have to be part of our outdoor decor.  He brought me many happy memories when I'd look at him.  The only problem was as the high heat of the Utah desert and the rainy atmosphere of Southwest Washington had really done a toll on him.  He'd faded and weathered and not in a very pretty way.  

Trying to figure out what I'd use on him to give him new vitality that would stand the elements let me to the Canvas Corp Brands Store.  That's when I discovered Tattered Angels High Impact Paints. OMG I love these paints.  They come in small bottles (don't be fooled or scared when you see how small the bottle is) 1.35 ounces.  I had all these colors to choose from but actually only ended up using the Copper and the Antique Gold primarily, they are both Metallics.  This paint spreads like nothing I've ever used before.  I used 1 1/2 bottles on my sun, which is over 3 1/2 feet across!  It dries beautifully.  You can choose to put in on as a wash by adding more water or use it straight from the jar for more coverage.

I'm only going to give you this teaser photo here but please, pop on over tot the Canvas Corp Blog and read the full blog post with photos.  Take a look at the video below, I didn't do live, yep I was too lazy to haul my laptop, camera and tripod to the back yard.  I instead took lots of photos and will narrate you through what I did.  I hope you'll give these paints a chance when you're looking at revitalizing something around your house.  I can't imagine you won't be thrilled with the outcome.


Follow Canvas Corp Brands StoreBlog and Facebook Collective Group 
(this is a group you must request to join, but boy is it worth it!!!)
Canvas Home Basics at Facebook and Instagram.
7gypsies at Facebook and Instagram.
Tattered Angels on Facebook and Instagram.

Visit me at A Soul’s Heartbeat on BloggerFacebookYouTubePinterest and Instagram.

Thursday, June 21, 2018

Using the Scraps - Authentique's Meadow - Note List Holders

a Country Craft Creations Design Team Project


Today I have a fast and simple, use up your scraps, idea.  I'm using the remains of the Authentique Meadow collection.  I am always looking for note pads to write stuff on, I know it's the dawn of the techno age, cell phones, instant messages and all writing digital.  Well I like to pull out my trusty pen and paper and jot stuff down.  Thus was born today's project, using the scraps to make these nifty list pads.  You'll find it's a great way to use up the remains after the main projects been made.  And, as a bonus, you'll have some neat tuck in gifts just waiting for the right moment and the right person.


I had several 4" x 12" scraps of the Artisan cardstock after I'd finished my mini and they are the perfect size for a stack of paper.  My niece had gifted me with some old, decorative paper, copy paper weight, which I'd been wanting to find a home for.  A perfect marriage, the scraps and the paper!


I'm going to share one step by step process on the video, complete with a goober and a makeover.  The best kind of video in my estimate.  That way you get to see not all things turn our perfect, and often the mistakes lead to the best outcomes.  Which was the case this time.


To make these cute note/list pads you're going to need some heavier weight cardstock, like the Artisan, some light weight chipboard, even one or two layers of a cereal box might do the trick, and scraps (paper, ribbon, bling all kinds of scraps, dig them out and use them up!)


If you're one of my followers/viewers you've seen me paper piece mats before, and that's exactly what I did here, using up all those bits and pieces of paper.


The insides were also decorated, here I wrapped the outer jacket with two pieces of 6x6" paper that I pieced together.  I took an older EK Success border punch, Scalloped Scallop, and ran it down both sides, inked the edges and tucked the excess 1" to the inside on both sides.  It really gives a nice finish.  A few stickers from the sticker sheet and this ones done.


This is the one we'll be making on the video, so come on over and watch and see if you'd like to use up some of your scraps this way!


Please visit Country Craft Creations here -
you can also join the Facebook groups

Visit me at A Soul's Heartbeat on


Sunday, June 10, 2018

Authentique's Meadow Collection into a 9 page Mini Album

a Country Craft Creations Design Team Project

Hello everyone today I'm sharing a nine page mini I've made with Authentique's Meadow collection. This is a fun whimsical collection with soft spring colors.  To me it's reminiscent of fairy tales of my youth.  Come along as I take you though some of the pages.


This mini is housed inside an 8"x 6 1/4" outer cover with a 3" spine.  I choose to use 1/4" gussets between my pages so I'd be able to accomodate all nine pages and 5 top inserts.  Because the book has so many pages bulky elements must be kept to a minimum so there's lots of room remaiing for all the photos that will be tucked away inside


Every other page has a top insert that measures 4 1/2" x 12". With this mini I was trying to not cut the 12" pages and utilize the whole sheets.  The pages are 7 1/2" x 12" so the left over strips became the top inserts.  You'll need one 12"x12" sheet for each page in your mini.  I used Artisan Cream Cardstock, a favorite go to of mine.


The pages alternate from the top pocket insert to a side flip out, extending the pages to a trio across.  There are 5 insert pages and 4 trio pages.


I did a lot of fussy cutting, which you know I love, of all the little characters in the paper collection.  These two friends are mounted on brown Artisan cardstock with a magnet inclosed.  There's a matching magnet under  the paper so they just pop on top after you've mounted your photo.  If you decided you didn't like them on this page they could easily be glued else where in the mini.


On this page again I fussy cut the little girl with her goose, added a piece of acetate behind her.  I tinted the acetate with Tattered Angels Stained Glass in this blue, just to give her a little shadow behind her and allow for a photo to slide neatly behind.  On the opposite page I've taken one of the darling saying from the collection and created a large, side to side, belly band for the tucked in photo mat behind.


The biggest obstacle for me is not embellishing, it's so hard not to add lots of stuff to the pages but this time I wanted lots of room for large 5"x7" photos.  You can see here the main pages are free for the photo and the background will then become a fantastic mat to frame the picture.  The tuck in insert has a sweet pocket across the bottom with several tiny tags made from pieces of the collection.


If you've watched my videos or read my blog posts before you know I like to use as much as I can from a collection.  This time I even used the cover sheet, shown as the mat on the left.  It was such great snippets of the paper line I just couldn't see wasting it.  I did supplement papers from the Spectrum line to stretch the decorative collection a little further.  That's what the polka dot is on the right above.


The back and front inside covers both house a nice large pocket for tuck ins.  I included a tied ribbon booklet in the front pocket and a tri-fold magnetized book in the back pocket.

There's so much more to show you, I hope you'll join me on the video to see it all.  I will have a quick process video coming to share how and why I constructed different parts of the book the way I did so you can create one for yourself if you'd like.

Thanks for sharing your time with me, see you on the video.


For hints, tips and tricks to making my mini
please check out my How To Video


Please visit Country Craft Creations here -
you can also join the Facebook groups

Visit me at A Soul's Heartbeat on

Thursday, May 31, 2018

Authentique Accolade Collection - Scraps to Masculine Cards

a Country Craft Creations Design Team share

Well my friends I think this just about does it for the scraps from Authentique's Accolade collection  I have some stickers left and a few papers I'm saving for other masculine/graduation projects as time goes on.  I did want to leave you with a little inspiration for some guy cards since I know many of you struggle for ideas, as I do, for the guys in your life.


I made a total of 7 cards for you using up the scraps and stickers from the collection.  All cards are on a Kraft card base, 4" x 5 1/2".  Here I've fussy cut the hot air balloon and added some accents with thin black twine.  I used a sentiment stamp to tie it all together.


Inside was left pretty simple with just the fussy cut camera and some lined paper to write my greeting on.  I did ink all around the edges, inside and out with an espresso colored ink.


I wanted to give you some food for thought on the video (link at the bottom of the blog post).  I used two Distress Oxide inks and one regular Distress ink to color up the Accolade paper.  I moved the inks around using Tattered Angels Glimmermist in Dazzling Diamonds. 


Keep in mind when you're working with your papers you can always change up the colors by the use of mists and inks.  I love how these papers took to the blues.  A great guy card.  The stickers were from my stash.  They've been hanging around for eons just waiting for me to pluck them out and glue them down.  I'm not much of a packaged sticker person but after seeing how cute these cards turned out I'm thinking I may look at them a little closer when I see them in the close out bins.


I wanted to share one more card on the blog post and you can check out the video for the other four examples of using your scraps. In the 12x12" papers I had two of these flying pigs.  OMG aren't they adorable?  There's just something about a flying pig.  I knew I had to do a couple 'over the hill' cards for a birthday I'm belated on and one that's just around the corner.  I know both of the guy recipients are going to get a laugh out of them.  


I used those super cheap alpha stamps that you can get in the close out bins, I have several of them in my crafty stamp drawers.  The fonts are funky and fit perfectly with the little pig.  

Check out the video for a short how I did it with the Oxide inks and other examples to spur your imagination creating your own masculine cards from scraps.  Happy crafting and thanks so much for joining me today.  I know time is precious and you just don't realize how much I appreciate you all for sharing a little of your time with me!


Please visit Country Craft Creations here -
you can also join the Facebook groups

Visit me at A Soul's Heartbeat on


Friday, May 25, 2018

Authentique Accolade - Scraps to Tiny Boxes

A Country Craft Creations Design Team Project Share

I'm back again with another share using the Authentique Accolade collection. I'm still using up my scraps.  I was sending out some Happy Mail to a friend and ran across a box another crafty friend had sent me years ago.  In it she'd included all these fun Tiny Boxes.  I wrote and asked if I could make a pattern and share what she'd sent me using my scraps.  Well being the sweetheart she is she said yes of course.  These original boxes were from Manuela, you probably know her on YouTube as Bunny Bow, please check her channel out and say hello.


You could use up any scraps of paper you had left as long at they were close to 8" in length.  The possibilities are endless.  Here's one I used with the Autograph paper and a buckle closure.  The ones I received had some great brad closures with an easy elastic band but for the life of me I can't find where I put my elastic cording, it's here very safely tucked away, so safely I can't find it, please tell me you have the same problem?? 


This is a super quick project, you can whip these little boxes out in no time.  This one closes with magnets.  I had wanted to use small velcro circles but I'm thinking I used them all up because they were no where to be found either.


Because they have a gusseted side they expand to hold a lot of little surprises inside.  

Check out my video for a step-by-step walk through tutorial of how to put these little guys together using up lots of your scraps.  Thanks for stopping by!


Please visit Country Craft Creations here -
you can also join the Facebook groups

Visit me at A Soul's Heartbeat on

Thursday, May 24, 2018

Spritzing and Spraying with Tattered Angels Glimmermists

a Canvas Corp Brands CREW project

My project is being featured on the Canvas Corp Brands - The Creative Studio Blog today.  I'd so love it if you'd pop on over there and give me some love.  I had so much fun just playing and creating with the Tattered Angels Glimmermists.  Do you have some of them sitting on your shelves just crying for attention?  If so find them and start creating today, you'll be so glad you did!


Since I was really running low on Sympathy cards I choose to do a lot of those, you'll see them all on Video 2.  If you love watching the process check out Video 1 (links below) where I'll share step-by-step the whole process of making gorgeous backgrounds for your cards.  I also tried very hard to have one layer cards so they easily could go through the mail with no additional postage or worry of being snagged before arriving at their destination.  This is a much harder process for me than you might think.  I guess I like textures and bumps and bows and whatnot, but I succeeded on the majority.

Join me on the Canvas Corp Blog for the whole story and on the videos for the how to's and end results.  Thanks everyone, I so appreciate you all stopping by to see what I've made.


Supplies include Tattered Angels – Glimmer Mists;  Glimmer Glam in Twinkle Toes and Rustic Canvas Home Basics – Cards/Envelopes- Note Cards in WhiteShip to Shore – Signs on Ivory  Ken Oliver Water-Media Greeting Cards
Supplies from my stash include Canson Cold Press Watercolor paper,  embossing powders, embossing folders, dies, stamps, Big Shot, Score Board, bone folder
Follow Canvas Corp Brands StoreBlog and Facebook Collective Group (this is a group you must request to join, but boy is it worth it!!!)Canvas Home Basics at Facebook and Instagram.
7gypsies at Facebook and Instagram.Tattered Angels on Facebook and Instagram.
Visit me at A Soul’s Heartbeat on BloggerFacebookYouTubePinterest and Instagram.