Welcome Graphic 45, followers and guests!
It's been a year since I tried out for the 2013 Graphic 45 Design team making it to the final round of thirty! Where has all the time gone this past year? I've learned so much more this crafty year from all my followers and YouTube subbies. Your inspiration and support has challenged me and helped me to grow my art. Thanks to all of you I'm here again trying out for the 2014-2015 team.
Graphic 45 requested I pick six projects that best represent my work so here goes. I'll include links to any YouTube videos or blog posts so you can see more photos or the video of the project if it was posted previously.
(1) Mother Goose Mini Album
I've just started a new series called Mother Goose - Not a Scrap Left. This is the second Project of the series. The premise is use up all the collection I purchased, in as many projects as I can, to see how far my paper and extras will stretch by only using the addition of colored cardstock. I think it will be fun for my followers as well as a kudos to myself for 'using it up' instead of buying more, lol, which we all tend to do.
This mini is completely enclosed with an extra panel on the left and a front flap that hides 3 large magnets to keep it closed as it expands. I used a Shabby Chic Door pull for the handle with a few of the flowers from the collection around it. Hanging is a little star which says 'Just For You'.
The unique part of this mini is the patchwork pockets, six in all. Each pocket is a different combination of pieces patch-worked together. This is a perfect way to use up all the little pieces that might otherwise be tossed and an easy, eye-catching way to stretch the designer papers.
You can see on the right the pocket this time has a diagonal pattern to the pieces with a banner of the tiny pendants hanging from a ribbon of ric rac across the top. On the left is a waterfall with Humpty as the main focal point. He's been fussy cut, attached to black card, cut again, Glossy Accented. He serves not only as a cutie-pie for the page but also a hidden magnet which keeps the waterfall closed.
Here's another glimpse at a page done with all little one inch squares. Because there were so many little pieces I added a couple of coats of Aleene's Collage Pauge which will help seal and protect all those edges. The little girl has been fussy cut placed on blue card and fussy cut again. She's only attached on two sides so a tag or photo can slip behind her.
Here I wanted to show you not only the next pocket design the diagonal going in the opposite direction but also the paper clip. Do you recognize this??? That's the negative space left over from the flags and banner sheet when you poke the banner out. I added the verse behind from another little scrap and then added a coat of Glossy Accent over top. Attaching only the right hand side to the mat allows it to act like a paper clip between mat and cover. And again, scraps are being used instead of tossed, wow this could get addictive, lol.
It's extremely difficult for me to decide what to show you here, this is but a tip of the mini book you're viewing. The full video, page by page, can be found
here.
~ ~ ~ ~ ~ ~ ~
(2) Note Pad Holders
When I was in Michaels one day I ran across note pads, two to a pack, and thought, hmm these would be nice to have on hand for friends. After I got home and looked at them I thought how boring I bet I could make a holder for them. Designed with a magnetic closure under the front flap to keep them closed and a pocket on the inside to house post a notes or a card. The paper pads slip into a slot so they can easily be removed and replaced when used (notice the one in the bottom folder is made with colored paper instead of a store bought pad).
Designed with Graphic 45's Curtain Call Collection
Designed with Graphic 45's A Ladies Diary Collection
(I also included a small pocket on the inside of the flap to hold a bookmark)
This is what I designed and shared. There's a previous blog post
here and a YouTube video
here with complete instructions. It's such a simple idea but the response was so positive with lots of feedback from so many of you that made them as well.
~ ~ ~ ~ ~ ~ ~
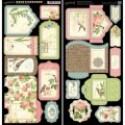
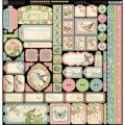
(3) Steampunk Spells Mini Little Book
Designed with Graphic 45's Steampunk Spells Collection
Using the 12x12 Vintage Voyage Papers from the Steampunk Spells Collection I created this mini little book for photos and memories. This has got to be one of my favorite collections!
Each page's corners were punched with a spider punch, top and bottom, but instead of having the punches on the right they are on the left above and below where the holes were punched for the Cinch binding. By having the punched parts in the center they receive less stress as the book is opened and closed but still provide a decorative look.
Cutting around a focal point, like the owls creates an interesting pocket for tags.
There is a prior blog post here and YouTube video here.
~ ~ ~ ~ ~ ~ ~
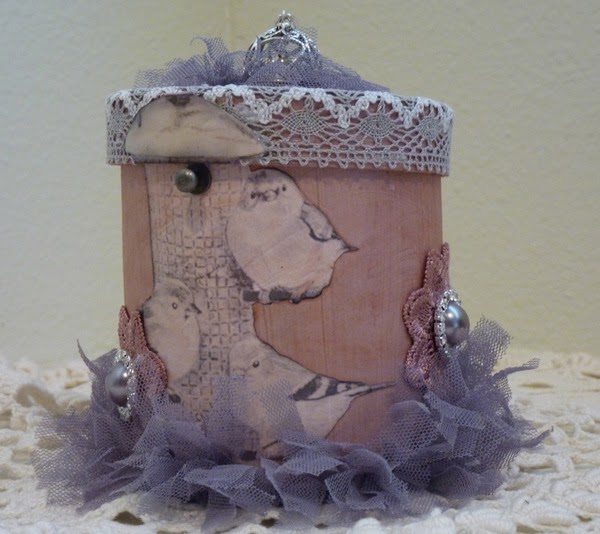
(4) Botanical Tea Gift Box
Last summer we met family in the Rocky Mountains for a few days of reminiscing and sightseeing. My sister in law pulled out a zip lock bag filled with Heritage laces that were my Mother's, Grandmother's and many Aunts from generations past. It's bit and pieces she had saved and stuck back thinking someday someone would use them. I cried! Of course I get emotional that way but was so thrilled with my new treasures and then.... I hoarded them!!! I do that too. Until I saw this paper collection! I knew I'd found a home for some of them. These papers bring all these wonderful ladies right back to my heart. I used the tatting edge around the bottom of my box, isn't it gorgeous? It's the perfect compliment for the paper.

Peeking out from under the metal flowers in the lower left hand corner is a tatted doily with similar colorings, a perfect match again! The flowers were taken from my stash (the remnants of a taken apart-on-clearance flower swag) and were sprayed with Lindy's Alpine Tea Rose Starbust Spray. Wow I couldn't have found a better color match for the paper.

The metal pieces tucked here and there are all gifts from a couple of my crafty friends. I love the look of the metal with the paper and flowers. I took the birds and butterfly and added a layer of black chipboard underneath then fussy cut them out, it gives great dimension to the top of the box. The little hummingbird has had his paper beak replaced with a piece of wire I painted black. I also cut the flowers, leaves and dragonfly and glued them directly atop the first layer, it gives just a little pop up to them. You can see the dragonflies wings were left free on the left to tuck in around the flower. I also used Glossy Accents which gives just a nice amount of shimmer as they catch the light. All the top was lightly misted with Lindy's Blazing Sun Glitz Spray, as the box catches the sunlight you see this gorgeous shimmer of gold dust.
Inside of box
This will make a perfect home for a special gift to a special someone.
You can see the video
here.
~ ~ ~ ~ ~ ~ ~
(5) Steampunk Spells Wicked Birthday Card
Designed with Graphic 45's Steampunk Spells Collection

For this fun card I lopped the head off the bicycle lady and popped it so that underneath it reads wicked. Outside reads 'something wicked this way comes' with the spinner pointing to the message inside which was printed on glossy photo paper, inked with Distress Inks and stamped with stamps from the collection. You can find the original blog post
here and the YouTube video
here.
~ ~ ~ ~ ~ ~ ~
(6) Laughing Cow Altered Christmas Boxes
(non Graphic 45 project)
If you're the same kind of crafty addict I am every time you see a box you say, hmm what can I do with that? That's how I felt each time I bought Laughing Cow cheese from Costco. It comes in packages of 3 each of which is in an adorable little round container.


At Christmas time I always like to have gifts on hands for my neighbors, just a little something to share from me to them. These altered boxes were the perfect gift filled with a few chocolates, who can resist chocolates?? Needless to say they were a big hit with all who received them. You can see the original blog post
here and the YouTube video
here.
~ ~ ~ ~ ~ ~ ~
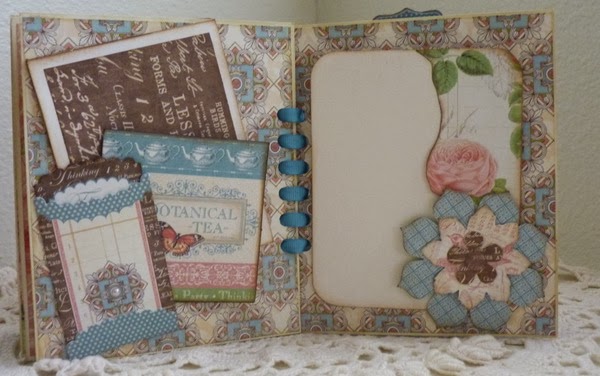
(7) Botanical Tea Mini
(I ended up making a mini to go in the gift box above
so thought I'd include it as well)
8 Inner pages with pockets, belly bands and tuck in spots for photos.
Using the same paper on right and left gives a nice flow to the page. I cut along the natural design of the paper to create unique edges to a couple of the pockets.
The blue grosgrain ribbon laces through the holes to create interest on each page as well as the book binding. I fussy cut a lot of little pieces out, like the flowers on the left above, to slip photos behind.
This is such a fun little mini to put together. It's designed for any level of crafter to accomplish from the beginner to the most advanced. Those who have crafted a lot have an endless number of options to 'dress it up' with the paper collection, those just starting out can create it from start to finish and feel like they've created a beautiful one of a kind gift. Using the gift box above would just push it over the top as a very special gift for someone.
As always it's hard to share the whole mini here so there's a video
here which walks through page by page.
~ ~ ~ ~ ~ ~ ~
Thank you Graphic 45 for giving me this opportunity to share my crafty passion with you in these seven projects. They are but a small example of what I've made, and an even smaller representation of what's swirling around in my mind still waiting to be created! Good luck on your 2014 Design Team search I know whomever you pick will do wonderful justice to the beautiful collections you design for us to play with! Patti