Friday, January 29, 2016

Canvas Corp Crew 4x4 Canvas


A Canvas Corp Crew Project


Hi Everyone, as most of you know I had the honor of being selected to be on the Canvas Corp Crew for 2016.  To say this was exciting news just doesn't begin to describe how I've felt since finding out.

For those of you unfamiliar with Canvas Corp let me just give you a quick run down of what they are about.  Canvas Corp is based out of Springdale Arkansas and the majority of their product are made there. They consist of three companies under the Canvas Corp Brands umbrella, Canvas Home Basics which is geared to home decor, DIY and paper crafting, 7Gypsies which offers a great vintage funky vibe to all their papers and embellishments and lastly Tattered Angels providing a multitude of spays, paints and mediums to enhance any project you might have in mind.  All in all Canvas Corp offers enough to delight any crafting pallet!

Our first request was to alter a Canvas Corp Basics 4" x 4" Canvas to represent our personality.  After much thought and reflection I chose to highlight the word Change for that's what this year is going to be about for me.  Not only in my new crafting endeavors but also in my home life since our plan is to move back to Washington State this year to be nearer family and friends.  So change is a good thing!


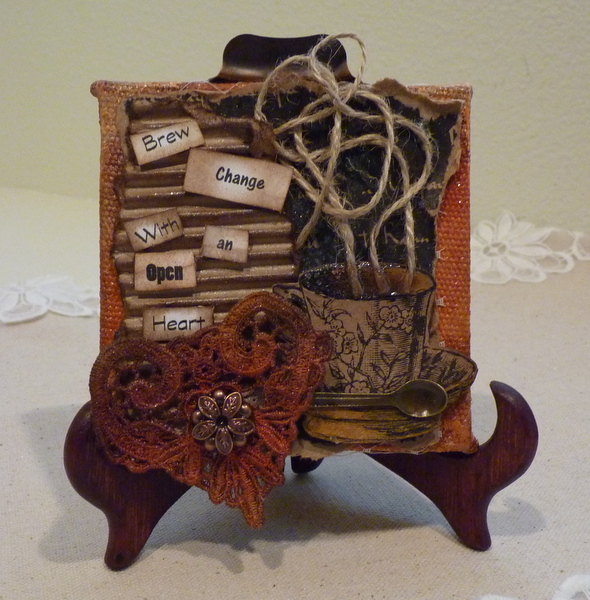
I used the 4" x 4" stretched canvas today along with the tag strings from the Heart tags & ties  I also used several Glimmer Mists and a Glitter Glam which I'll list under the supplies at the bottom of this post. The cup on the right is fussy cut, misted and Glimmer Glammed from one of the Kraft cardstock papers in the Beans and Bags Mix and Match Pad.  These Mix and Match pads are fantastic because they may include printed fabric, cardstock and fluted sheets, burlap and canvas sheets.  Everything in these pads measures 12" x 12" so you gets lots to work with and a chance to try out different textures you may not usually work with. 


The lace heart is really special to me, it was made by my friend Manuela (Bunny Bow online) on her Bernina machine and came all the way from Switzerland to me.  I used three different mists on it to  achieve this beautiful amber color and added a button (shank cut off) to the center.


Here's a look at what the heart looked like before the mists.  They really change it up don't they?


I printed my sentiment out on my computer in several different fonts onto heavy cardstock, picked the font I liked, cut the words apart, inked the edges and glued them to a piece of fluted cardstock.  The steam are the ties from the Hearts Tags and Ties package (picture is shown above).  I used glossy accents in the tea cup to look like liquid.

This was a fun project which shares my love of Coffee, my new adventure of change for 2016 and my beginning creative path with the Canvas Corps Crew.  Be sure and follow my channel so you don't miss out on the projects coming in the weeks and months ahead.

To futher inspire you check out my fellow CREW member's 
4x4 canvas loveliness as well---  you may want to pop
back often as new canvas's will go up often until
we're all represented.  Be sure
and click on the canvas to
be taken to that
Crew's page
Supplies from the Canvas Corp Store:
4"x4" canvas
Beans and Bags Mix and Match pad

Glimmer Glam Rockin' On Sunshine
Tattered Angels Glimmer Mist in -
Candlelight, Tattered Leather, Dazzling Diamonds, Candy Corn, Rum Punch

Tags & Ties Hearts (I used the ties)


Wednesday, January 27, 2016

Graphic 45's Mermaid Card

a Cut at Home Design Team Project


Today I'm sharing a fun card made with Graphic 45's new collection Voyage Beneath the Sea.  I've fussy cut this lovely Mermaid out to be the focal point on my card.  Because the Mermaid is larger my card today measures 4" x 8 1/2".


I used a selection of metals from my crafty stash to embellish over the cogs and gears that had been printed on the paper.  


The inside uses a sentiment from the Collection along with a few more metal pieces.  I hope you'll join me on today's video where we'll make the card start to finish and I'll show you some more papers from this fun new collection.


Supplies from Cut at Home include 
Graphic 45 Voyage Beneath the Sea Collection
TIM43270: Tim Holtz Distress Ink – Ground Espresso
TDMK39082: Tim Holtz Distress Marker set

.

Thursday, January 21, 2016

Children's Hour Tag Inserts

a Cut at Home Design Team Project


Today I'm sharing two tags I've made for my Graphic 45 Children's Hour Mini.  I used Graphic 45 Large Ivory tags.  If you'd like to follow along for the whole series on how I'm making the pages I have a playlist on my YouTube channel called You and Me Making a Mini.


This is the tag I'll be making start to finish on the video.  I used Graphic 45's Children's Hour stamps to emboss the image of the girls.  I masked them off with Inkadinkado Stamping Mask Paper and used Tim Holtz Distress inks in Tumbled Glass and Broken China to give the sky background.  I also used Ground Espresso Distress Ink around all the edges of both tags.


The bottom of the tag has two pockets to hold a little spot for photos in the first and a journaling tag in the second.  The sentiment across the bottom has also been embossed, I used WOW Earthtone Pepper, a great color for my project.


The back is from the back of the print page, it's so hard to cut this pretty paper and even harder to use the back sides sometimes.  I wanted this one so this would match the stripe I put on the front pocket.


Here's the second tag, I'll have lots more photo of it on the video. I hope you'll join me.  Thanks so much for stopping by.


Supplies from the Cut at Home Store:
4501249: Graphic 45 Children’s Hour 12×12 Paper Pad
4501247: Graphic 45 Children’s Hour 6×6 Patterns and Solids pad
4501259: Graphic 45 Children’s Hour Journaling & Ephemera Pack
4501254: Graphic 45 Children’s Hour Pockets and Tags
ICO350: Graphic 45 Children’s Hour Stamp Set 1
ICo351: Graphic 45 Children’s Hour Stamp Set 2
4500849: Graphic 45 Large Ivory Tag
SCI-001: Spellbinders Celebra’tions Berry Black Ink
TIM21414: Tim Holtz Distress Ink – Broken China
TIM27188: Tim Holtz Distress Ink – Tumbled Glass
TIM43270: Tim Holtz Distress Ink – Ground Espresso
SCT-001: Spellbinders Celebra’tions Linen Thread

Thursday, January 14, 2016

Making a Mini Together

a Cut at Home Design Team Project

Hello everyone, I have many viewers tell me over and over again that they love what I do but they can't do it themselves. I'm here today to tell you that anyone of you CAN make a mini especially with what I share with you today.

I'm using a new product from Heartfelt Creations called the 3D Flip Fold Album.  This is a pre-made base for your mini.  I think this is what intimidates a lot of you is creating your base with the spine and pages from scratch.  Well this is your solution everything is constructed for you, all you need to do is pretty it up!  And that's what I'm going to share with you today.

I'm going to marry Heartfelt Creations album with Graphic 45's new Children's Hour collection and share with you the first page I've done.  I want to inspire you to take a stab at this yourself if you've never done a mini.  Or if you're old hat try it anyway because there are always times when the benefit of having something pre-made out weighs the time of making it yourself.  So come join me.


Today I'm using primarily the two March papers from the Children's Hour Collection and some black cardstock.  As the mini progresses I will use from all three paper pad sizes (today I've used mostly the 12x12" pad) and the majority of the other products in the collection, stamps - stickers - tags and pockets.


On video I'm going to share how you can start with just a mat and add your photos or continue to step the basic page up to fancier with surprises galore.  I've precut everything so you can simply watch the thought process and see how I put it all together.  If I get a positive response to share the making of each of the rest of the pages I will turn this in to a series and share how I created each page just as I've done with this one.  So if this is something you're interested in seeing please let me know in the comments or on the video comments.


As always today's video will also include lot of tips and tricks I've stumbled upon while making minis, why I do what I do, and a host of other tidbits.  Of course there will be many more still photos as well.  So come join me on today's video and be sure and stop by Cut at Home and check out all the fabulous things they have in their store. Linked at the bottom of the post are the items I used today.


Measurements for this page:

Solid black mats 6 1/4" x 8 1/4" (I cut 10 because I know I'll need one for each of my pages the front and back insides will require larger mats) 
Decorative mats 6" x 8"
Top Insert 5 1/4" x 7 1/4" (this is the maximum this insert can be, you might even want to cut it down to 5" x 7")
Side Insert - 5 3/4" x 7 1/2" (again this is the largest you'll want it to be to allow for easy in and out access from the side, you might want to cut it down to 5 1/2" x 7 1/4" to allow for even more ease.)
Inserted folder: 10 1/2" x 4 1/4" score in the middle and fold at 5 1/4" to make booklet

NOTE: I suggest using the larger measurements for the inserts, seeing how they fit after you make the pockets, if they don't glide in and out easily re-cut them using the smaller measurement.  Nothing is worse than struggling to slide your inserts into the pocket, better to cut smaller than to be frustrated and hey this is going to be a fun thing so no frustration allowed!!!

Supplies from the store:

HCFA1-432:
 Heartfelt Creations 3D Flip Fold Album
4501228: Graphic 45 Children’s Hour Collection
HCD 727: Heartfelt Creations Vintage Floret dies
HCPC 3500: Heartfelt Creations Open Vintage Floret stamps
SCT-001:  Spellbinders Celebra’tions Linen Thread
SCI-001: Spellbinders Celebra’tions Berry Black Ink
TIM19541: Tim Holtz Distress Ink – Black Soot

Supplies from my stash:
Coredina'tions Black Cat Cardstock 8 1/2" x 11"
American Crafts Black Textured Cardstock 12" x 12"
Decorative brads
Strong double sided tape 1/8", 1/4" 1/2"
Strong wet glue

Thursday, January 7, 2016

Valentine Shaker Cards

a Cut at Home Design Team Project

Today I'm featuring two shaker cards.  If you've not done a shaker before now is the time to try. You'll love the effect.  I'll be doing the pink one start to finish on the video below.  Just a note I tried using some fine glitter and chunky glitter inside the red shaker card and ending up ripping everything apart, removing it and starting again.  The glitters tended to stick to the acetate instead of shaking around like they are suppose to.  I had even used my embossing buddy pillow across the acetate but they still clung, it just wasn't a look I liked.


Here's card one, it's done using Spellbinders Doily Heart Circle for the shaker part and Heartfelt Creations All Glammed Up decorative papers (the LOVE is from an older Bo Bunny collections called Head Over Heels).


Both cards include these darling little bows made from Spellbinders Tiered Multiloop Bow die set. This set has three sizes of bows and you can either cut them with the insert, creating the effect as shown on the bow top above, or plain like the tails above.  


Here's the second card, this is the one I'll be doing start to finish on today's video.  I love pink and black color combos and this is no exception.  This is a really old paper collection from Heidi Grace but perfect for this card.  I used Spellbinders Shapeabilities Font One in Lowercase for the Be Mine sentiment on the inside.  


Outside I die cut the word Forever from the Sizzix Thinlits die set from Tim Holtz - Friend, in script.
There are a lot of these word sentiment dies in the store, be sure and check them out.  I cut mine three times and glued them together to give more of a punch to the word and a semi-chipboard look.  All the circles were die cut using Tattered Lace Essentials Decorative Circles die, wow are these die sets a must have, this one has 19 graduated circles in it!

So come join me on today's video, I'll share tips, tricks and ideas for making a shaker card plus lots more still photos.


Supplies from the store include:
S4-316: Spellbinders Nestabilities Doily Heart Circle dies
660225: Sizzix Tim Holtz Thinlits – Friend collection
S5-199: Spellbinders Shapeabilities Font One – Lowercase
S6-048: Spellbinders Tiered Multiloop Bows
HCDP1-260: Heartfelt Creations All Glammed Up paper collection
ETL14: Tattered Lace Essentials Decorative Edge Circles
TIM43287: Tim Holtz Distress Ink – Candied Apple
Supplies from my crafty stash includeHeidi Grace decorative Valentine papers; Stampin’ Up red Glitter paper; Kraft cardstock: WRMK Corner Chomper; Brads; Wink of Stella; black eyelash trim; Little B Scallop dies; Double sided tape; ATG gun; Black cardstock; Sequins in red and pink, Martha Steward