Showing posts with label Christmas Cards. Show all posts

Saturday, July 28, 2018

This is it! Christmas in July Crop at Country Craft Creations

Country Craft Creations project share

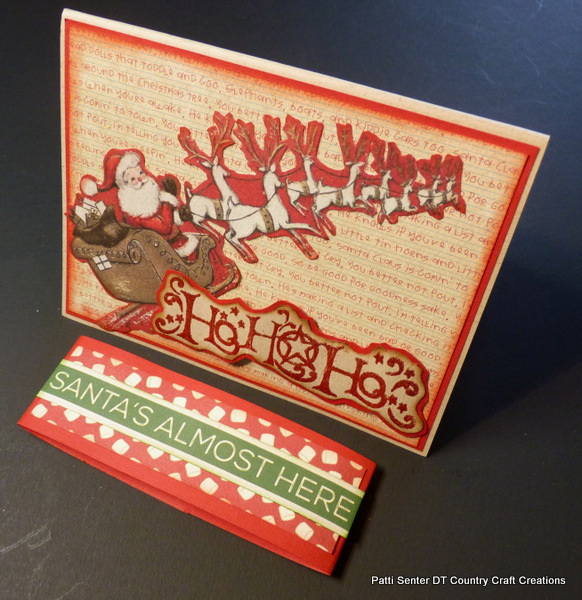
HO HO HO - Merry Christmas!  

This is it my friends.  Well Merry Christmas in July anyway.  Country Craft Creations has been celebrating their Christmas all day crop long, today, July 28th, 2018, on their Facebook Page, Scrapbookers of Country Craft Creations.  I hope you've signed up for the group so you get  to be a part of not only the crop but this fabulous group of designers and members.  Lots of tutorials (all for free), lots of inspiration (all for free) lots of member participation and sharing (yep again all free).  So check out Scrapbookers of Country Craft Creations!  The crop started at 11 am Mountain Time Saturday July 28th and I'm bringing in the tail end.  The best for last huh?  Hahahaha!


I'm sharing a Christmas Gift Card Holder.  
You'll need these basic supplies -

Scor Board, cutter, bone folder, scissors, etc
Glue - I use Art Glitter Glue but you are free to use your favorite
1 card base color of your choice A2 size 5 1/2" x  4 1/4" (when folded)
Decorative Christmas Paper of your choice with elements you can cut out if you so wish
Solid Cardstock to match your collection paper I'm using Artisan Red
Stickles or something to make glittery areas
Embossing ink, powder and gun - optional

Here's the video tutorial, Have fun, be creative and I hope you've enjoyed Christmas in July at Scrapbookers of Country Craft Creations 


Please visit Country Craft Creations here -
you can also join the Facebook groups

Visit me at A Soul's Heartbeat on

Thursday, December 29, 2016

Canvas Corp Brands - Christmas Wreath Easel Cards


Hello everyone I'm here today to share a couple of easel cards I've made for a Crew Blog post over at Canvas Corp Brands.

I just love the effect that the Martha Stewart pine bough punch has for making wreaths, although a bit time consuming the end effect is so pretty.  I taught a Christmas card class and many were newbies, ones that have never created any type of paper craft, and this was one of the cards we made, I'll include some group shots below.


Here's a look at both cards together, would you like to know how to make one yourself?


You'll want to start by punching out a circle with a 2 1/2" circle punch and then punching the middle of that one out with a 1 1/2" punch, this will give you the basis to build your wreath.  Cut 3 or 4 and glue them together for stability.  Next take a 8 1/2 x 11" piece of 110# (or similar weight cardstock). I use Georgia Pacific and get it at Walmart.  You'll want to punch the complete sheet for each wreath. 

I used the lid of a disposable condiment container as a dish (you can buy these at your local supermarket in with the paper plates) adding an ample amount of Aleene's tacky glue.  I like this glue because it gives you plenty of wiggle room to reposition your boughs until you get the look you're going for.  You can also use the top of the bottle as a holder as you position your boughs atop one another. Make sure you only apply glue to one end of each bough and leave the other side free for a dimensional look, otherwise your wreath will look flat when you are done.

Using a small paper punch and glitter paper punch 7-10 small circles for the balls.  You could also use gems or stickles for this.  Set your wreath aside to allow the glue time to dry.  


I used the bulk pre-scored cards and envelopes in Kraft from the store.  I added an additional score line on one side of the card base at 2" (These cards measure 4 x 5 1/2 when closed, a tad shorter than a standard A2 size).  When folded this will create your easel.  In order to have a stopper you'll need something on the inside bottom to stop the card from sliding closed.  I took the Burlap Fringe and laid a strip across the bottom using Beacons Fabri-Tac Glue.  On this card I punched elements from the Farmhouse Christmas Mix and Match pad. To finish the top edge of the burlap I edged it with Hemp rope in red.  This is what I used behind the flat back red pearl on the wreath as well, to change it up I frayed the rope on each end.


Shown above is the card I made using the Grey and Ivory Ribbon Stripe cardstock.  In order to make the easel part you need to cut your front again, the same size as the card front, so in this instance it would be 4 x 5 1/2".  Glue the bottom portion of your decorative mat to the bottom portion of the front of the card base, the area below where you scored. Make sure you don't glue anything to the top portion of the front card base.  Now when you open your card it will stand nicely behind your bottom inside stopper. The 'deck the halls' shown above is from the Famhouse Christmas Mixed Media Pad. You can see from the photo on the left how nicely the stopper holds it in place.


The great thing is when folded flat they slip nicely into an envelope for mailing.  I've used the pre-made Kraft envelopes and card bases available in the Canvas Corp store.  I forgot to mention above that I also misted the card fronts with either the Dazzling Diamonds or Iridescent Gold Glimmer mist, I'm so addicted to this stuff I just love the glisten it gives to the card and wreaths.  I'll link to all my supplies below.

Here's a group shot of everyone making these cards.  Most of these ladies were newbies who'd done little to none crafting, everyone went away with cards and a smile, you couldn't ask for more!


Supplies from the Canvas Corp Store


Farmhouse Christmas mix and match pad
Jolly Christmas mix and match pad
Ribbon Stripe cardstock
Hemp Cording in Red
Glimmer Mist in Dazzling Diamonds and Iridescent Gold
Kraft Bulk Envelopes A-2 size

Follow Canvas Corp Brands here 
Store - https://shop.canvascorpbrands.com/
Blog - http://blog.canvascorpbrands.com/
Facebook Collective Group - https://www.facebook.com/groups/1124592877561970/
(this is a group you must request to join, but boy is it worth it!!!)

Tattered Angels at
Facebook https://www.facebook.com/mytatteredangels?_rdr=p
and Instagram https://www.instagram.com/tatteredangels/

Canvas Home Basics at
Facebook https://www.facebook.com/CanvasCorp/
and Instagram https://www.instagram.com/canvascorp/

7Gypsies at
Facebook https://www.facebook.com/7gypsies?_rdr=p
and Instagram https://www.facebook.com/7gypsies?_rdr=p

Visit me at A Soul's Heartbeat on
Blogger -  http://asoulsheartbeat.blogspot.com/
Facebook -  http://tinyurl.com/zbph36l
YouTube - https://www.youtube.com/user/nwlady1949
Pinterest - https://www.pinterest.com/northwestlady/
Instagram - https://www.instagram.com/nwlady/


Wednesday, December 9, 2015

Old World St Nick Christmas Card for Meg's Garden

a Meg's Garden Design Team Project 


Today I'm sharing an Old World Christmas Card for the Meg's Garden Design Team.  I've used the Vintage Christmas Papercrafter Pack with Kraft cardstock to create a 5" x 7" card with a a matching box envelope.


Using Velvet Flowers and leaves along with Jute Ribbon was just the touch to dress the front of the card.


I fussy cut Santa from the paper, placed a hinge on him, hid a magnet underneath and created a great secret flip out to house the tiny tag and a special message.


To tie everything together I've used Art Deco Snow-Tex on the front, inside and back.  These little touches of snow make the whole card come together.  

Please check out the Meg's Garden of Papercraft Delights store and the Meg's Garden Design Team Blog for lots of inspiration and products to create your Holiday cards, tags and what nots.  If time is short you can always purchase the digital edition of the papers to print instantly at home.


~ Supplies from the Store ~

Monday, November 9, 2015

Meg's Garden Vintage Victorian Christmas Card

a Meg's Garden Design Team Project


Today I'm sharing a little bit of Vintage and a little bit of Victorian in a Christmas Card featuring both collections from Meg's Garden of Papercraft Delights StoreThere will be links to the products used from the store directly below the video.


I am in love with the old world look of these collections, use one or the other or mix and match them as I've done today.  This is a 5"x7" card with a Kraft cardstock base.  I added some Diamond Stickles on Santa's beard to give it a little shimmer.


Today's video will walk you through how to do everything from the collage background to adding the decorative flowers.  I hope you'll join me there.


Supplies from Meg's Garden 

Wednesday, October 28, 2015

Crazy Birds Christmas Cards

a Cut at Home Design Team Project


Today's post features Tim Holtz Bird Crazy collection, stamps and dies.  I love these Crazy Birds!  I'm sharing three cards, the middle one below I'll be doing start to finish on the video, I hope you'll join me.  This little guy above uses some of the Tim Holtz Crazy Things, like the glasses, Santa hat and bow.  This is such a fantastic set of stamps ready for anything from a Birthday Party to Easter, Forth of July, dress up for guys or gals, just a multitude of pieces to make your card making super fun!


I'll share how I created the rolling snowbanks and what I've used to dress them up.  Don't you just think these birds are adorable??  I don't have the dies that cut the birds out, those I did by hand, but I do have the Framelits that cut the Crazy Things like the hat above.


I used my Neocolor II crayons from Caran D'Ache to color my birds, I'm really liking them (I ordered them from Amazon).  On video I'll also share how I turned the witches boomstick into the sprigs of greenery above.

So come join me on video and while you're here if you haven't become a follower I'd love for you to do so today!


Supplies from the Store:
CMS212: Tim Holtz Stampers Anonymous Bird Crazy Stamp set
 CMS236: Tim Holtz Stampers Anonymous Crazy Talk Stamp set
CMS237: Tim Holtz Stampers Anonymous Crazy Things Stamp set
660953: Sizzix Tim Holtz Alterations Framelits Crazy Things
SCI-001: Spellbinders Celebra'tions Berry Black Ink
TIM43294: Tim Holtz Distress Ink - Twisted Citron
SCP-014: Spellbinders Celebra'tions Cardstock - Cuddle Cream
ACT1412: Angel Craft Tape 1/2"
ACT1414: Angel Craft Tape 1/4"

Wednesday, October 21, 2015

Fold-A-Long Christmas Tree Cards

a Cut at Home Design Team Project

Hi everyone today I'm sharing four cards I've made using Sizzix's Fold-A-Long Christmas Tree Card die set.  With this set you cut on the fold creating the three attached trees.  You also get dies to cut the solid inner tree and the sentiment that sits atop it.  You get two small dies to cut ornaments and leaves, which I didn't use this time. 


I tried several different techniques just to see the difference between them.  On this first card I used green Coredina'tions cardstock and glittered the sentiment with Wink of Stella. 


The second card is white on white.  White cardstock with White tinsel glitter atop from Martha Stewart.  I love this look but had a hard time keeping the tinsel on the trees.  I finally used some hairspray and added a good coat on top and that seemed to do the trick. This time I used a silver glitter paper for the sentiment and tie the trees shut with a wire edged silver and white ribbon.


The card I'm going to make on video with you uses gold foiled paper for the tree bases and red glitter paper for the solid background tree for the sentiment.  I adorned the tress with red bling droplets.


To complete the set I cut envelopes from white cardstock.  I edged them in red and silver ink and Zig Painty FX in gold to match the cards.  I then stamped sentiments using Lawn Fawn's Winter Scripty Sayings stamp set. 

Join me on today's video for a walk through of the cards, a start to finish sharing the process and more photos for your inspiration.


Supplies from the Store: 
660665: Sizzix Thinlits Fold-A-Long Christmas Tree dies
LF938: Lawn Fawn Winter Scripty Sayings
660341: Big Shot Starter Kit
SCP-013: Spellbinders Celebra'tions Whirl White Cardstock

Wednesday, August 19, 2015

Jump Start on my Christmas Cards

a Cut at Home Design Team Project


On today's video I'll share four cards designed with Spellbinders Holiday Holly Frame dies, Graphic 45's Christmas Carol collection and Sizzix Stripes Embossing folder.  Each of my cards are 5"x7" a little larger than my norm but the Holly Frame is larger and needs more room to show off it's gorgeous details.

For the card bases and the frame die cuts I used Spellbinders Celebra'tions Whirl White and Cuddle Cream cardstock.  This cardstock is fast becoming one of my favorites.  The finish is smooth and it handles score marks and folds like a dream.  I'd say add this to your crafty wish list for sure.


I found Snow-Tex from DecoArt at my local craft store and used it to add the look of snow to my cards.  I really think I like the Aleene's Glitter Snow better, it's easier, in my opinion, to work with.  I wasn't able to find it at this time of year locally and the Snow-Tex works it's just more fiddly.  I also used Frosted Lace Stickles to go over the printed snowflakes that are printed on the paper.  I did a lot of fussy cutting for these cards and added pieces of the cut aparts from the collection for sentiment spots or greeting spots on the inside.


If you have older collections be sure and check to see if any of the patterns match up to the new or if you can add any of the images.  I didn't want to cut the first page of the Christmas Carol collection up yet I loved the yellow snowflake dots on the red background that was on the back.  When I went pawing through my old collections I found this print in the Christmas Emporium collection and on the reverse side were these darling little girls.  I used the yellow snowflakes and red on the mat below and fussy cut girls on the reverse side of the paper for the inside above.  So nice to have things work together and Graphic 45 is wonderful about being able to interchange collections (based on color or design) from present and past collections.


Come and join me on today's video, I have four cards to share with you, one we will make together.  I'll walk through the other three with you and I'll share any tips I learned in the process with you. There are lots more photos to inspire you to get started on your Christmas card making too!


Supplies from Cut at Home Store:
S6-040: Spellbinders Holiday Holly Frame dies  
658989: Sizzix Textured Impressions Stripes Embossing Folder (this is sold in a duo pack with Pinwheels) 
4501195: Graphic 45 Christmas Carol 12x12 Paper Collection 
4501194: Graphic 45 Christmas Carol 8x8 Paper Collection 
ACT1412: Angel Craft Tape 1/2" 
SCP-014: Spellbinders Celebra'tions Cuddle Cream 12x12" cardstock  
SCP-013: Spellbinders Celebra'tions Whirl White 12x12" cardstock  
TIM19497: Tim Holtz Distress Ink in Antique White

Supplies from my stash: Red cardstock, Glossy Accents, pearls, bling, DecoArt Snow-Tex, Wink of Stella clear, Black felt tip pen

Wednesday, December 10, 2014

Holiday LIghts

a Cut at Home Design Team Project

I'm always on the lookout for Christmas dies and stamps I can add to my collection.  Even though you only use them once a year it's so nice to have a variety on hand.  When I saw this die set from Cottage Cutz called Holiday Lights I knew I wanted to add it to my Christmas crafty supplies.


Today's video will feature the whole process start to finish along with a few goobers and the steps I took to fix them all.  A normal thing in my craft room, making mistakes and then figuring out how to work around them!  I think most of us that craft do that very thing.

I used one front panel piece on my A2 card base (4 1/4" x 5 1/2").  This is from an older collection of Heartfelt Creations called Frosty Blanket but most collections have a focal panel either in the form of cut aparts or an element on a single paper sheet than can be used in much the same way as I've done here today.


The Holiday Lights and the little birds nestled perfectly over the top of my door and once you added the glitter snow it made it all work together beautifully.

I hope you'll join me on the video as I show you the whole process, warts and all.  I'll also include a slick trick on how I got the glitter on the script sentiment for the inside and how I get it to stay!


Wednesday, December 3, 2014

Painted Lady Victorian House Christmas Cards

a Cut at Home Design Team Project

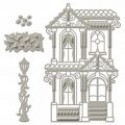
I had so much fun creating these Christmas cards for my Cut at Home project this week.  I used a brand new die from Spellbinders Shapeabilities collection called Painted Lady.  It's a Victorian House that I can see making it's way back for birthdays, weddings, housewarmings any special occasion that you want a 'wow' card for.


I chose to make three cards using this die to give you multiple ideas on how to use it.  Cut from pink cardstock the die is the perfect accompaniment to the Kraft card base.


The poinsettia is cut from Tim Holtz Alterations Tattered Poinsettia die, another of my favorites and a perfect one to add to that flower stash of dies.  You can use this die year round by tweeking the petals just a tad.  I also added Aleene's Glitter Snow to the house and ground, I really like how wintery  this stuff makes your card look.

There are two more cards on the video, a how to and of course many more photos.  So come join me and take a look.


Check out the Cut at Home store for these supplies -