a Country Craft Creations project
Metropolitan Girl by Carta Bella is a fun, zippy paper collection featuring some really snappy ladies and thoughts. Today I'm sharing a 6" x 8" horizontal mini album for the Country Craft Creations Design Team. There will be a walk though video at the bottom of this post and all supplies will be linked there as well. Be sure and stop by Country Craft Creations to see all the fabulous paper lines available. Don't forget to join Scrapbookers of Country Craft Creations Facebook Group, where you will be amazed at the abundance of fantastic free tutorials, crafters sharing their expertise and a never ending opportunity to learn something new. What more could a crafty person ask for?
This mini just lent itself to being horizontal, you'll see why in just a moment. I wrapped the basic structure in black cardstock and then used the designer paper skyline for the front and back. Black tulle hides under the front, over the spine and under the back cover joining together at the bottom to form a bow closure. Front, back and spine were adorned with fussy cut images and chipboard pieces altering the heights to give dimension.
I cheated on the spine and added a piece of Authentique Spectrum cardstock. These stripes just sealed the deal. I used Wink of Stella over all of the spine, in real life it takes on a sparkle that spot on for a Metropolitan Girl. The chipboard here is actually the top packaging of the chipboard pieces, when I craft nothing is off limits. I did have to eliminate the designers name with the addition of the Taxi sign. So stinkin' cute especially with the high heels balancing on top.
This is the bottom portion of the skyscape that was used for the front cover, fitting it should finish out the back as well. I took one of the chipboard pieces 'Be Your Own Kind of Beautiful', covered it in clear Wink of Stella and then covered that with Crystal 3D Lacquer. When all was dry I tucked some black tulle behind and add ribbons of black seam binding.
The book consists of 4 pages which layer in graduations one atop the other. To get the book to lie flat like this I used 1/2" gussets between each page. I also used a combination of red, blue and cream for the page construction using the Country Craft Creations Artisan Paper Sampler pack. I LOVE this paper!!! you can score and fold and not have any cracking, a big plus in my book.
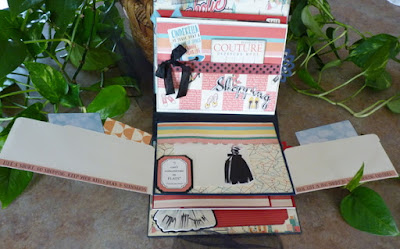
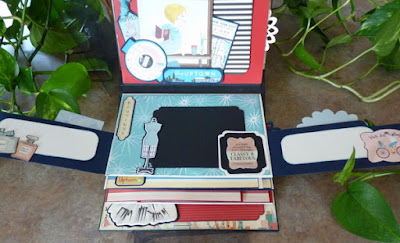
Each page has swing outs created from the border strips of shop fronts. I snipped each strip into two pieces and backed them leaving a small solid border around. I also only glued the backing to the bottom and sides to create extra pockets for photos and tuck ins. These stay closed with hidden magnets.
When flipped out you have places to write journaling or place your photos.
This is the back of the first page. I created a cluster pocket using 5 different elements. You can easily slip a 5 1/4" x 4 3/4" tag behind. I did use a lot of Crystal 3D Lacquer and clear Wink of Stella on my elements. Backing them with the navy blue solid helps them pop and adding dimension to some elements gives them a much better visual look.
Here's page two, again backed, this time with navy blue and open for photos, tags, or whatever extras you'd want to stick inside the extra pockets. The small photo shows how the flips look when opened. This time I added some stickers and chipboard on the inside to hold the photo mat in place.
The back side of page two has a pocket to hold larger photos or the little tuck in I have here. I dyed the ribbon strip with Tattered Angels Simply Sheer Matte in Red Rose, it was originally white with black dots. Since my papers were a cream base the white just jumped out of you. When you purchase elements, ribbons, flowers etc in white or cream you then always have the option to change the color to match your color scheme with mists or dyes.

Page three is my Uptown page. Such fun papers to play with they have that retro vibe to them. On the inside strips of this one I used a strip from the sticker sheet across the bottom flaps, added the striped paper across the middle top which I only glued on the 3 sides and punched with an EK Success Deco Scallop, I was going for an awning look here. You have so many options to choose from the stickers, chipboard and ephemera pieces.
This is one of my favorite pages, probably it's that striking red and blue combo. I love the chipboard sentiment she's standing on. The blue strip creates a belly band to slide the folded red mat under. Since I'd already used the chipboard piece of this gal I made her again by fussy cutting her from the paper and backing with the solid red.

The last page finishes off the strips of shoppes. The base page is cream again this time. I really like alternating the base page color.
I wanted to show you the inside mat on this page. I took one of the sentiments and cut it from the frame (it's tucked inside one of the pockets on the above pages). I used the frame here and left the top and side open. I slid a small mat under the sides and this will eventually be the home to the photo. If I could have found my acetate sheets, I've packed them in such a good place I can't find them now, I would have backed the frame with acetate, I think that gives a much more finished look. Once the photo is attached it won't matter.
Here's the flip outs on the last page, this time I matted the shoppes with the red, you can't go wrong with that. A couple of stickers and the flaps are done. I had to share the perfume bottle on the right.
 One thing I preach over and over is to always allow ample drying time when you are using a large amount of Crystal 3D Laquer or Glossy Accents. Well what did I do but set something right into the goo before it had dried. There was no way to smooth it out and it would have been a total loss, sniff sniff. So I decided to see what would happen if I took my heat gun to it. The result was this crinkly perfume bottle! Perfect so another goober salvaged!
Here's the back of the last page. Under the fussy cut lady are several magnets so she snaps shut and holds whatever you decided to put underneath snugly.
When I glued my pages to the hinges I left the right sides open so I'd have room for a pocket to slide my mats in. I used an EK Success Border Edge punch called Flower Burst for the pull. Because there will be a lot of strain on the pulls coming in and out of the pockets I punched and cut another flower burst and glued it directly over top of the first one. With double strength the pulls should hold up well.
Finally we are to the inside back covered adorned delightfully with this chipboard dress. I added a black seam binding sash to the waist to go with the black bows on the top sticker. So there you have it my horizontal flip mini. I hope you like it and perhaps will give it a go yourself. This is a fun retro paper collection to work with. Happy Crafting everyone, enjoy the process and have fun.
Finally we are to the inside back covered adorned delightfully with this chipboard dress. I added a black seam binding sash to the waist to go with the black bows on the top sticker. So there you have it my horizontal flip mini. I hope you like it and perhaps will give it a go yourself. This is a fun retro paper collection to work with. Happy Crafting everyone, enjoy the process and have fun.
Links to the store and mini album measurements will be directly below the supply list.
Supplies
Carta Bella Metropolitan Girl paper Collection
Carta Bella Metropolitan Girl Epherma
Carta Bella Metropolitan Girl Chipboard
Carta Bella Metropolitan Girl 6x6" pad
Authentique Spectrum
Paper Lady Bug
Authentique
Spectrum Paper Black Jack One
Bo
Bunny Pearlescents Island Mist
Art Glitter
Glue
Artisan Cardstock
Sample Pack
Medium
Weight Chipboard
Supplies from my Stash
Punches EK Success -
Flower Burst Border Edge
Scallopped Scallop
Deco Scallop
Corner Chompers - Rounder and Scallop
Tattered Angels Glimmer Mist Iridescent Silver
Tattered Angels Simply Sheer Plain Jane Matte Rose Red
3D Crystal Lacque
Glossy Accents
Black Tulle
Please visit Country
Craft Creations here -
Country Craft
Creations shoppe - http://countrycraftcreations.com/
YouTube - http://tinyurl.com/jkw6ptz
Pinterest - http://tinyurl.com/z49ueuc
Facebook - http://tinyurl.com/zbj7eu8
you can also join
the Facebook group
Scrapbookers of
Country Craft Creations here - http://tinyurl.com/zhess6s
Visit me at A Soul's
Heartbeat on
Blogger - http://asoulsheartbeat.blogspot.com/
Facebook - http://tinyurl.com/zbph36l
YouTube - https://www.youtube.com/user/nwlady1949
Pinterest - https://www.pinterest.com/northwestlady/
Instagram - https://www.instagram.com/nwlady/
Measurements
2 Chipboard 6"x8" for front and back
I Chipboard 3" x 8" for spine
Hinges for 4 pages with a 3" Spine
cut paper 7.5" x 9.5"
score at 2" (on long side) and then every 1/2" until
you get to 7.5"
fold your 4 hinges and leave a 1/2" gusset between
with a 2" at front and back
Pages (4)
Cut 7.5" x 11"
Score in half at 5.5"
Fold, glue over hinges


No comments:
Post a Comment