Thursday, March 30, 2017

Julie Nutting's French Flea Market - Scraps into Cards

Country Craft Creations Design Team Project

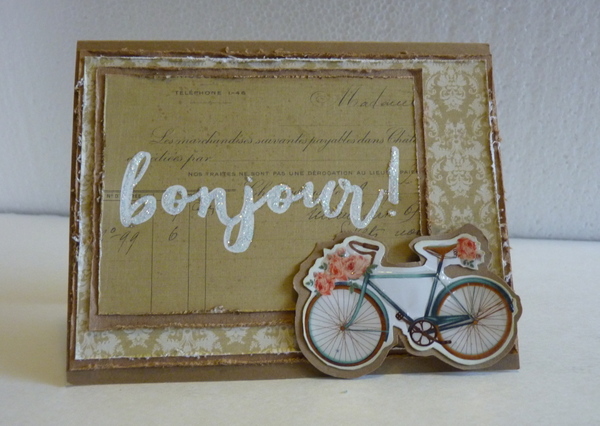
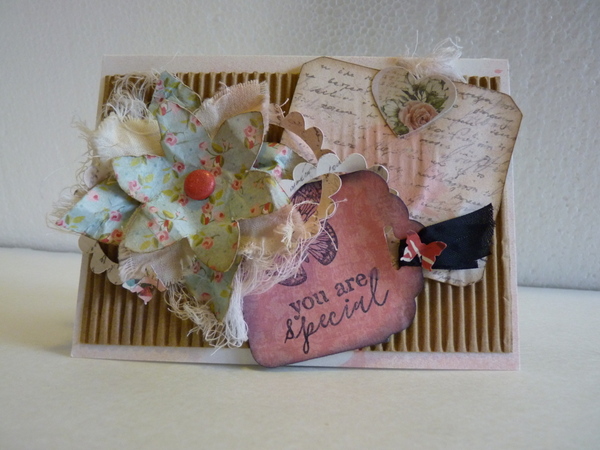
Well I have to admit I've had a hard time holding this video back.  As a lot of you know I've been trying to use the scraps from my projects up instead of sticking them away.  This not only gives me a bevy of cards or tags or whatever on hand it also provides lots of ideas for you to use your scraps as well.  As soon as I finished my French Flea Market mini I started in on the cards, I know me, once I tuck things away they rarely resurface, it's best for me to be creative when my desk is still a mess with all the project leftovers.  It didn't look like many scraps in that little box but as you'll see it provided 14 cards that I just love.  I think I like this set the best so far, oh wait, I seem to say that after each new set is completed.  I guess that's a sign that it was a fun, productive process.

This is going to be a harder one to share, I debated on if I wanted to share each card here or just a few so I think I'm doing a photo of each but no explanations.  On video (link below) I'll share the process of making half the cards.  If you don't want to watch the process (the video is long) I'll provide a skip to point at the beginning of the video to take you to all the photos of the cards.  This provides a couple of shots of the outsides plus one of the inside.  I'm sure you won't want to do exactly what I've done but it will give you lots of food for thought as to how you might use your scraps.  If you'd rather make tags all the cards could easily be converted into tag format.  Just a video note, I have sped the video up during the process so you wouldn't be with me hours while I decided what to do where.  If you need to slow the video to better see what I'm doing there is a cog (settings) button on the lower right, click on it and you'll see an option for Speed, when you click it you can slow the video down.  I hope that helps I know that some of my viewers prefer length to speed so I hope this helps everyone.

The main thing is enjoy, enjoy, enjoy the process.  Have fun, make it like a challenge 'how can I create with just the smallest amount'.  I'll start with my last card.  It was actually the last handful of scraps, already in my hand, posed above the trash can.  Then my inner crafty self said WAIT, you could just punch something out of all these scraps, so I grabbed my little heart punch and punched and tossed the remainder away, trust me there weren't many remainders!  Then I layered the base with the hearts one row next to the other.  I LOVE this card and I'm so glad I saved these scraps from the trash.  It really goes to show it doesn't take much to end up with something unique.

Enjoy!  The video and links to Country Craft Creations will be listed below.  


Supplies


Please visit Country Craft Creations here -
you can also join the Facebook group
Scrapbookers of Country Craft Creations here - http://tinyurl.com/zhess6s

Visit me at A Soul's Heartbeat on

Wednesday, March 29, 2017

French Flea Market Mini Album


a Country Craft Creations Design Team Project

Hello and welcome to my blog, it's nice to have all you regular visitors back to see my latest mini album and wonderful to have all you new viewers stopping by to check me out.  Today I'm sharing a mni created as a Design Team project for Country Craft Creations.  I used Julie Nutting's French Flea Market collection in the construction of this album.


I love to take elements from the papers, stickers and ephemera packages (if I have them) and create clusters.  The one shown above is on the outside of my mini.  Because minis, hopefully, are shared often the outside of them can get a lot of wear so I usually choose to keep the outside of the mini fairly flat in nature.  


Here are a few more views of the front, the spine and and overhead shot of the six pages.  I clustered a few elements of interest for the spine and tied them all together with black seam binding.

I won't be sharing everything here with you on the blog, but the video will give you a great walk through of each page, and all the tuck in's, mats and extras that I've included.  On the first and last page I created a gusseted pocket and cut the top edge with Tim Holtz, On The Edge die, Placket. Inside I've tucked a little note pad and pen. Once this is used up this pocket will become a nice nesting place for extra photos or memorabilia.


There are lots of places I've tucked little treasures of tiny booklets that open to house journaling or a small photo, or perhaps a special ticket stub.  On the right above this is a magnetized page that flips up and down. Here you can see it as the bottom is flipped down. The top flips up as well giving you a full 12" top to bottom to fill with photos or whatevers.


There were so many fantastic papers in this collection that it was difficult to know what to put where.  I like to try and transition the pages that face one another with the same colors or papers so that they flow left to right.  Be sure an notice the clip on the right.  That's the gloves from the sticker sheet, backed with black and attached to a clothes pin.  The inset photo to the left shows the Bingo page flipped open to create a 12" x 6 1/2' tri fold.  Lots of spots for photos with an additional bifold book in the middle pocket sporting a cluster of elements for the focal decoration.

The next two pages secure the photo mats with decorative stoppers and a belly band.


Tucked in the side is another trifold secured with a black seam binding ribbon.  This is the only extra pocket I added since the pages were quite chunky to begin with.  This mini has 1/2 gussets between the pages which allow for lots of room for many many photos to be placed on the pages and in the pockets.


Here we have two pages with have a nice roomy pocket for a tri fold on the left and a flip out (magnetized) page on the right.


Continuing the theme of lots of extras these pages don't disappoint.  On the left when you untie the ribbons you get this generous flip up and out for lots and lots of photos.  I added a nice cluster of elements to the center so you can easily slip several photos behind plus attach one directly to the page.  On the flip out sides there is a small pocket on the bottom of each to keep your photos from falling out.  Each of the elements top and bottom center are left free to slip your photo behind.  You can see in the photo to the right that I've slipped just the smallest of tags with a nice ribbon pull and brad behind the pocket flap.It just peeks out at you on the side.


To finish the mini I ended with the same gusseted pocket I had on the first page and a nice side pocket on the inside back cover.  There are so many elements that I haven't shared here, but you'll see them all on the video with lots more photos. Store links will be directly below the video along with supplies used.

Thanks so much for stopping by, if you like my blog and YouTube please share with your friends.


Supplies from Country Craft Creations

Supplies from my Stash
Punches, charms, cording, Glossy Accents, Glitter, Graphic 45 Name plate, 
various colored cardstock scraps, lace trim

Please visit Country Craft Creations here -
you can also join the Facebook group
Scrapbookers of Country Craft Creations here - http://tinyurl.com/zhess6s

Visit me at A Soul's Heartbeat on