I created this mini album for my daughter Amber. Her hubby gave her a surprise party in January when I was home visiting - The Mad Hatter Tea Party - to be exact. Well I just loved the Graphic 45 paper, Halloween in Wunderland and thought it would perfect for a mini. Here's the results:
Heavy Glossy Accents were added to the fussy cut tea set
and then popped up to give dimension to the front.
and then popped up to give dimension to the front.
If you're going to adhere a heavy layer of glossy accents be sure and leave plenty of drying time,
set the item aside where you'll keep your hands off of it for overnight or longer!
set the item aside where you'll keep your hands off of it for overnight or longer!
An assortment of charms dangle on the front,
including the key with a crown up top,
very appropriate for Alice.
The door knob is from the Tim Holtz collection
Pages have numerous pockets and interactive elements. I had watched a series of Paper bag tutorials on Kathy Orta (Paper Phenomenon)YouTube on how to construct this mini. She's fabulous, with amazing inspiration and techniques, check her out.
The mini is constructed of six paper bags hinged together with Tyvac and covered completely with the Graphic 45 paper. I used just the paper and bags the first go around and found the bags I was using were inferior (not strong enough for this purpose) and the binding began to tear apart. I took the binding apart (oh how I hate to REDO!!!!) and redid the binding gussets using tyvac which won't tear and will hold up to lots of opening and closing.
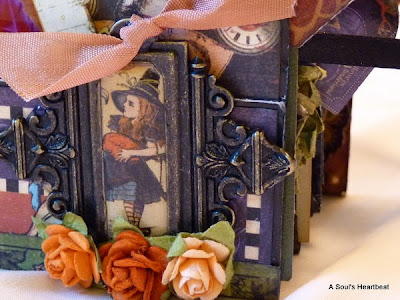
I took this little frame and added Alice from the collection from the back side and then layered Glossy Accents over the top, up close it looks like she's behind glass. Flowers are Recollections.
The Queen's right side is loose so the mat slips behind, the back side holds a large photo.
Paper flower is made from old book papers and sprayed with Olive Glimmer Mist. And the guy in the hat is my son-in-law, the kind gentleman who came up with this great idea for a surprise party.
The Rosette flower is a die cut I received from Leanne Clark in a swap, it worked perfectly for my book. There are numerous other flowers that I used in this book from swap I participated in, and unfortunately I took the flowers from the backing pieces and failed to keep the names of the creators, so a big thank you if you recognize your flower creation in my mini.
Each end has room to slide a huge mat down the inards of the paper bag.
Loved this little interactive matchbook, it's probably my favorite part of the whole book. I used Crystal Lacquer on the Queen and loved how it turned out. It's much thinner than Glossy Accents and seems to dry much quicker and with less bubbles.
I attached two velcro tabs on the inside to keep the matchbook closed while in the page pocket.
All these little cards were included in the paper collection
so I simply distressed the edges with Vintage Photo
and stamped the Remember on the front.
and added my photos to the backside
I added a vellum sheet to the back inside cover and then slipped a card inside it to be able to write a personal note to my daughter when I give her the mini album.Photo Shop and I were great compainions throughout the making of the book. It allowed me to scan and change the Mad Hatter's hat to Amber's name and birthdate with a popped up addition on the hat. I also used it to alter the size of the photos to fit the mats and pages I had.
This is the back of the Mad Hatter tag. Look familiar? Yep I used a Graphic 45 package insert that buttons came in. I just couldn't part with it and then after I'd distressed it with Vintage Photo didn't want to cover it up either. So I left it so she can either journal or put a picture on it.

In Kathy's minis this was a separate interactive piece which had a cover that came down and inserted behind the belly band to close it. I found that mine began to wrinkle as I took it in and out so I attached the gusseted folder to the page and took the front flap off (which later became another tag) I liked it much better this way.
In each pocket of the folder are these removable inserts which hold two tabbed mats
with room for a photo on front and back.
Here's the back cover which is actually the back cover from the Graphic 45 paper collection.
The cover was heavier weight paper and glossy so it worked perfectly for the outside cover of my book.


5 comments:
this is absolutely awesome!!!
Oh Patti how special is this book. Your daughter must love it. Just awesome.
What an amazing project Patti! I loved every little detail of this!!! So grateful for all the photos and the idea! Wow! Your daughter is gonna love this! So much work involved and totally worth it!
Your mini is stunning Patti.
I have only made a card out of these papers. they are so beautiful I am intimidated to cut them up.
But I do plan on making my middle daughter a mini out of them for Christmas.
Thank you again for the papers you sent me. I made a card with them today. I had to make a sympathy card and these papers were perfect as the colours were muted.
OMG, Patti!!!! This book is off the charts fantastic!! I love mini's and this is definitely in the top five of the ones I've ever seen! Wow, wow, wow!!! I love it!
hugs, Sharon
Post a Comment