Tuesday, September 11, 2018

Upcycling! Trash to Oh La La.

a Canvas Corp Brands CREW project

Recently I placed an order for some spices online and when it arrived it came in this bright, shiny, yellow box.  I think I was more excited over the box than what was in it.  From the first moment I knew I was going to have to alter that box into something fun and useable.


I know, I know, I throw you that great tease and then what do I do just give you this little snippet of a photo.  But you can already see the fantastic effet the High Impact Aqua paint made over the shiny yellow of the original box!  Pretty cool huh?  I'd love for you to pop on over to the Canvas Corp Brands Blog and take a look at the complete project.


Not only is there the transformed box but also the cutest little mini tucked neatly inside.  You're going to love how I've used the Architextures Collection to make this mini!

As always I've added a video to the mix, a complete walk through of the box and mini.  But wait!  This time I'm sharing a playlist of three videos, two are process videos, how to alter the box and how to make the mini so if you'd like to replicate my idea with any box you have lying around this will give you great food for thought.  The entire Playlist can be found here Upcycled Box & Mini Playlist

Please check out the complete blog post - Upcycled Box and MIni Book using Architextures Collection   over on the Canvas Corp Brands Blog.


Supplies, Tools and Stuff from my Stash
Tattered Angels Glimmer Mist – Graphite, Silver Sugar, Vanilla Breeze, Valentine Pink, Patina; High Impact Paint -Aqua
From my Stash – Artisan Cardstock – Black; Black cording/twine; Versamark Ink; Clear embossing powder; Art Glitter Glue; Kraft Tex – Black; Glossy Accents; Wink of Stella; Metal Rose embellishment; Aleene’s Collage Podge
Tools I used – Fiskars Cutter; Martha Stewart Scor Board; Bone Folder; WRMK pokey tool; Large Eyed long needle

CANVAS CORP BRANDS
Follow Canvas Corp Brands StoreBlog and Facebook Collective Group (this is a group you must request to join, but boy is it worth it!!!)
Canvas Home Basics at Facebook and Instagram.  7gypsies at Facebook and Instagram.  Tattered Angels on Facebook and Instagram.
Visit me at A Soul’s Heartbeat on BloggerFacebookYouTubePinterest and Instagram.


Saturday, September 8, 2018

Prima's Misty Rose Mini Album for CCC

a Country Craft Creations project share

Today I'm sharing a new mini album using Prima's Misty Rose Collection from Country Craft Creations.  Oh my word what a gorgeous collection this is my friends!


The base of my mini is medium weight chipboard covered with white Artisan cardstock from the Country Craft Creations store.  I have 4 8" square pages.  I adorned the front with this great doorknob from the Graphic 45 staples collection. Clustering a group of embellishments together added a great front focal place with room behind to tuck in a nice folded notecard, perhaps the perfect place to put a nice to and from note.


Because the mini has 1/2" gussets between the pages it will lie flat when opened, I love this look.  Don't be fooled because there are only four pages, it holds a huge amount of photos.


I've included several paper clip embellishments and embellishment clusters.  I'll be posting a follow up post and video using all the scraps in many more of these little gems.  Perfect to adorn a scrapbook page or be the beginning of a wonderful card.


Many of you ask how can I do pages that will stay closed without using magnets.  So this mini has no magnets but several different types of closures from tuck ins, swing spots, and ribbon ties.  Ideas to help you keep those pages from flapping in the wind and not have the expense of magnets.


Most of you that follow my blog and YouTube know that I really enjoy fussy cutting. To me it's a stress reliever, something I can do while the tv is babbling in the background.  This paper was a fussy cutters dream.  I cut one of the floral pages all apart and have used it throughout my book for closures and embellishments.  Never fear if fussy cutting puts your teeth on edge there are lots of cut aparts that you can substitute for where I used a cut out flower.


I hope you'll pop on over and watch the video walk through so you can get a real sense of my mini.  I'll be adding the video tutorial series over the next week and will pop them all into a playlist to make it easier for you to find.  Thanks for stopping by and have a super crafty day!


Please visit Country Craft Creations here -
you can also join the Facebook groups

Visit me at A Soul's Heartbeat on


Sunday, August 19, 2018

Club Graphic 45 Imagine Kit - Scraps to Cards

Here is the last of the bits and bobs from the Club Graphic 45 Imagine Kit that Tammy Merrill from Country Craft Creations sent me to play with.  I've used it all, every sticker, all the papers there's nothing left to store away and gather dust!  Woot Woot!

Now the process of cutting, piecing and gluing has yielded eleven cards for my card stash.  Not a bad deal considering the bag of scraps would probably have stayed hidden for eons and purged by who knows who!


Check out the video below if you'd like some ideas of how to use up your leftovers and create some cards in the process.


Supplies can be found at
Country Craft Creations store
Inspiration can be found at
Scrapbookers of Country Craft Creations
you can also join the Facebook groups

Visit me at A Soul's Heartbeat on


Wednesday, August 15, 2018

Club Graphic 45's Imagine Kit made into a Cinch Flip Mini

a Country Craft Creations design project

Today I'm sharing a top flip mini album with a Cinch coil closing.  I so rarely use my Cinch and have always liked the idea of mini's that stand on a table.  I hope you'll like it as well.  I've used the Club Graphic 45 Kit Imagine.  It included the 12x12" Patterns and Solids, Journaling and Ephemera Cards, a stamp set, and some Keyhole embellishments along with a pad of Color Box ink in Cashmere.  I can tell you I really liked the ink.


There are 4 page flips and the front and back of the easel available to place photos. The pages measure 7 3/4" x 8 3/4". I used one inch coils in black for the top closure. If you don't have a Cinch you can always punch your holes and add the individual rings to achieve the same effect.  There is an attached bottom hinge which allows the mini to stand freely by itself.  You have your choice of whichever pages you'd like to display while it's standing.  I had originally planned to have six pages but I realized that when all the pages are on one side it makes the easel too top heavy to stand correctly.  If you wanted to eliminate the easel bottom flange you could just stand the book on the front and bottom outside covers.  

I intend this to be a gift so I was delighted to see the Dear Friend and For You stickers on the sticker sheet.  Most everything has been backed and edged in the Artisan black cardstock available from Country Craft Creations.  This is fantastic paper it won't crack when folded, a true necessity when you shaping paper to your needs.  I did strengthen the bottom flange/easel portion with several coats (inside and out) of Aleene's Collage Podge, any Mod Podge type solution would be fine.  You DEFINITELY need to do this other wise with the constant folding and unfolding of the easel it's not going to be long before whatever type of paper you use begins to wear.


Only having the Patterns and Solids to work with is interesting.  The original kit has some fantastic images and this is really the filler paper but I think with the use of the stickers and the journaling and ephemera pieces it worked out ok.  I did haul out a lot of my old punches to add interest here and there and of course I couldn't do a book without some fussy cut images like the one on the right in the above photo.


Using the Journal spots as focal points really captures your eye.  Here I used a couple of large magnets so the doors stay shut when not open for viewing.  Magnets can be a crafters best friend.


Included in this kit is the set of Key Holes.  I used this one as a stopper for the flap of my oversized envelope.  Large enough to tuck some pretty good sized photos or some personal journaling you don't want out for everyone's eyes.


 My challenge to myself this time was to use some of my staples from my stash that gather dust and not a whole lot more.  Like the Cinch machine and the punches.  Here I found this fantastic Martha Stewart punch called Flourish Lace.  I cut a teeny tiny strip of black and wove it through the openings like you would ribbon, then I cut a second strip in black and added it behind like a shadow.  I love this effect.


I'm a big fan of Glossy Accents, I love the look you get with it.  Often though I forget that you can get a similar effect by using clear embossing powder like I show here.  It dries as soon as the heat gun hits it and if it's not enough you have the option of adding another layer.  I've got to try and remember to do this more often.  The lady is from the sticker sheet.  She was a two-part sticker the frame and the lady.  I backed the lady with a small circle of back and put 3 or 4 cardstock spacers behind her so she sits up nicely above the frame.  You can always use your littles bits of cardstock or chipboard to pop your elements up.  They usually go into the garbage can so it's a real win win.  You're not throwing anything away and you're not spending your crafty dollars on foam squares for height.


I have many more things to share with you but I'm going to stop here and let you join me on the video. I did film this as I was making it so shortly during the week I'll be adding a new playlist of tutorials in case you want to try a Cinch Flip Book yourself.

Thanks for joining me and have a super crafty day!  Patti


The Video Tutorial Playlist
If not all videos are there check back I will be updating as I get them edited!


Please visit Country Craft Creations here -
you can also join the Facebook groups

Visit me at A Soul's Heartbeat on

Saturday, July 28, 2018

This is it! Christmas in July Crop at Country Craft Creations

Country Craft Creations project share

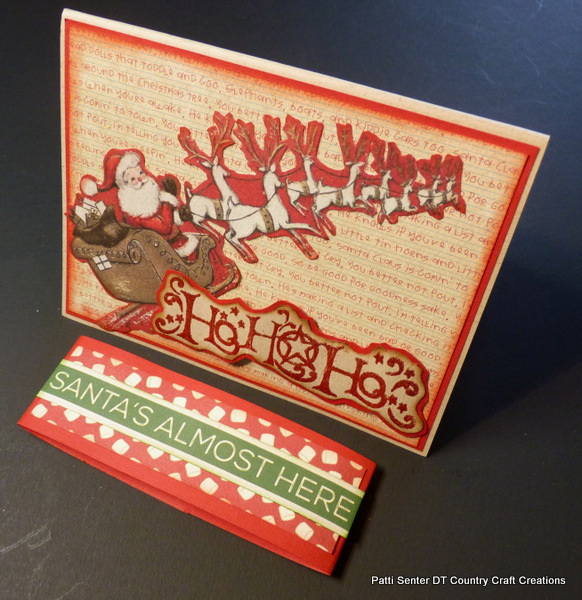
HO HO HO - Merry Christmas!  

This is it my friends.  Well Merry Christmas in July anyway.  Country Craft Creations has been celebrating their Christmas all day crop long, today, July 28th, 2018, on their Facebook Page, Scrapbookers of Country Craft Creations.  I hope you've signed up for the group so you get  to be a part of not only the crop but this fabulous group of designers and members.  Lots of tutorials (all for free), lots of inspiration (all for free) lots of member participation and sharing (yep again all free).  So check out Scrapbookers of Country Craft Creations!  The crop started at 11 am Mountain Time Saturday July 28th and I'm bringing in the tail end.  The best for last huh?  Hahahaha!


I'm sharing a Christmas Gift Card Holder.  
You'll need these basic supplies -

Scor Board, cutter, bone folder, scissors, etc
Glue - I use Art Glitter Glue but you are free to use your favorite
1 card base color of your choice A2 size 5 1/2" x  4 1/4" (when folded)
Decorative Christmas Paper of your choice with elements you can cut out if you so wish
Solid Cardstock to match your collection paper I'm using Artisan Red
Stickles or something to make glittery areas
Embossing ink, powder and gun - optional

Here's the video tutorial, Have fun, be creative and I hope you've enjoyed Christmas in July at Scrapbookers of Country Craft Creations 


Please visit Country Craft Creations here -
you can also join the Facebook groups

Visit me at A Soul's Heartbeat on

Monday, July 23, 2018

Christmas in July Crop at Country Craft Creations

a Country Craft Creations project share

HO HO HO - Merry Christmas!  Well Merry Christmas in July anyway.  Country Craft Creations is celebrating Christmas with an all day crop July 28th, 2018, on their Facebook Page, Scrapbookers of Country Craft Creations.  You want to be a part of not only the crop but this fabulous group of designers and members.  Lots of tutorials (all for free), lots of inspiration (all for free) lots of member participation and sharing (yep again all free).  So check out Scrapbookers of Country Craft Creations today!  The crop will start at 11 am Mountain Standard Time Saturday July 28th but don't wait until then to join!

There's going to be a lot of activity all throughout the day with challenges to keep your scrapping fingers active, and yes I'm participating.  I'll have a video tutorial for one of the challenges, right here on my blog and on YouTube.  Tamra, owner of Country Craft Creations, will announce the time and activities over at the  Scrapbookers of Country Craft Creations Facebook group throughout the day.  So my thought is, you want to be a member NOW so you don't miss out.  

Oh yes, did I forget to tell you????  Their are PRIZES, and PRIZES and oh yes, did I mention PRIZES you can win!!!  Stay tuned more will be posted on this blog post on Saturday!!  But I couldn't leave you without a little sneak peak now could I????

For my project you will need basic supplies
Scor Board, cutter, bone folder, scissors, etc
Glue - I use Art Glitter Glue but you are free to use your favorite
1 card base color of your choice A2 size 5 1/2" x  4 1/4" (when folded)
Decorative Christmas Paper of your choice with elements you can cut out if you so wish
Solid Cardstock to match your collection paper I'm using Artisan Red
Stickles or something to make glittery areas
Embossing ink, powder and gun - optional


Please visit Country Craft Creations here -
you can also join the Facebook groups

 Visit me at A Soul's Heartbeat on

Sunday, July 15, 2018

Side Swing Mini using Authentique's Jingle Collection

a Country Craft Creations Design Team Prochject

It's always fun to create something new and fresh that no one else has done.  Today I'm introducing my new Side Swing Mini.  It's an 8" square mini with the front split into two sections each 4"x8" which swing in opposite directions to open.


I will be uploading a compete tutorial playlist walking you through the construction of the Side Swing Mini along with decorating each of the pages.  This mini incorporates two hinges one on each of the mini sides.  The hinges are 2" wide and house 3 pages.  The pages alternate side to side on top of one another.  


I've added 3 waterfalls to this mini, two are horizontal and one vertical  The horizontal ones will house 3"x4" photos 7 if you only use the one side double if you use both.  All three close with a magnetic strap. The vertical waterfall houses slightly smaller photos and has 4 flaps and the base photo mat.


This mini has lots of pockets holding mini booklets to showcase your photos.  The collection has darling cut aparts and elements to make your pages pop with Christmas happiness.


I used Artisan red cardstock for the base of the book (along with medium weight chipboard for the book construction).  The red is a great compliment to the colors in the collection.  I also used some Artisan Kraft and the green from the older 6" pad of Graphic 45's Patterns and Solids from the Home Sweet Home collection that was gifted to me from my friend Cheryl.


I'm not a good Washi tape user but my friend Paula had gifted me a roll of red glitter Washi tape some time ago and it was perfect to give some sparkle here and there.  I must admit I erred on the side of caution and glued them as well with my trusty Art Glitter Glue (also available in the CCC store).


If you've followed my projects for a while you know I like to see if I can use up the collection.  This time I have to share I even used (a lot) of the Jingle cover sheet which has the small pics of all the papers).  The Jingle above is from the header on that cover sheet, it made a perfect flag pennant for this page along with some mini clothes pins in red and green.  The  horizontal flag with the sentiment is the topper on each of the collections papers.  I use those quite often as well.

I hope you'll join me on the video for a complete walk through of this video. Thanks so much for stopping by my blog today, see you on the video.


The complete series sharing how to make this mini 
from start to finish is on 
the video playlist link below.
(I am in the process of uploading videos daily, please be patient I will get them all there ASAP.)

Video Tutorial Playlist

Please visit Country Craft Creations here -
you can also join the Facebook groups

Visit me at A Soul's Heartbeat on


Saturday, July 7, 2018

Crafty Retreat at Simp Lee Memories

Hello everyone.  I was so fortunate to be able to attend a Design Team Retreat for Country Craft Creations at Simp Lee Memories, Medical Lake, Washington.  This is a Bed and Breakfast type home that caters to crafters like me.  It's owned and operated by Karen Oliphant who just happens to be Ginger Ropp's Sister, hmm perhaps that's why her crafty name is My Sister's Scrapper.


Ginger taught a class using the fabulous Graphic 45 collection Tropical Travelogue.  Oh my goodness do I love everything about this collection.  This was a super special folio she taught because it was designed for us.  Loved it, loved learning from her.  What a fantastic personality this woman has!


On today's video I'll walk you through the whole folio.  It's just gorgeous and it's so fun to learn from someone else, glean information first hand from them on how they do things.  As you all know we each have our own way of crafting but it's always nice to peek inside another's brain and see how they do it.  I thoroughly enjoyed peeking inside Gingers!

Tammy Merrill, owner of Country Craft Creations store made sure each and every one of us had a fabulous time.  I was fortunate to share a room with her and long gab sessions, something I'll treasure forever.  That she left Godiva chocolates on our pillows the first night was certainly not a bad thing either!


We all did a project. the Fan Fold Box, that Tammy had taught on the Authentique Facebook page.  After ours was constructed we blindly exchanged them with one another, I have Rosa Kelly's.  My goodness is that lady a sweetheart!


I enjoyed meeting Karen, Ginger, Angela, Bonnie, Rosa, Cathy, Tiffany, Ann Marie and Kim and of course our fearless leader Tammy.  What a great bunch of crafters to call my friends!

See you on the video --- 


Please visit Country Craft Creations here -
you can also join the Facebook groups

Visit me at A Soul's Heartbeat on


Tuesday, July 3, 2018

My Infatuation with Tattered Angels High Impact Paints

a Canvas Corp Brands CREW project

If you follow me on YouTube, Facebook or here on Blogger you'll know I'm primarily a mini album and cardmaker, once in a while I'll throw in some mixed media.  Today I'm really stepping outside this safety net zone to share a wonderful product I've discovered.  Tattered Angels High Impact Paint.


I have this large metal sun that we got when we first moved to Southern Utah in 2008.  Two years ago when we moved to Southwest Washington I knew this fellow would have to be part of our outdoor decor.  He brought me many happy memories when I'd look at him.  The only problem was as the high heat of the Utah desert and the rainy atmosphere of Southwest Washington had really done a toll on him.  He'd faded and weathered and not in a very pretty way.  

Trying to figure out what I'd use on him to give him new vitality that would stand the elements let me to the Canvas Corp Brands Store.  That's when I discovered Tattered Angels High Impact Paints. OMG I love these paints.  They come in small bottles (don't be fooled or scared when you see how small the bottle is) 1.35 ounces.  I had all these colors to choose from but actually only ended up using the Copper and the Antique Gold primarily, they are both Metallics.  This paint spreads like nothing I've ever used before.  I used 1 1/2 bottles on my sun, which is over 3 1/2 feet across!  It dries beautifully.  You can choose to put in on as a wash by adding more water or use it straight from the jar for more coverage.

I'm only going to give you this teaser photo here but please, pop on over tot the Canvas Corp Blog and read the full blog post with photos.  Take a look at the video below, I didn't do live, yep I was too lazy to haul my laptop, camera and tripod to the back yard.  I instead took lots of photos and will narrate you through what I did.  I hope you'll give these paints a chance when you're looking at revitalizing something around your house.  I can't imagine you won't be thrilled with the outcome.


Follow Canvas Corp Brands StoreBlog and Facebook Collective Group 
(this is a group you must request to join, but boy is it worth it!!!)
Canvas Home Basics at Facebook and Instagram.
7gypsies at Facebook and Instagram.
Tattered Angels on Facebook and Instagram.

Visit me at A Soul’s Heartbeat on BloggerFacebookYouTubePinterest and Instagram.