Monday, March 29, 2010

Celebrate Spring

These little flowers are from the Pocket Full stamp set from Stampin Up. I stamped them on white cardstock, colored them with Copic markers, cut them out and applied Glossy Accents to the center. The round leaf mat behind them is from the Songbird collection, DCWV.

I Love this ribbon from Martha Stewart, it comes already pre-sticky, you just pull the backing off and stick it down. The celebrate spring stamp is from Stampendous - Everything Happy.
Posted by Picasa

Anniversay Wishes - Inspired By ....

 I saw this beautiful card on Amazing Paper Grace blog. I just loved the look of it and wanted to do something similar. I didn't have any of these beautiful lace frames she used so I cut one out on my Cricut that I had downloaded from Monica's Creative Room blog. I wish I had used a different paper, this one was pretty lightweight and didn't give the effect I was hoping but it was still pretty enough once put together to not trash.

The oval chipboard was from a set I had bought eons ago and never used. When I was hunting last night I thought there was no reason why I couldn't repaper it and use it, worked great.
Posted by PicasaThe sentiment is a rub on from My Sentiments Exactly, the floral background paper is K & Company, ribbon is Michaels.

Monday, March 22, 2010

Friends are Like Pockets

Stampin Up stamp set - Pocket of Fun - I went to a Scrapbook Exchange last weekend which was really sad, a very poor turnout, but I did manage to aquire this fun stamp set for next to nothing, so it wasn't a total loss by any means.
Did the froggy eyes a couple of times in Glossy Accents so they would bulge.
Used my Copic markers on the stamps & inked the background with several colors.

 Really like the addition of the brown stitching to tie in with the pocket.

Posted by Picasa

Dragonfly


Created for the card Swap Challenge - Dragonfly at Crafty Card Creators Yahoo Group
Digital kits used - Bannerwoman's My Little Ladybug and Royanna Fritschmann Girly Wuv Bugz
Martha Stewart Trellis Punch
Glossy Accents
Various Paper scraps
Posted by Picasa

Bunny Easter

I have entered this in the following Challenges:
Stamp for Fun Challenge 51 - Easter or Spring
Allsorts Challenge - Spring is in the Air
Our Creative Corner - Think Easter
Everybody Art Challenge - Challenge #83 - Easter 

This little guy was created at a 'playdate' with another card addict.  She had this set of bunny cards and we cut them apart and used him as a template.  The bunny and background are wallpaper.  The stamps are Inkadinkado.
Love her little neck ribbon and bow.
This is some paper cut in circles, scrunched, inked and then split almost to the brad in several spots and recrunched to give the flower look.
The carrot took some thinking, we finally cut some little ovals or orange on the Cricut and punched the top of this Martha Stewart tree punch from green.  By trimming the trunk of the tree and shaping the oval we got it to resemble a carrot.
Posted by Picasa

Wednesday, March 17, 2010

Because Nice Matters

I found this darling image at Homeberries. I used my Copic markers to color her in then cut and embossed it with a Nestie in my Cuttlebug. The bottom mat was cut on my Cricut.
I used the texture embossing folder for the background mat and then inked it with the Tim Holtz blending pad.
Added a little Glossy Accents to her flower and then bling to the middle of it.
A ribbon and bow and then inking finished the card base.
Posted by Picasa

Tulip Border

I got some cards in the mail from and knew I'd never use them so I took the tulips off of one and put it on the border cutting around the shape of the flowers. I added a border on the inside to show behind the tulips and matched it with another on the front.
I used my Cuttlebug and embossed then inked the white on the front of the card.

The scalloped were from different EK Success border punches. A very narrow olive green satin ribbon finished the inside and out.
Posted by Picasa

Wishing You Happy

This is more of the Songbird paper pad from DCWV. I just love the possibilities with this paper!
I was browsing through the March issue of Cards magazine and saw the just because card on page 130 by Michelle Woerner that had these fun flowers so I had to try. I just kept playing, inking and adding until I got to this end result. I added the stems and leaves with a brown fine tip Marvy marker.
The sentiment is My Sentiments Exactly. The inside finishes with the word "Hello"
The birds in this pack are just so adorable, every time I use them I smile. I added a little glossy accents to her beak, legs and tail.
Posted by Picasa

Hi Friend!

This darling little guy is called Harold Duck and he's from Ai Factory (and he's a digital download freebie to boot). I used my Copics to color him.
Added a popped up K and Company flower to the stem in his hand. The paper is DCWV Songbird.

Posted by Picasa

Tuesday, March 9, 2010

Let's Get Together

Vicky at Clip-n-Cuts just posted a weekend video showing how to make this card with a gift enclosed, an actual teabag! I made my card a 5x7 and adjusted the measurements accordingly. Except, I forgot the flap in the back for the teabag would have to be behind the front flap, so I had to redo and readjust for that.
Love this paper, I think (see the word think here, not sure) that it's Kand Company. The sentiment stamp is Inkadinkado. Tea is Tazo :-)
Posted by Picasa

Saturday, March 6, 2010

Peace - Pop Up Card

This card is entered in the following challenges:
Lucy's Cards: Challenge 6 - Inspiration.  - My inspiration for this card was created by Mary Jo, you can view it here.
SCS Friday Free 4 All -


I saw this video at Splitcoast Stampers for a 
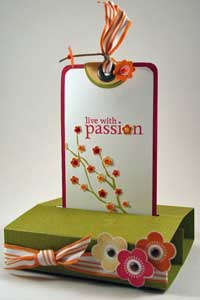
Free Standing Pop Up Card and had to try it. I must admit mine was more freestanding the first couple of times I popped it up, but I kept playing, adding a little ,popping up, popping down, well you get the picture so it's not as straight and sturdy as the one my friend and I made together yesterday, of course it was hers and I was showing her how to do it so she took it home, lol. But this will give you a good idea of what you can do, easily, with this card. The first picture above shows it almost fully closed.
When you pull the tag up by the curled ribbon it begins to 'pop' out of the base and appear.
Fully extracted this is the end result a darling card that has popped out and stands freely. Cool huh?
The chipboard pieces are from Me and My Big Ideas, the beautiful flower shown here is from Petaloo, called Mulberry Street
The chipboard bird is from Maya Road, covered in the same cardstock (which was from Costco) and a bead added for the eye.  This is an extremely fun card to make, very simple, the hardest part is trying to decide which paper to have out, which to have in and how you want to decorate it.
Posted by Picasa