Hi Everyone, have you heard my blog moaning and groaning because I've ignored it for so long! Well today I'm back sharing a fun idea to use up your scraps and create a multitude of cards. I kept seeing YouTubers doing epherma snippets for their journals and thought hmmm, this would be an excellent way to use up some of my scraps but I want to turn mine into cards. I had no idea how much I was going to fall in love with this idea, I hope you do as well.
I started with two strips of 3"x12" paper, a medium weight scrap paper. I glued them together to form a strip a little less than 24". Then the fun began, I just started adding layers and building up. No scissors just tearing and inking the edges. You really don't have to have too heavy of a base weight paper to begin with, just something to glue the scraps to and be able to transfer to your card fronts

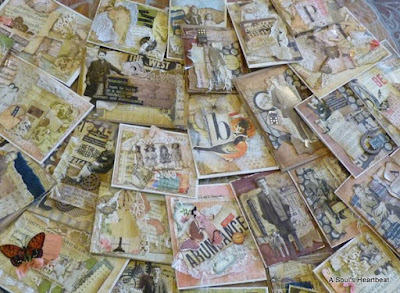
Then I started looking at where I could cut the strips apart to form my card fronts. I did discover it's easier to make a snip on the right side, flip the strip over, and then continue cutting from the back. you get a much straighter cut this way.

I discovered when I started to cut my strips that some sections worked better as a portrait card and some as a horizontal. Also I alternated between sizes fitting card base size to the snippet I was cutting apart. I used A2 (4 1/4"x 5 1/2"), A7 (5"x7") and 6"x7", just because some of my pannels didn't fit the standard size and I wanted them to fit in a regular A7 envelope.

I pulled out all kinds of stuff from my crafty spaces. Pieces of cardstock, epherma, lace, buttons (real and cardboard) and word strips. I did a lot of sorting and organizing so if I wanted a butterfly, a button or a sentiment I quickly could find it and not have to rummage through everything around me.
I also dug out my old music paper, some books and magazines for that age bit here and there. It's amazing how these little snippets of paper and lace can really change up and add to your snippet strip. I guess what I'm saying is nothing is off limits (notice the corrugated cardboard from and old box???)
Don't despair if you have little strips left over, they are perfect for just a little something on the inside (I didn't add any sentiments on the insides of the cards so I could use them however I wanted and not be limited to all birthday, all thank you etc.).
I think I made 5 or 6 of the feminine strips and 2 of the masculine and ended up with 28 fabulous cards. I've created a playlist on YouTube sharing the strips, the process, the cards and photos of all the cards. I hope you'll give this a try and let me know how your Snippet Strips turned out. Remember you don't have to use them for cards they would work fabulously as tags, pockets or tuck ins in any journal you're making.
This video series consists of four videos -
Find A Soul's Heartbeat at


