Friday, December 30, 2016

G-45's Nature's Sketchbook revamping my Mixed Media Book

a Country Craft Creations Design Team Project

When Tammy Merrill, owner of Country Craft Creations, recently sent me Graphic 45's Nature's Sketchbook collection it was like falling into a sea of wonderful color.  Colors that just spoke to me and made me happy, you've had that feeling haven't you?  It's amazing how different color schemes affect our moods.  Well my mood turned instantly happy.

I scoured my craft room to see what just popped off the shelf and screamed, play with me, play with me!  And you know what, it was another Graphic 45 product, the Mixed Media book.  I'd had it on the shelf for several months, had picked it up and put it down just not sure what I was going to do with it but so glad I had it.  I didn't want to alter all the pages in it at this time, it has a selection of Mixed Media Art sheets in Ivory and Kraft and some vellum pages.  I'm leaving those to play with as the mood strikes throughout the coming year.  Tammy has talked about offering this in the store so if you're interested in altering it, as I'm showing today, message her and see if it's going to be available anytime soon.


Because this is a book I plan on using (or if I decide to offer it for sale it will be one that you use often) so I kept the front as close to one level as possible.  How beautiful is this paper!  The book measures just a tad over 8.25" x 8.75" with a 2" spine and two rings, so a great size to work with.  Having a two ring system inside I can take out or add pages as I see fit.


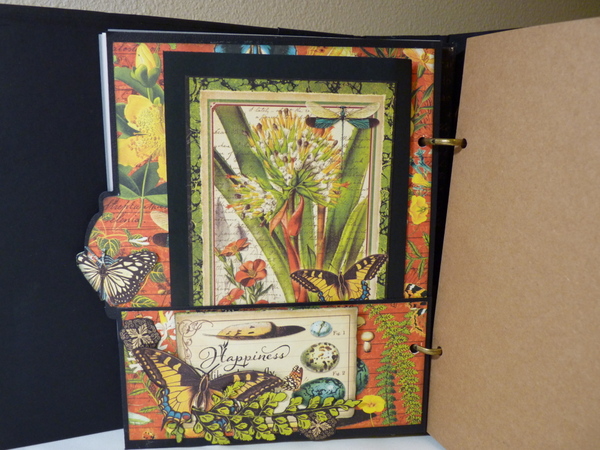
To give the book life and interest I fussy cut the dragonfly from a second sheet of 12x12 paper and enhanced the wings with some glitter and Glossy Accents.  By popping the pieces above the printed ones I achieved a great dimensional look.


There are four pre-made black dividers in the book and I altered each of them with paper, mats and tuck in's.  To give a little added interest I cut around the butterflies on the pocket allowing them to float above the pocket edge.  If you decide to do this you may want to back them with cardstock (I used black like the divider page), this will give strength and also the illusion of them just rising off in flight. I popped a little booklet in the pocket.


On the back of the first divider I used the greens.  The bottom pocket uses stickers.  These are two piece stickers so I mounted the inner one with the sentiment on a couple of layers of cardstock so it will pop slightly above the frame.  The frame work is also fussy cut from the 12x12 I used for the front cover. It's a great border accent to use here or there so don't overlook the littlest things when you're snipping away with your scissors.  I just toss the pieces in a box as I go along and then pull them out and see what looks good where. It's so nice to have pieces cut and ready to use than to have to stop and cut each time you want to add a new element.


Isn't it interesting that when the color scheme changes so does the life of the page.  Don't you just love the shades of blue here?  The butterfly on the right is attached to the divider tab and again floats. I tucked two tags into the bottom pocket using seam binding (from the store) as the pulls.  Again I've tucked a little booklet into the large pocket. By distressing the edges you get a nice rustic look.  I use the Tim Holtz distressing tool but any pair of scissors will do the trick as well.  I also matted the page elements with black which helps them pop against the blue and carries through the scheme of the original book.


Here's the back of the blue divider above.  I used several elements I'd fussy cut from the paper to create the pocket below and slipped in a little sentiment leaving the back available for a photo or journaling. To give you a little perspective the large mat is just shy of  5" x 8", a fantastic size for a large photo. When you use elements like this you don't need to glue completely across the bottom.  Leaving just a little open here and there will allow the mat to peek out between the bits and sit better behind the cluster.


Now we've moved to the soft oranges that compliment the honey bee paper fantastically.  I ran a seam binding ribbon through the top of the slip in allowing extra inside papers to be added at any time. You can see the extra pocket created by adding a word banner across the bottom and of course the page wouldn't be complete without a fussy cut butterfly.


This is one of my favorites.  I think it's the symmetry of the three mats and the seam binding pulls, don't you love that green seam binding.  Tammy does a fantastic job of offering colors to match the papers.  You can extend the size of any tag by matting it and leaving a larger cardstock border, like you see with the black here.  I glued the focal point from the papers to the black cardstock, but allowed an inch extra to trim with my 'angle' Corner Chomper adding the ribbon pull.


The last divider shares a large booklet with a chipboard hinge to hold it in place.  This is easy to do by placing a decorative brad in the hole and allowing the chipboard to swing up or down and in turn holding the little booklet closed. 

When the booklet is open it shares the embossed area that I stamped with the Nature's Sketchbook stamp set 3.  I love this journaling spot and used it in a couple of areas.  I again created the little band across the bottom to hold a mini little booklet.  Tuck ins, tags and mats are so fun and add so much to pages.


This was extremely fun to do, I hope you'll check out the video below.  I won't show the step process for the pages but I will share my thought process for putting together the front and spine.  Supplies linked to the store will be directly below the video as well as links to Country Craft Creations and my other social media sites. Thanks so much everyone for stopping by and sharing your time with me!


Supplies
G 45's Nature's Sketchbook Collection - http://tinyurl.com/jfxj5qj
Art Glitter Glue - http://tinyurl.com/gpnvqew
Artisan Cardstock Black - http://tinyurl.com/zxago6t

Please visit Country Craft Creations here -
Country Craft Creations shoppe - http://countrycraftcreations.com/
you can also join the Facebook group
Scrapbookers of Country Craft Creations here - http://tinyurl.com/zhess6s

Visit me at A Soul's Heartbeat on

Thursday, December 29, 2016

Canvas Corp Brands - Christmas Wreath Easel Cards


Hello everyone I'm here today to share a couple of easel cards I've made for a Crew Blog post over at Canvas Corp Brands.

I just love the effect that the Martha Stewart pine bough punch has for making wreaths, although a bit time consuming the end effect is so pretty.  I taught a Christmas card class and many were newbies, ones that have never created any type of paper craft, and this was one of the cards we made, I'll include some group shots below.


Here's a look at both cards together, would you like to know how to make one yourself?


You'll want to start by punching out a circle with a 2 1/2" circle punch and then punching the middle of that one out with a 1 1/2" punch, this will give you the basis to build your wreath.  Cut 3 or 4 and glue them together for stability.  Next take a 8 1/2 x 11" piece of 110# (or similar weight cardstock). I use Georgia Pacific and get it at Walmart.  You'll want to punch the complete sheet for each wreath. 

I used the lid of a disposable condiment container as a dish (you can buy these at your local supermarket in with the paper plates) adding an ample amount of Aleene's tacky glue.  I like this glue because it gives you plenty of wiggle room to reposition your boughs until you get the look you're going for.  You can also use the top of the bottle as a holder as you position your boughs atop one another. Make sure you only apply glue to one end of each bough and leave the other side free for a dimensional look, otherwise your wreath will look flat when you are done.

Using a small paper punch and glitter paper punch 7-10 small circles for the balls.  You could also use gems or stickles for this.  Set your wreath aside to allow the glue time to dry.  


I used the bulk pre-scored cards and envelopes in Kraft from the store.  I added an additional score line on one side of the card base at 2" (These cards measure 4 x 5 1/2 when closed, a tad shorter than a standard A2 size).  When folded this will create your easel.  In order to have a stopper you'll need something on the inside bottom to stop the card from sliding closed.  I took the Burlap Fringe and laid a strip across the bottom using Beacons Fabri-Tac Glue.  On this card I punched elements from the Farmhouse Christmas Mix and Match pad. To finish the top edge of the burlap I edged it with Hemp rope in red.  This is what I used behind the flat back red pearl on the wreath as well, to change it up I frayed the rope on each end.


Shown above is the card I made using the Grey and Ivory Ribbon Stripe cardstock.  In order to make the easel part you need to cut your front again, the same size as the card front, so in this instance it would be 4 x 5 1/2".  Glue the bottom portion of your decorative mat to the bottom portion of the front of the card base, the area below where you scored. Make sure you don't glue anything to the top portion of the front card base.  Now when you open your card it will stand nicely behind your bottom inside stopper. The 'deck the halls' shown above is from the Famhouse Christmas Mixed Media Pad. You can see from the photo on the left how nicely the stopper holds it in place.


The great thing is when folded flat they slip nicely into an envelope for mailing.  I've used the pre-made Kraft envelopes and card bases available in the Canvas Corp store.  I forgot to mention above that I also misted the card fronts with either the Dazzling Diamonds or Iridescent Gold Glimmer mist, I'm so addicted to this stuff I just love the glisten it gives to the card and wreaths.  I'll link to all my supplies below.

Here's a group shot of everyone making these cards.  Most of these ladies were newbies who'd done little to none crafting, everyone went away with cards and a smile, you couldn't ask for more!


Supplies from the Canvas Corp Store


Farmhouse Christmas mix and match pad
Jolly Christmas mix and match pad
Ribbon Stripe cardstock
Hemp Cording in Red
Glimmer Mist in Dazzling Diamonds and Iridescent Gold
Kraft Bulk Envelopes A-2 size

Follow Canvas Corp Brands here 
Store - https://shop.canvascorpbrands.com/
Blog - http://blog.canvascorpbrands.com/
Facebook Collective Group - https://www.facebook.com/groups/1124592877561970/
(this is a group you must request to join, but boy is it worth it!!!)

Tattered Angels at
Facebook https://www.facebook.com/mytatteredangels?_rdr=p
and Instagram https://www.instagram.com/tatteredangels/

Canvas Home Basics at
Facebook https://www.facebook.com/CanvasCorp/
and Instagram https://www.instagram.com/canvascorp/

7Gypsies at
Facebook https://www.facebook.com/7gypsies?_rdr=p
and Instagram https://www.facebook.com/7gypsies?_rdr=p

Visit me at A Soul's Heartbeat on
Blogger -  http://asoulsheartbeat.blogspot.com/
Facebook -  http://tinyurl.com/zbph36l
YouTube - https://www.youtube.com/user/nwlady1949
Pinterest - https://www.pinterest.com/northwestlady/
Instagram - https://www.instagram.com/nwlady/


Friday, November 25, 2016

A Baker's Dozen created with Cafe Parisian Scraps!

a Country Crafts Creations design team project

What to do, what to do. Is that your mantra after creating a project and looking at all those usable scraps of paper all over your crafty spaces?  Well do I have a solution for you.  After creating my Cafe Parisian Mini Album I kept looking at all these bits and bobs of paper and decided it was time to make a few cards with the scraps.  Well a few turned into a Baker's Dozen, thirteen to be exact!  But that's not all, after the cards were done I still had a little of this and a little of that so I decided to take plain white envelopes and decorate the flaps and fronts.  Let's have a look at what all those left overs turned into.


You know once you put all the leftovers away seldom do you take them all out again and start fresh, It's much easier, when everythings all over your crafty space to cut, tear, paste and create right then and there. That's what I decided after I finished my mini.  Well actually I thought why not make a few cards and then it just grew and grew to the point I wanted to see how much I could actually squeeze out of what was left.  When you check out my video you'll see what was left over, not much a couple of sheets of 6x6" paper and a few chipboard pieces.\

 
Because there are thirteen cards I'm not going to share multiple photos of all of them, just this first one to give you an idea of what I've done.


The following cards will show only the fronts and envelopes but you can see more view and the insides of all of the cards on the video below.


\


 I hope you've enjoyed this little glimpse at my pieced together cards.  As you watch the video you'll see lots more views of each card and envelopes.  Thanks so much for stopping by.  Comments are most welcome.  You'll find links to Country Craft Creations and the supplies I've used directly below the video.


Please visit Country Craft Creations here -
Country Craft Creations shoppe - http://countrycraftcreations.com/
you can also join the Facebook group
Scrapbookers of Country Craft Creations here - http://tinyurl.com/zhess6s

Visit me at A Soul's Heartbeat on

Supplies from Country Craft Creations
Graphic 45 Cafe Parisian - http://tinyurl.com/jpkxdxe
8x8 pad,  6x6 pad, Journaling Chipboards, Decorative Chipboards, Ephemera Cards
Art Glitter Glue/Scor Tape 1/8" -  http://tinyurl.com/ojasb9m
Bo Bunny Pearlescents -  http://tinyurl.com/osb94vg
Hug Snug Seam Binding - http://tinyurl.com/zz3xbho
Flat Crochet Heart Lace - http://tinyurl.com/h3olh36
Artisan Cardstock - http://tinyurl.com/jx6abhs


Tuesday, November 15, 2016

Cafe Parisian Mini Album

a Country Crafts Creations Design Team Project


Today I'd like to share my November project for Country Craft Creations.  I've used Graphic 45's Cafe Parisian in a 5 page 8 1/2" square mini album.  The front, shown above, was created using two identical sheets of the 8x8 paper pad. I trimmed elements from the top sheet, took the bottom sheet and glued a sheet of Heartfelt Creations acetate paper (clear plastic) over the top.  The fussy cut sheet was then positioned and elevated using 3M foam tape to give the illusion of the girls at a table behind the glass and the server in front. I love how it turned out. You can see all the dimension you get from this side photo when you use the three layers this way.


On the inside front cover and the first page I combine the White Flat Heart Lace and the peach dyed Seam binding from the store weaving the one through the other.  I also added chipboard elements to create stoppers for interest.  The pocket on the right has gussets along the edge to allow for plenty of loose photos besides those placed on the mats.  All the chipboard pieces were sprayed with Tattered Angels Glimmer Mist in Iridescent Gold.  I tried to pick this up on the video but it's extremely hard to show.  In real life you get a wonderful glisten to all these elements.  Notice the stem of the cherry on the inside cover, It's made with a piece of jewelry wire.


The next two pages incorporate the striped paper. I used a circle punch to cut the tabs from the paper and added them as the pulls for the mats. The ribbon tied buttons create the tab.  I've clusterd lots of elements from the paper and Chipboard pieces to create my stoppers and pockets throughout the book.  The photo to the right shows the top right page opened to reveal a journaling mat and the photo mats.


Here's the next page.  The pocket ribbon is created by gluing a scrap strip of paper to the middle of the seam binding and then gluing both ends to the page, tucking the tails to the back for a finished look.  This is a fabulous effect for your books.  By added the paper strip you strengthen the seam binding to create a nice pocket or element for your page.  I added a simple bow around the lower end to finish the look and tucked a couple of photo mats behind.


On the corresponding page I snipped the hinge in half in the middle and removed about 1/4".  This allowed me to make two small flip pages for the top and bottom in place of one full page.  I used the Martha Stewart decorative edge and corner Deco Fan punches to accent the ends.  Both have tags tied with seam binding and mats.


The next page is secured with a magnet under the bow element on the lower right.  When opened you have the top, middle and bottom for large photos or journaling.  I used an Ephemera card for the pock above the punched decorative bottom and simply folded two more Ephemera cards to create mini tuck ins.  You can see peeking out the right side is a decorative mat, I left the end open to provide a pocket.  You have the option to do this on any of the sides or tops by not gluing all around when securing the pages to the book.


Here on the left I added another Ephemera card for the pocket and a belly band to the right to hold lots of mats and photos. The flowers on the bottom left were cut a second time and popped with foam tape in the middle to give dimension to the page. The large chipboard piece on the right was left free but could be glued at the bottom if items begin to fall out of the book.  The belly band is finished out with a chipboard file tab on the top left, again, all these chipboard elements were sprayed with Glimmer Mist to give a real glisten to the page.  


Here's the last page on the left with a pocket created from the chipboard and fussy cut pieces from the 8x8 pad. I might mention that everything in the book was inked with Tim Holtz Distress ink in Rusty Hinge.


This is the back inside cover.  It houses a large envelope with a bifold booklet inside and a chipboard stopper on the bottom right to fit tuck ins behind.  I finished it up with the lace and inserted seam binding to match the front of the book.


I hope you've enjoyed this visual walk through of my mini.  Please join me on the video below for a much more indepth look with other snippets of how and why I did what.  Also I will include many more still photos.  Supplies from Country Craft Creations will be directly below the store links under the video.

Thank you for sharing your time with me!  Patti


Please visit Country Craft Creations here -
Country Craft Creations shoppe - http://countrycraftcreations.com/
you can also join the Facebook group
Scrapbookers of Country Craft Creations here - http://tinyurl.com/zhess6s

Visit me at A Soul's Heartbeat on

Supplies from Country Craft Creations
Graphic 45 Cafe Parisian - http://tinyurl.com/jpkxdxe
8x8 pad,  6x6 pad, Journaling Chipboards, Decorative Chipboards, Ephemera Cards
Art Glitter Glue/Scor Tape 1/8" -  http://tinyurl.com/ojasb9m
Bo Bunny Pearlescents -  http://tinyurl.com/osb94vg
Hug Snug Seam Binding - http://tinyurl.com/zz3xbho
Flat Crochet Heart Lace - http://tinyurl.com/h3olh36
Artisan Cardstock - http://tinyurl.com/jx6abhs
Basic Grey Magnets - http://tinyurl.com/pzdm6of

Supplies from my stash -
Cream cardstock, Tattered Angels Iridescent Gold Glimer MIst, Rose Gold High Impact Paint, Glimmer Glam Roses are Red, Stickles Christmas Red, Brads, Punches - 2 1/2" round, 1" round, Martha Steward Deco Fan Edge and Corner, Tim Holtz Distress Ink in Rusty Hinge, 3M Foam Tape,  Flat Lace, Heartfelt Creations Acetate sheet