a guest design team project for Crafty City
Today I'm sharing a new album made from Lemon Craft's collection Sweet Secrets. Archana Joshi owner of Crafty City was kind enough to send me this collection to play with as a Guest Design Team project for her store. A Video link to the complete walk through is at the bottom of this blog post. Archana is offering all my viewers a 10% discount through the end of October with the code PattiDT10, be sure and check out the Crafty City Store for some wonderful products (discount does not include kits)
This Mini is FOR SALE
USA only, payment via PayPal
Please email me if you are interested nwlady2@gmail.com
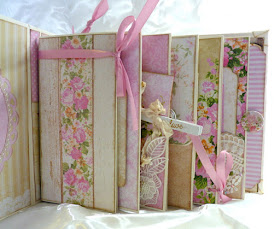
I am calling this original design a Graduated page mini which is easy to see why. The base of the mini is 8"x10" with a 4" spine. Constructed of medium weight chipboard and covered in a cream cardstock. Each page of the mini graduates in width by 1" starting with the first page being 4" and the last being 9" for a total of 6 page sections.
Inside the front cover I've included a huge circle photo mat to complement any photo you'd like to showcase. I am including a circle template that fits perfectly inside the pearl trimmed frame so whomever purchases this will have no problems filling it.
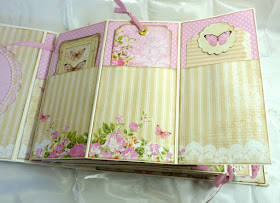
All the pages measure 7 1/2" high. The first section, as I said, measures 4" wide when tied and closed. Open to the right, as shown above, it expands into 3 sections each housing a tucked in spot for photos or journaling or those little treasures you'd like to keep.
When opened to the left the sections expand to include a fourth. Lots of space for a variety of photos, journaling and whatever you'd like to preserve on them.
The next section expands to 5" and has a beautiful side lace pocket with a nice folded tuck in inside. The lace has been mounted onto clear acetate to create stability and strength to the pocket.
 The next group of pages expands to 6" in width and showcases a beautiful lace pocket filled with tuck in mats. I found this fantastic beige mesh butterfly in my stash that had just been waiting to adorn this page. It's so fun to use things you've looked at many times and now find they fit perfectly. To secure the surprise hidden inside this page I used a LOVE white clothespin with a cream Seam Binding bow on one side and a button adornment from the collection on the opposite side. The clothes pin neatly holds the mats on both sides in place.
When you remove the decorative LOVE clothespin from these pages they pop open to share side by side Belly Bands complete with fussy cut sprays of flowers. The flowers are free in the middle so the tuck in can slide behind. Folded, large, photo mats store neatly on each side behind each belly band.
Increasing another inch to 7" the next page has a gorgeous flower and paper element anchoring the top flap and acting as a stopper. Released it pops up, down and out to reveal numerous large areas for photos.
The backside is a simple, but lovely, pocket housing three mats.
Moving to the 8" wide page shares a plain page with just the lovely print of the collection showing except for a tied ribbon bow at the bottom which promises something fantastic when opened.
Within these two pages are 3 sets of waterfalls each allowing for different sized photos. Because it's secured with the tied ribbon closure it allows the waterfalls to grow in size to accommodate all the photos. So much is here in such a small area, I love it! There are lots of surprises under the waterfalls as well but I'll let you discover them when you watch the video.
Probably my favorite duo of pages are these with the lace scallop pockets across the bottom. I would be remiss if I did not thank Cheryl Wells for the lovely laces within the pages of this mini and Manuela Ott (Bunny Bow) for the bags, sacs and envelopes tucked here and there throughout. I am blessed to have such generous crafters share their things with me.
Inside the back cover is a humongous envelope filled with all sorts of goodies for the purchaser of this mini to help decorate the pages to their liking. Some ribbons, and paper elements, butterflies and clothespins, some tab pulls and oh yes photo templates to take the guesswork of what to put where.
Please join me on the video to see the full walk through front to back of the mini. I do not have a tutorial for this but I do have a playlist of many How Do I Do That videos that will walk you through basic mini album construction.
Please visit Crafty City here -
Visit me at A Soul's Heartbeat on


