Pages

Thursday, June 21, 2018

Using the Scraps - Authentique's Meadow - Note List Holders

a Country Craft Creations Design Team Project


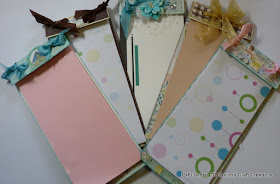
Today I have a fast and simple, use up your scraps, idea.  I'm using the remains of the Authentique Meadow collection.  I am always looking for note pads to write stuff on, I know it's the dawn of the techno age, cell phones, instant messages and all writing digital.  Well I like to pull out my trusty pen and paper and jot stuff down.  Thus was born today's project, using the scraps to make these nifty list pads.  You'll find it's a great way to use up the remains after the main projects been made.  And, as a bonus, you'll have some neat tuck in gifts just waiting for the right moment and the right person.


I had several 4" x 12" scraps of the Artisan cardstock after I'd finished my mini and they are the perfect size for a stack of paper.  My niece had gifted me with some old, decorative paper, copy paper weight, which I'd been wanting to find a home for.  A perfect marriage, the scraps and the paper!


I'm going to share one step by step process on the video, complete with a goober and a makeover.  The best kind of video in my estimate.  That way you get to see not all things turn our perfect, and often the mistakes lead to the best outcomes.  Which was the case this time.


To make these cute note/list pads you're going to need some heavier weight cardstock, like the Artisan, some light weight chipboard, even one or two layers of a cereal box might do the trick, and scraps (paper, ribbon, bling all kinds of scraps, dig them out and use them up!)


If you're one of my followers/viewers you've seen me paper piece mats before, and that's exactly what I did here, using up all those bits and pieces of paper.


The insides were also decorated, here I wrapped the outer jacket with two pieces of 6x6" paper that I pieced together.  I took an older EK Success border punch, Scalloped Scallop, and ran it down both sides, inked the edges and tucked the excess 1" to the inside on both sides.  It really gives a nice finish.  A few stickers from the sticker sheet and this ones done.


This is the one we'll be making on the video, so come on over and watch and see if you'd like to use up some of your scraps this way!


Please visit Country Craft Creations here -
you can also join the Facebook groups

Visit me at A Soul's Heartbeat on


Sunday, June 10, 2018

Authentique's Meadow Collection into a 9 page Mini Album

a Country Craft Creations Design Team Project

Hello everyone today I'm sharing a nine page mini I've made with Authentique's Meadow collection. This is a fun whimsical collection with soft spring colors.  To me it's reminiscent of fairy tales of my youth.  Come along as I take you though some of the pages.


This mini is housed inside an 8"x 6 1/4" outer cover with a 3" spine.  I choose to use 1/4" gussets between my pages so I'd be able to accomodate all nine pages and 5 top inserts.  Because the book has so many pages bulky elements must be kept to a minimum so there's lots of room remaiing for all the photos that will be tucked away inside


Every other page has a top insert that measures 4 1/2" x 12". With this mini I was trying to not cut the 12" pages and utilize the whole sheets.  The pages are 7 1/2" x 12" so the left over strips became the top inserts.  You'll need one 12"x12" sheet for each page in your mini.  I used Artisan Cream Cardstock, a favorite go to of mine.


The pages alternate from the top pocket insert to a side flip out, extending the pages to a trio across.  There are 5 insert pages and 4 trio pages.


I did a lot of fussy cutting, which you know I love, of all the little characters in the paper collection.  These two friends are mounted on brown Artisan cardstock with a magnet inclosed.  There's a matching magnet under  the paper so they just pop on top after you've mounted your photo.  If you decided you didn't like them on this page they could easily be glued else where in the mini.


On this page again I fussy cut the little girl with her goose, added a piece of acetate behind her.  I tinted the acetate with Tattered Angels Stained Glass in this blue, just to give her a little shadow behind her and allow for a photo to slide neatly behind.  On the opposite page I've taken one of the darling saying from the collection and created a large, side to side, belly band for the tucked in photo mat behind.


The biggest obstacle for me is not embellishing, it's so hard not to add lots of stuff to the pages but this time I wanted lots of room for large 5"x7" photos.  You can see here the main pages are free for the photo and the background will then become a fantastic mat to frame the picture.  The tuck in insert has a sweet pocket across the bottom with several tiny tags made from pieces of the collection.


If you've watched my videos or read my blog posts before you know I like to use as much as I can from a collection.  This time I even used the cover sheet, shown as the mat on the left.  It was such great snippets of the paper line I just couldn't see wasting it.  I did supplement papers from the Spectrum line to stretch the decorative collection a little further.  That's what the polka dot is on the right above.


The back and front inside covers both house a nice large pocket for tuck ins.  I included a tied ribbon booklet in the front pocket and a tri-fold magnetized book in the back pocket.

There's so much more to show you, I hope you'll join me on the video to see it all.  I will have a quick process video coming to share how and why I constructed different parts of the book the way I did so you can create one for yourself if you'd like.

Thanks for sharing your time with me, see you on the video.


For hints, tips and tricks to making my mini
please check out my How To Video


Please visit Country Craft Creations here -
you can also join the Facebook groups

Visit me at A Soul's Heartbeat on