Pages

Monday, June 19, 2017

Using Blue Fern Embossing Powders

A Country Craft Creations Design Team Share

I've had numerous crafty viewers comment they haven't used embossing powder!  WHAT's that you say????  Unbelievable.  So I thought it was time to do a simple here's how I do it blog post and video to entice you to try your hand..  Disclaimer ---- it's highly addictive and you'll want to do it again and again!


I did use portions of the May and June Craftology boxes, a few tags, stickers some paper and card bases with envelopes.


You don't need a lot to get started.  I'm using 3 different Blue Fern Embossing Powders in my samples today.  Peacock, Black Sand and Antique Gold.  I use an embossing buddy, that's the little pillow that provides an anti static surface once you run it over your paper. Versamark is my pad of choice, it's the clear, sticky ink that adheres the powder to the page.  I also keep an embossing pen, again by Versamark, in my stash and I'll share on video how and why I used it.


This example uses the Black Sand embossing powder with the Joy Crafts Floral Lady stamp. This powder is a mixture of textures with glittery bits and just like the name says bits that resemble sand before they are heat embossed. When you watch the video you'll also see how I created the background for her as well as embossing her on cavas as well.


The Peacock powder is grittier and has a super sheen to it.  I used an Anna Griffin embossing folder with the center sentiment omitted for the mat.  Todays video really is the place to be because not only do I emboss each color for you we make them together on screen into the cards.  Lots of information so you'll want to make sure you watch.


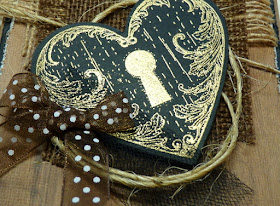
This is probably my favorite.  I used a Heartfelt Creations stamp for the heart on black cardstock and embossed it with the Blue Fern Antique Gold powder.  Gorgeous how it turns out, this was a perfect stamp to get all those wispy details surrounding the heart.

Thanks for stopping by, I'll leave links to the Country Craft Creations store where you can find the Blue Fern product as well as check out the craftology boxes.  I hope you'll follow the link below and watch the video as well.


From the Store

Please visit Country Craft Creations here -
you can also join the Facebook group
Scrapbookers of Country Craft Creations here - http://tinyurl.com/zhess6s
Or Coffee Talk page here - http://tinyurl.com/y8byhnel

Visit me at A Soul's Heartbeat on

Tuesday, June 13, 2017

Playing with the Scraps from Midnight Masquerade


What to do, what to do, when you have leftovers.  My biggest suggestion, hint, observation is never ever nicely store them away!! Why??? Because I've found my nicely stored scraps most times stay that way, nicely stored away never to be popped out to play with again.  Now of course this isn't always the case.  BUT!, if you keep the scraps on your worksurface after your main project is done and just keep playing you'll end up, often times, with scads of projects and often a dozen or more cards.  


Here's my first set of leftovers.  My niece called one day from Crafter's Warehouse, a local store here in the SW Washington area.  She said Aunty they have this set of 5 Kraft things for around $4 do you want one?  Nope, get me two.  And now I'm kicking myself because the 3rd set had some broken snaps and I told her no don't get that one, duh, what was I thinking?    It's so rewarding to find a 'super buy' and watch it transform with paper, paint and embellishments into a gift or card you'd be proud to share with anyone.  That's how I feel about these three items.  Of course it never hurts to begin the process with a gorgeous paper collection like this one from Graphic 45 called Midnight Masquerade.


This set consisted of the three items here plus a large box (perfect for housing stamps, dies or embossing folders, watch for it a little later since I'm not sure how I'm altering them - I have 2) and a magazine holder which I always use to hold my 8 1/2 x 11" paper.  I used Tim Holtz Distress Paint in Wilted Violet to paint everything before adding the papers and pretties.  I did remove the front and back covers, painted all the edges, covered them with my main paper and then gently replaced them in the binding.  Worked great.


Tammy Merrill shared this lovely collection with me so that I could play.  She also had sent a gorgeous set of Petaloo flowers called teal Dahlias.  Whenever I start with my leftovers I start searching my crafty spaces (of which there are many) for things that have the same color tones or things that I think would enhance what I'm playing with.  I found another set of Petaloo flowers that were perfect to accompany the teal ones Tammy sent.  These had hints of purple along with teal excellent for my cluster on the front of the notebook.


Also in the set of flowers was this one, well you tell me was this not the perfect headdress for this dancer?  It complemented her outfit perfectly.  Since I had two sheets of this paper I fussy cut this lady from the second paper popped her several times on light weight chipboard (fussy cutting each time) and then I inked the edges with a black marker.  I find this helps the chipboard piece pop, almost like it has a heavy shadow around.


The second item was this little 4 1/2" square box. These items were all covered in Kraft which is easy to alter and my Wilted Violet paint did the trick perfectly.  I covered the box with paper then added two pieces of black lace and then added the cut apart on top.  The cut apart has a purple mat and black chipboard to pop it up above the lace.  I used 3D Crystal Lacquer for the lady and gent on the top of the cut apart.  I also fussy cut another flower to pop above the main sheet. Adding these simple elements gives the finished project a lot more dimension.


Here's a peek inside the box.  The notesheets were included I simply tied a piece of colored seam binding into a bow around them.  Country Craft Creations has almost any color of seam binding you could possibly want in the store.  The lid has been lined with a purple paper from the collection, you can see there how perfectly the Wilted Violet paint matches it.

Using one of the chipboard pieces from the Decorative Chipboard package along with two embossed Embossabilty embellishments finished the inside of the lid.

I found, for myself, it was easier to put a glop of paint on my craft mat and spritz it with a little water applying it to the Kraft items with a brush.


The final item was this little pop up box.  It came flat and the inside bottom popped down to create the box.  I covered inside and out with papers from the collection and also again used the Wilted Violet to paint the exposed Kraft edges. This box is 4" tall and each side measures about 3".  A great size to hold pens or pencils, fill with candy, add a small vase of flowers. 


I always try to check out the close out bins and areas at the stores I'm shopping at.  Even the local grocery stores have promotional, seasonal, items that close out at large discounts.  It doesn't matter if it's red, white and blue for the 4th of July or red and green for Christmas, once you grab your paints, mists or whatever you can change it up to whatever you want.  So look beyond what you see to what it might be.  Have fun everyone and enjoy your crafting time,


Please visit Country Craft Creations here -
you can also join the Facebook group
Scrapbookers of Country Craft Creations here - http://tinyurl.com/zhess6s
Or Coffee Talk page here - http://tinyurl.com/y8byhnel

Visit me at A Soul's Heartbeat on


Sunday, June 11, 2017

Using Bo Bunny Stencils and Glitter Paste

Bo Bunny repositionable, stickable stencils are made flexible to adhere to almost any surface including paper, wood, glass, plastic anything you can stick the stencil to can be used.  Combine that with their wonderful array of Glitter Paste and you've got a combination sure to knock your creative socks off.  


I'm using a few of the 12x12 stencils along with the Grape and Turquoise Glitter Paste. The 12x12 sheets are a combination of multiple sticky back stencils on one sheet, perfect for lots of creative inspiration.  These are available at Country Craft Creations store along with numerous other varieties of stencils and pastes.


Today's video (clickable below this post) is much more about the process, the how to and results than it is about the finished cards I made.  But it's always nice to see what we play with made into something useable so each example I share making on the video will have an accompanying finished card at the end to inspire your creative processes. The biggest secrets I can give you is less is more!  You'll find it takes a small amount of Glitter Paste to make a big wow statement.  So start with a little and add more as you need it. Secondly, make sure, especially when using the Bo Bunny Glitter paste, clean your stencils right away and not let the glitter dry on the stencil. Often times Baby Wipes will be enough to remove the glitter but be prepared to stop the process and thouroughly wash the stencil to remvove all the bits of glitter.  You certainly don't want to pick it up later to use with something yellow and find you still have traces of grape glitter around.


To me the most enjoyable part of this process is the reveal, when you peel back the stencil to see what you've created.  It's always an oh wow feeling.  With this particular example I used some of the Bo Bunny Grape Glitter Paste with TCW's Light & Fluffy Modeling paste, this creates a softer more muted look.  My personal preference is full out glitter paste for the deep glittery effect.


With this design I chose to cut it up to use for not only the outside but to tie it to the inside of the card as well. 


You certainly aren't limited to using the stencils with just the paste, although this effect is super you may want to use mists or paints or any other medium you have in your stash to achieve an entirely different look.  Let's look at one more example here and then I'll save the rest for the video.  I think this turned out to be one of the most interesting.  I used  the chicken wire stencil with some Tattered Angels Plain Jane mist in a yellow.  It has a little bit of glitter in it so when it dries that shines through.


At the beginning, as you'll see in the photo the result is quite deep. 
 

As the mist dried it became a light shadow of chicken wire on the Kraft cardstock.  So keep in mind your results are going to differ depending on what medium your using with the stencil and what surface you're applying it to.

These are great products, I'm really in love with the glitter paste, it gives an amazing look to whatever you apply it to and the fact that once dried no glitter comes off is fabulous.  The repositionable, sticky stencils also have a great place in your crafty arsenal, I'm sure you'll think of lots of places you could use them, (think picture frames, mason jars, mirrors, windows etc etc etc).

Come join me on the video, that's what's really going to convince you this is fun stuff to play with. Thanks to Tammy Merrill for supplying me with these lovely glitter pastes to play with.


Please visit Country Craft Creations here -
you can also join the Facebook group
Scrapbookers of Country Craft Creations here - http://tinyurl.com/zhess6s
Or Coffee Talk page here - http://tinyurl.com/y8byhnel

Visit me at A Soul's Heartbeat on


Monday, June 5, 2017

Double Mini in a Box

a Country Crafts Creations design team project

Hi everyone, I'm sharing with you a project using Tammy Merrills 8x8 mini in a box tutorial that she shared on her Group Page Coffee Talk. If you haven't yet discovered Coffee Talk, Scrapbookers of Country Craft Creations or the Country Craft Creations store you're really missing out on some amazing tutorials and projects made just for you to try out yourself along with an array of wonderful products to create with.  I'll link all these fabulous places at the bottom of this post so be sure and check them all out.


My mini is created using the Graphic 45's Midnight Masquerade collection.  Oh my goodness what gorgeous color combinations you have to work with in these papers. I made my own mask to decorate the front along with feathers and baubles.  


My mini is actually a double since I added a second to the underside of the lid. On the video I'll share each page, how they flip and fold and all the tuck ins included.


The right side is a regular mini, with a spine with hinges and swinging pages which include a large side pocket and pull tab. I used some clear acetate for the pocket on the first page with a lovely fussy cut lady from the collection as decoration.


Here is a double page spread featuring belly bands and accent pieces for journaling, a photo or to leave as is.  Slipped underneath are two mats of different sizes.  There's amble room to leave more photos tucked in as well


These two pages each share a large cut apart on the swinging flip and an extra mat tucked under the edge.  Magnets hold the flips securely in place.


Probably my favorite of the pages are these two.  Each side boasts three flip ups which will hold photos just shy of 4x6".  They tuck nicely under the chipboard accents to keep everything neat and tidy and the book is looked at.  Fussy cut elements adorn each flip up.


The last pages share cream colored Artisan Paper embossed with Swiss Dot.  On the left I've fussy cut a large image and backed it with the embossed paper to form a extra large pocket.  On the right there's a side flip with a open tuck in area at the top. This finished up the mini on the right.  But wait, there's more, there's another mini on the other side (the underside of the top of the lid).


This side simply utilizes the waterfall technique where each right/left flip out has an extra 1/2 inch flange that's scored and glued to allow the swing outs.  Each flip is graduated in width so they tuck nicely one side into the other.  The heights remain constant. This whole mini is secured with numerous magnets at the beginning to keep it nice and snug when closed.  The pocket houses a couple of tags with a huge area underneath to attach a photo.  Don't you love that beautiful teal border?  That's achieved with one of the Bo Bunny flexible stencils and the Bo Bunny Glitter Paste in Turquoise.


Flipping that first page open to the left you have a huge area to cover with a photo or collage.  The middle section is a pocket  with an open area and large mat tucked under.


Here you can see both the left and right flip out.  I also heat embossed one of the stamps from the collection onto the center panel using Blue Fern's Turquoise embossing powder, the perfect color to complement this collection.  You have to keep in mind while making a mini in a box that it's tight quarters and allow for the bulk the photos are going to add to the finished project.  That's why you'll notice I have very few bulky elements.  Stamps etc are a great balance to give extra detail with out extra bulk.  Not adding flowers, bling and chunky pieces is hard for me.


When you flip the center section with the solid orange to the left you get this next set of pages.  Pockets both diagonal and horizontal.


Flip the right and you get the center panel, with pocket and the mirrored right side to the left flip out.  

Flip to the left again and you get the high orange pocket and the center section that's secured with a swinging chipboard piece, swivel it to reveal the top spot ready to house your photos.


Continuing the alternating flips when you flip the one on the right you have the end of this side.  Two orange high pockets on the outer flaps and a small corner pocket and tag in the middle.


So that's it my friends, a huge area for photos left and right all tucked together nicely in a box.  Love this tutorial from Tammy, it's so versatile and can be used with endless possibilities.  Don't forget the video to follow, it will give you such a greater perspective than the still photos.  Thanks for joining me. Be sure to stop by and join and like both the Group Scrapbookers of Country Craft Creations and the Page Coffee Talk on Facebook, you'll be so glad you did!!


Supplies
Artisian Cardstock in Navy and Natural Linem
Bo Bunny Glitter Paste in Turquoise and Grape
Black Lace
from my Stash
Laces
Glossy Accents
Chipboard
Feathers
Assorted Punches
Bling
Scrap Cardstock
Swiss Dot Embossing Folder


you can also join the Facebook group
Scrapbookers of Country Craft Creations here - http://tinyurl.com/zhess6s
or the Coffee Talk page here - http://tinyurl.com/y8byhnel

Visit me at A Soul's Heartbeat on