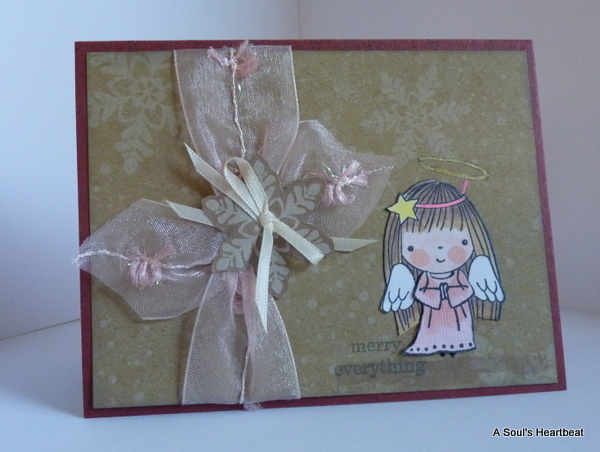
Another stamp from Mimi's Christmas by Penny Black. I am in love with this stamp set, oh wait did I say that a couple of post back, sorry it's worth repeating! The stamps just stamp so nice I know I'm adding more of these to my collection! I stamped the little angel directly onto the mat (papers from Recollections Warm Hearts)
Then I restamped her again on white, heavy cardstock, and on the pink which is a natural fibre paper (I got it years ago at Costco) but the paper is very fiberous, like real handmade paper. I accented the one I stamped on the paint with just a little deeper pink with my Copics. I colored the one stamped on white and cut her out minus the halo and feet and then paper pieced them all together.
I painted her little halo and shoes directly onto the mat. Sentiment is also from this collection.
Inside sentiment is Stampin Up
The ribbon was a super buy at a local craft store when they were selling all their spring/summer things out. 90% off!!!! The ribbon is wire edged so easy to manipulate where you want.
Here's a photo video of the cards I've made so far this year. If you're on my mailing list and don't want to see yours you better not watch, lol. I'm not done but at least I have a good start. The best of it all is I've been having fun making them, and that my friends, is what it's really all about!
For each of my four youngest grandchildren I made a Kaisercraft Beyond the Page Advent Calendar. I absolutely loved making these, Kaisercraft sends you everything you'll need to assemble the box and drawers. There are 24 drawers, one for each day leading up to Christmas and then I tucked a special envelope with 25 on it in the middle. They'll get to open one drawer each day to discover a candy, gift or money. I'm anxious to hear their feelings about having a gift from Grandma each day of December.
You can follow along and watch how I assembled and covered the little drawers in the first video
And see the finished boxes in the second video
I printed out directions for opening the little drawers onto Kraft Cardstock and attached it to a full 12x12 decorative paper from the Warm Wishes or Snowy Days collections from Recollections.
I covered each page in clear contact paper, added
ATG glue to the back and attached them to the tops of the storage boxes.
Each Advent Calendar fix just perfectly in these Art Bin boxes from JoAnns
And having a handle to pick them up by is the perfect touch for storing until the next year.
Each middle of the calendar was filled with a background paper scene
some ornaments from JoAnns and Michales, little chipboard pieces
from K & Company
Each one is different depending on the Grandchild
I was making it for.
In the middle is a special envelope for Christmas Day
I had so much fun making cards with the leftovers of a paper pak I bought last year
It's Recollections Snowy Days from Michaels.
The cardbase is from their collection this year called Warm Wishes
The sentiment is from K&Company
Border Punch is from EK Success
Edges all inked with Vintage Photo Distress Ink
Heart is covered with Glossy Accents
and Diamond Stickles were applied to the snowflakes on his hat
This stamp was in a rubber grab bag from My Sentiments Exactly
after I'd stamped it I realized I'd used the clear embossing on it
and it wouldn't show up so I lightly used Very Vanilla Craft ink from Stampin Up
to bring out the embossing, I really liked the way it looked after that.
I made this card for a dear friend of mine getting inspiration from Melissa Phillips in the June 2010 Cards Magazine. I layered papers which I inked heavily under the lace.
The lighting on this photo is horrid but I wanted you to see the card from this angle so you'll have to overlook it. The flower is one I received in a swap at YPP from Natalie Wathins, thanks Natalie, I love it! I stuck a stick pin I had made through the flower and lace to finish it off.
The bling inside and out is from Recollections, the butterfly from Websters Pages. Under the sentiment I took a page from an old novel and tore and inked the edges. I used Vintage Photo, Peeling Paint and Worn Lipstick Distress inks on the print to give it the same tones as the papers. The sentiment I printed out on my computer and inked it with the above Distress Inks.
The little ticket is from the Tim Holtz idea-ology line and the stamped sentiment on it was from a set of old Stampin Up stamps I picked up at a garage sale. The base of the card is Kraft Cardstock.
OK Marlene over at Disguised as a Grown Up has done it again with her digital images. This one is just way too cute, she named her Tubby Tabitha and if you rush over there right now today you can pick her up for free before she pops into the stores.
Today she surprised us all with a new version where the bubbles aren't blue and she added a saying, you can find it here.
The inside reads: Personally I like the tickle your nose and drink me down bubbles myself.
I printed her 3 times and cut leg, arm, hair and facuet out once or twice and popped them up. Added a few stickles to the bubbles and glitter gel pen to the wine glass. Love that big toe!
I added a touch of Glossy Accents to her lips and toenails.
Bottom punch is Martha Stewarts Trellis
Papers are We Are Memory Keepers - Christmas (the plaid borders)
and Stampin Up - the stirpes
Anyway, I love Marlene's stuff, she has a warped sense of humor that I adore!
Have a creative week! Patti

 The love is from the Michaels wedding section